Sign In
Upload
Manuals
Brands
Samsung Manuals
DVD Recorder
DVD-TR520
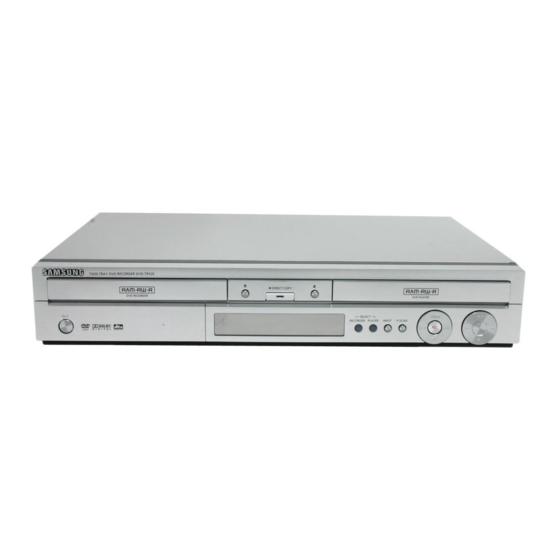
User Manuals: Samsung DVD-TR520 Tray DVD Recorder
Manuals and User Guides for Samsung DVD-TR520 Tray DVD Recorder. We have
2
Samsung DVD-TR520 Tray DVD Recorder manuals available for free PDF download: Instruction Manual
Samsung DVD-TR520 Instruction Manual (115 pages)
Brand:
Samsung
| Category:
DVD Recorder
| Size: 9 MB
Table of Contents
Warning
2
Precaution
3
Important Safety Instructions
3
Handling Cautions
3
Maintenance of Cabinet
3
Disc Handling
3
Disc Storage
4
Disc Specifications
4
Disc Copy
5
Disc Format
6
Table of Contents
7
General Features
9
Before Reading the User's Manual
10
How to Use the TWIN TRAY DVD RECORDER
10
Preparing the Remote Control
12
Setting the Remote Control
12
Unpacking
12
Description
14
Front Panel
14
Front Panel Display
14
Rear Panel
15
Tour of the Remote Control
16
Connecting & Setting up
17
Quick Overview
17
Step 4 : Connecting External Devices
17
Step 1: Connecting the Antenna Cable
18
Method 1 : Antenna + TWIN TRAY DVD RECORDER
18
TV : no Cable Box
18
Method 2 : Antenna +Cable Box + TWIN TRAY DVD
18
RECORDER + TV : Cable Box with Many Scrambled Channels
19
Method 3 : Antenna + TWIN TRAY DVD RECORDER
19
Channels
19
Step 2 : Connecting the Video Cable
20
Method 1 : Connecting to a Video Input Jack
20
Method 2 : Connecting to an S-Video Input Jack
21
Method 3 : Connecting to Component Video Input Jacks(Y,P )
21
Step 3 : Connecting the Audio Cable
22
Method 1 : Connecting to Your TV
22
Method 2 : Connecting to a Stereo Amplifier with Analog Input Jacks
22
Method 3: Connecting to an AV Amplifier with a Digital Input Jack
23
Step 4 : Connecting External Devices
23
Method 1 : Connecting a VCR, Set-Top Box(STB) or
23
TWIN TRAY DVD Player to the AV 1 in Jacks
23
Method 2 : Connecting a Camcorder to the AV 2 in Jacks
24
Method 3 : Connecting a Camcorder to the DV in Jack
24
Step 5 : Connecting the Power Cord
24
System Setup
25
On-Screen Menu Navigation
25
OSD Language Setup
26
Auto Clock Set
26
Time Zone
27
Daylight Saving
27
Select the Sub Menu
27
Manual Clock Set
28
Auto Channel Memory
29
Manual Channel Set
30
Auto Power off Setting
31
CM Skip Time Setting
31
EP Mode Time Setting
32
Setting up the Front Display Options
33
Automatic Chapter Creator
34
Setting up the Language Options
35
Setting up the Audio Options
36
Digital Output
37
Dynamic Compression
37
Setting up the Video Display Options
37
Setting up the Progressive Scan
38
Canceling the Progressive Scan
39
Setting up the Parental Control
40
If You Forgot Your Password
40
About the Rating Level
41
About the Change Password
41
Playback
42
Before Playing
42
Playing a Disc
43
Using the Disc Menu & Title Menu
44
Using the Search & Skip Functions
45
Searching through a Chapter or Track
45
Slow Motion Play/Step Motion Play
46
About ANYKEY
46
Playing the Title List
48
Using the TITLE LIST Button
48
Navigation Menu
49
Using the Anykey Button
50
Time Navigation
50
Using the Markers
52
Playing Back a Marker
53
Clearing a Marker
53
Using the Bookmarks
54
Playing Back a Bookmark
55
Clearing a Bookmark
55
Selecting the Subtitle Language
56
Using the SUBTITLE Button
56
Selecting the Soundtracks & Audio Channels
57
Using the AUDIO Button
57
Changing the Camera Angle
58
Repeat Play
58
Playing Repeatedly(Repeat Playback)
58
Zooming-In
60
Select Tray
61
Playing an Audio CD/MP3
61
Playing an Audio CD(CD-DA)
61
Audio CD(CD-DA) Screen Elements
61
Playing an Mp3 Disc
62
To Return to Normal Playback
63
New Playlist
64
Playing a Picture
68
Slide Show
69
Go to Photo List
70
Recording
71
Before Recording
71
Recordable Discs
71
Recording Formats
72
Recording Mode
72
Unrecordable Video
73
Recording the Current TV
73
Program You Are Watching
73
To Pause Recording
74
To Stop Recording
74
Recording from External Equipment You Are Watching
74
Recording from External Equipment
74
You Are Watching
74
Before You Start
74
Copying from a Camcorder
75
Making a One Touch Recording (OTR)
76
Making an One Touch Recording (OTR)
76
Making a Timer Recording
77
Flexible Recording (for Timer Recording Only)
79
Editing the Timer Record List
79
Using the MENU Button
79
Deleting a Timer Record List
80
Editing
81
Basic Editing (Title List)
82
Renaming(Labeling) a Title
82
Using the TITLE LIST Button
82
Locking (Protecting) a Title
83
Deleting a Title
83
Using the Menu Button
84
Deleting a Section of a Title (Partial Delete)
85
Advanced Editing (Playlist)
87
Creating a Playlist
87
Playing Entries in the Playlist
88
Renaming a Playlist Entry
89
Editing a Scene for the Playlist
90
Deleting a Playlist Entry from the Playlist
94
Title Copy
95
About the Copy Screen
95
Contents(Title) Copy Specifications
95
Copying a Title that Has Been Edited Once before
97
Cancel Button
97
Changing the Record Mode
98
Copying Multiple Titles at One Time
99
Deleting an Undesired Title from the Copy List
100
Enter Button
100
Previewing a Selected Title from the Copy List
101
Selecting Record Mode of each Title from the Copy List
101
Changing Record Mode of All Titles from the Copy List
102
Disc Copy
102
Disc Copy Specifications
102
Disc Manager
103
Editing the Disc Name
103
Disc Protection
104
Formatting a Disc
105
Delete All Title Lists
105
Finalizing a Disc
106
Unfinalizing a Disc (V/VR Mode)
107
Reference
109
Troubleshooting
109
Timer Recording
111
Remote Control Unit
112
Specifications
113
Warranty
114
Limited Warranty to Original Purchaser
114
Advertisement
Samsung DVD-TR520 Instruction Manual (115 pages)
Brand:
Samsung
| Category:
Measuring Instruments
| Size: 27 MB
Table of Contents
Important Safety Instructions
3
Handlingcautions
3
Maintenanceof Cabinet
3
Disc Handling
3
Disc Storage
4
Disc Specifications
4
Disc Copy
5
Table of Contents
7
Setting the Remote Control
12
Front Panel Display
14
Rear Panel
15
Tourof the Remote Control
16
Cancel Button
16
Quick Overview
17
Method 1 :Antenna + Twin TRAY DVD RECORDER
18
Method 2 :Antenna + Cable Box + Twin TRAYDVD
18
RECORDER + TV : Cable Box with Many Scrambled Channels
18
Method 3 :Antenna + Twin TRAY DVD RECORDER
19
Channels
19
Method 1 :Connectingto a Video Inputjack
20
Method 2 :Connectingto an S-Video Inputjack
20
Method 3 :Connectingto Componentvideo Input Jacks
20
Method 1 : Connecting to Your TV
21
DVD Recorder
22
Method 2 : Connecting to a Stereo Amplifier
22
Method 3: Connecting to an A\/ Amplifier
22
Method 1 : Connecting a VCR, Set-Top Box(STB) or
23
Method2 : Connecting a Camcorderto the AV 2 in Jacks
23
Method S: Connecting a Camoorder to the DV Tn Jack
23
Daylight Saving
27
Digital Output
37
Dynamic Compression
37
Noise Reduction (Motion Adaptive Noise Reduction)
38
Input Level
38
Black Level
38
DVD Recorder's
39
If You Forgot Your Password
40
About the Change Password
41
Region Code (DVD-Video Only)
42
Disc Types that Can be Played
42
Searchingthrough a Chapter or Track
45
Time Navigation
50
Using the ANYKEY Button
51
Playing Back a Marker
53
Clearing a Marker
53
Playing Back a Bookmark
55
Clearing a Bookmark
55
Using the SUBTITLE Button
56
Playing an Audio CD
61
New Playlist
64
Select Tray
68
Go to Photo List
70
Recording Formats
72
Recording Mode
72
To Stop Recording
74
About INFO Button
77
Editing a Scene for the Playlist
90
About the Copy Screen
95
Changing the Record Mode
98
Editing the Disc Name
103
Disc Protection
104
Formatting a Disc
105
Finalizing a Disc
106
Unfinalizing a Disc (V/VR Mode)
107
Timer Recording
111
Remote Control Unit
112
Advertisement
Related Products
Samsung DVD-R119
Samsung DVD-HR750
Samsung DVD-SH855M
SAMSUNG DVD-R125
SAMSUNG DVD-HR736
Samsung DVD-R120/ASTR
Samsung DVD-HR754
Samsung DVD-VR320/EUR
Samsung DVD-VR320/XEB
Samsung DVD-H40A
Samsung Categories
Cell Phone
Monitor
Air Conditioner
Washer
Microwave Oven
More Samsung Manuals
Login
Sign In
OR
Sign in with Facebook
Sign in with Google
Upload manual
Upload from disk
Upload from URL