Sign In
Upload
Manuals
Brands
FOR-A Manuals
Switch
HVS-392WOU
FOR-A HVS-392WOU Manuals
Manuals and User Guides for FOR-A HVS-392WOU. We have
1
FOR-A HVS-392WOU manual available for free PDF download: Operation Manual
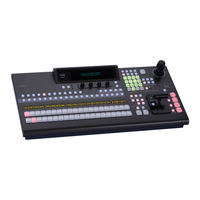
FOR-A HVS-392WOU Operation Manual (268 pages)
Digital Video Switcher & Operation Unit
Brand:
FOR-A
| Category:
Switch
| Size: 3 MB
Table of Contents
About this Manual
7
Table of Contents
8
1 Prior to Starting
17
Welcome
17
Features
17
2 Panel Descriptions
18
Hvs-390Hs
18
Control Panel
20
Option Slots
23
Interfaces
24
EDITOR Connector
24
Connector 1-6
24
GPI in Connector
25
GPI/TALLY out Connector
26
GPI/TALLY out Connector (HVS-392OU/ROU/WOU)
27
TALLY out Connector (HVS-30TALR)
28
3 Connection
30
Basic Configuration
30
Optional Configuration
31
How to Connect between MU and OU Units
32
Power on
33
System Signal Format Selection at Initial Use
34
4 Menu Operations
35
How to Access Menus
35
Menu Access Buttons
35
Other Menu Access Buttons
36
USER Button (Menu Shortcut)
36
How to Set Values
37
Displaying Parameters
37
Changing Settings or Values Using F1 to F4
38
Changing Settings or Values Using the Numeric Keypad
39
Changing Settings or Values Using the Joystick
40
Copying / Swapping Settings
42
Operation Example: Copying Settings from M1K2 to M1K4
42
How to Return Settings to Default
43
Returning Parameters to Default
43
Returning Menus to Default
43
How to Back up Settings
43
5 Video Sources
44
How to Assign User Names to Sources
44
How to Assign Sources to Bus Buttons
45
How to Display Signal Names on the Bus Section
46
Resize Function
47
INPUT STILL (Freezing Input Video)
48
Changing the Side Panel Image
49
Xpt Delay
49
Frame Synchronizer
50
Bus Matte
50
Setting the Matte Color
50
Setting the Gradient Matte
51
Setting up Additional Inputs
52
6 Video Outputs
54
Selecting Video for SDI OUTPUT1 and 2
54
How to Select Aux Signals
54
Selecting Video Via Bus Buttons
55
Selecting Video from Menu Selection
55
AUX Video Switching with Effects
56
Preview Set up
57
Preview Bus Monitoring
57
Setting up Preview Images
57
Clean Set up
58
HDMI Output
58
Selecting the HDMI Output Video
58
HD Multiviewer Video Output in SD Mode
59
Setting up and Outputting KEY out
60
Setting up Additional Outputs
61
Aux Link
63
Creating AUX Output Link Groups
63
Creating Signal Link Groups
64
Enabling AUX LINK
64
7 Bus Operation
66
Selecting Video Sources
66
Selecting Video Sources on M/E1 and M/E2
67
Selecting Video Sources for AUX Outputs
68
Button Switching Mode in M/E Buses
69
Setting-Up and Using the SHIFT Function
69
To Assign the SHIFT Function to a Bus Button
69
Using the SHIFT Function
70
8 Transitions
71
Transition Block Description
72
Quick Reference for Available Transitions
73
Black Transitions
73
Background Transitions
74
KEY Transitions
75
Simultaneous BKGD and Key Transitions
77
Pattern (WIPE/DVE) Transitions
78
How to Select Patterns
79
Selecting Patterns in the Menu
79
Direct Pattern Function
79
Key IN/OUT Effects
82
Setting the KEY on AIR Button Function (USER Transition)
83
Setting the KEY AUTO Button Function
84
Advanced Settings for Transitions
85
Fader Limit
85
Transition Rate
86
Endpoint Processing for DVE Transitions
86
Background Layer of DVE Images (Effect Background)
87
9 Modifying Patterns
88
Preset Pattern Groups
88
Modified Patterns
88
Pattern Modify Example 1 (Pattern 20)
89
Pattern Modify Example 2 (Pattern 117)
90
How to Reset the WIPE Menu
91
WIPE Menu
92
No. 0-99
92
No. 100-137
93
No. 140-147, 150-157, 161 and 162
94
No. 170-181
95
No. 200-202
95
10 Key
96
Luminance Key
97
Full Key
98
Bus Key
98
Key Link
99
Key Insert Matt
99
Key Insert Aux
100
Adjusting the Key Signal
101
Chroma Key
102
Creating a Chroma Key
102
Chroma Key Adjustments
103
Advanced Example 1 (Using KEY INSERT AUX)
105
Advanced Example 2 (Images with a Specified Color Left)
105
Mask and Invert
106
Inverting Key and Background
106
Key Masks
106
Key Edge
108
Where KEY3 and KEY4 Appear
109
Changing KEY Layer Order
109
Key Information Display (HVS-392WOU)
110
Key Information
110
Displaying KEY Layer Priority
111
11 DVE Effects on Keys
112
How to Enable 2D Dves
112
Changing Position
112
Changing Sizes or Aspect Ratios
113
Fade
114
Rotation
114
Setting Example
115
Crop
116
Sub Effect
117
Mono Color
117
Defocus
117
Paint Color
117
Freeze, Strobe, Nega, Mosaic
118
Borders
119
12 Still Store
120
Saving Stills
120
Displaying Still Images
120
Backing-Up Stills
121
Backing-Up Still and Clip Data (HVS-39MB)
122
Setting the Automatic Backup to on
122
Loading Backup Data
123
Deleting Backup Data
123
Automatic Loading at Startup
123
13 Managing Clips
124
Clip Recording
124
Recording Video
124
Recording Video and Key Signals Simultaneously
125
Playing Clips
126
Ex. 1: Playback on PGM Bus
126
Ex. 2: Playback on KEY1
126
Clearing Clip Data
127
14 Cg Wipe
128
CG WIPE Operation Example 1
129
CG WIPE Operation Example 2
130
Saving CG WIPE Settings
132
CG WIPE Menu Quick Reference
132
15 Multiviewer
134
Assigning the Multiviewer to an AUX Bus
134
Selecting the Split-Screen Type
135
Selecting Video for each Split Area
135
Setting up each Split Area
136
Titles
136
Audio Level Meter
137
Safety Area
137
Frame Border
137
On-Air Tally
138
16 Event Memory
139
Storing Events
139
Recalling Events
141
DIRECT Mode
141
Using the RECALL Button
142
Transitions Using Event Recall
143
Overwrite Protection
144
Deleting Events
144
Setting the User Default Menu When Storing an Event
145
Loading an Event at Start-Up
145
17 Sequence Operation
147
Sequence Operation Examples
148
Creating New Sequences
148
Playing Back Sequences
149
Quick Recall (Direct Mode)
150
Playing Back Sequences Using Advanced Settings
151
Editing Sequences: Adding or Inserting Steps
153
Editing Sequences: Copying and Deleting Steps
155
Editing Sequences: Setting Interpolation and Duration
156
Sequence Menu and Keypad Mode
157
SEQUENCE Mode
157
SEQ EDIT Mode
158
Sequence Memory Operation Examples
160
Setting Overwrite Protection on Sequence Memory 2
160
Deleting "Sequence Memory 2
160
Backing up Sequence Data
160
18 Macros
161
Recording Macros
161
Executing Macros
162
Operation Example 1
162
Operation Example 2
163
Macro Memory Operation
164
Overwrite Protection
164
Naming Macros
164
Deleting Macros
165
Macro Execution Buttons
166
Assigning Macros to Bus Buttons
166
Changing the KEY/AUX Bus Buttons to Macro Buttons
166
Macro Attach and Macro Detach
167
19 File Operations
168
USB Flash Memory
168
Supported Files
168
Saving Data to USB Flash Memory
169
Loading Data from USB Flash Memory
170
To Load Setting Data
170
To Download Image Files
170
Moving between USB Flash Memory Directories
171
Deleting Files in USB Flash Memory
172
Renaming Files in USB Flash Memory
172
20 Color Correction
173
Assigning a Bus or Signal to a Color Corrector
173
Adjusting Colors
174
Clip Adjustment
177
21 System Setup Settings
179
Selecting System Signal Format
179
Crosspoint Switch Timing
179
Selecting Reference Signal
180
To Set Reference Input
180
To Set Reference Output
180
Adjusting Video Signal Levels
181
Proc Amp
181
Video Level Clip
181
Safety Area Markers
182
Ancillary Data
183
M/E Outputs
183
AUX and Optional Outputs
184
Setting Date and Time
184
Setting Time Using SNTP (Time) Server
184
Buzzer, Brightness and Screen Saver
186
22 USER Button
187
USER Button Operation
187
USER Button Settings
188
Triggering User Buttons
191
23 Reboot and Initialize
193
Rebooting System
193
System Initialization
193
24 GPI IN/OUT and Tally Outputs
194
GPI Control
194
Gpi in
194
Gpi out
195
Ou Gpi/O
195
Tally Output
200
Tally Color Settings
200
Tally Output Settings (GPI/TALLY OUT)
200
Tally Output Settings (HVS-30TALR)
202
Sending Tally Signals to Tally Units
203
25 VTR / VDCP Control
204
VTR Connection
204
Selecting a VTR or VDCP Channel
205
Selecting the VDCP Type
205
Playback and Recording
206
Assigning Functions to User Buttons
206
VDCP Operation
207
Creating Playlists
207
Jumping to an in or out Point or a Specified Position
209
Changing CLIP ID and Deleting Clips
209
Copying and Clearing Playlists
210
Creating New Clips (Recording Using VDCP)
210
26 Connecting to FOR-A MFR Series Router
212
Assigning Router Channel to RS-422 Port
213
Assigning Router Control Function
213
Setting MFR Link
213
Router Control
214
Crosspoint Switches Using the Menu
214
Crosspoint Switches with Bus Buttons (Setup)
214
Crosspoint Switches Using the Bus Buttons
215
Displaying Destination / Source Settings
215
Saving and Loading Crosspoints
216
Simultaneous Switching Using Take
217
Linking Titles by Sending TSL Messages
218
TSL Tally
218
27 Connecting to Routers
219
Assigning a Router Channel to an RS-422 Port
219
Router Control
219
Linking Titles and Tallies in the System Via TSL Protocol
219
Linking Titles in the System by Receiving TSL Messages
220
TSL Tally by Sending TSL Messages
220
28 Audio Mixer Control
221
Connecting Audio Mixers
221
Audio-Follow-Video Setting
221
29 Editor Control (Option)
223
Editor Control Settings
223
Connection Settings with Editor (EDITOR Port Setting)
224
30 AUX Bus Control Units
225
Hvs-Aux8/16/32
225
Connecting AUX Units
225
Hvs-Aux16A/16B/32A/64A
226
Connecting AUX Units
226
Assigning Actions to AUX Unit Buttons
227
Assigning the SHIFT or TAKE Function
229
Adjusting Light Levels for AUX Unit Buttons
229
Setting LOCK Button on AUX Boxes
230
31 Smartdirect Control (Option)
231
Connecting to Smartdirect Via Ethernet
231
Executing Direct Buttons
232
Executing in the Menu
232
Executing Using Macros
232
32 Network Settings
233
Arcnet
233
Ethernet
235
Image Data Transfer
236
Setup before Connection
236
Sending / Receiving Still Images
238
Sending Images to Clip Memory
239
33 Status Information
240
Checking Alarm Status
240
Verifying Versions
241
Installed Options
242
34 Upgrading an Operational Version
243
Upgrade Procedure
243
Upgrading HVS-390HS
244
Loading Setting Data
244
Bitmap Images for Control Panel Bus Buttons
245
35 Connecting Control and Remote Panels
247
Connecting Remote Panels (HVS-30RU)
247
Connecting Control Panels
248
M/E Mode
249
P/P Setup
250
P/P Control
250
36 Setup Setting for HVS-30RU
252
Assigning Sources to PGM/PST Bus Buttons
252
Setting USER Buttons
253
37 Specifications and Dimensions
254
Specifications
254
Hvs-392Ou
254
Hvs-392Rou
254
External Dimensions
257
Hvs-390Hs
257
Hvs-392Wou
259
Appendix 1. Supported Files
260
Appendix 2. Transition Pattern List
261
Dve Type
262
Advertisement
Advertisement
Related Products
FOR-A HVS-390HS
FOR-A HVS-391OU
FOR-A HVS-392OU
FOR-A HVS-392ROU
FOR-A HVS-300HS
FOR-A HVS-300RPS
FOR-A HVS-30OU
FOR-A HVS-3800HS
FOR-A HVS-350HS
FOR-A HVS-35OU
FOR-A Categories
Switch
Remote Control
Computer Hardware
Amplifier
Media Converter
More FOR-A Manuals
Login
Sign In
OR
Sign in with Facebook
Sign in with Google
Upload manual
Upload from disk
Upload from URL