Sign In
Upload
Manuals
Brands
evertz Manuals
Control Panel
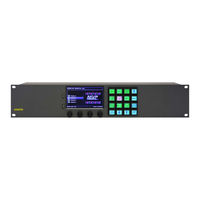
CP-2116E-H
evertz CP-2116E-H Manuals
Manuals and User Guides for evertz CP-2116E-H. We have
1
evertz CP-2116E-H manual available for free PDF download: User Manual
evertz CP-2116E-H User Manual (74 pages)
Remote control panel
Brand:
evertz
| Category:
Control Panel
| Size: 3 MB
Table of Contents
Table of Contents
7
Overview
11
Figure 1-1: CP-2116E Control Panel
11
Installation
13
Rear Panel
13
Figure 2-1: CP-2116E Rear Panel
13
Front Control Panel
14
Figure 2-2: CP-2116E Front Control Panel
14
Power Connections
15
Mounting
15
Figure 2-3: One CP-2116E-H Mounted in a 3RU CPH-TEK with Owner Furnished Tektronix WFM
15
Figure 2-5: One CP-2116E-H Mounted in a 2RU CPH-RMB with Supplied Blank Plate
16
Figure 2-6: Two CP-2116E-H Mounted in a 2RU CPH-RMB
16
Figure 2-7: Mounting Installation for the CP-2116-DBK
16
Figure 2-8: Mounting Installation for the CP-2116-TEK
17
Technical Description
19
Specifications
19
Control
19
Electrical
19
Physical
19
Compliance
19
Servicing Instructions
19
Front Panel Control
21
Front Panel Navigation Options
21
Upgrading
21
Configuring the Network Settings
22
Testing the Panel's Functionality
23
Key Test
23
LCD Test
23
Touchscreen Test
23
GPIO Test
23
Checking the Status of the Cp-2116E
24
System Configuration
25
Upgrading the Cp-2116E Panel
25
Requirements
25
Getting Started
25
Upgrading Firmware on the CP-2116E
26
Figure 5-1: Cp116E Web Interface
26
Figure 5-2: Install Firmware Page
26
Systems Menu
27
Products Page
27
Figure 5-3: Systems Drop down Menu
27
Figure 5-4: Products Page
27
Products Uploaded
28
Service Templates Page
28
Figure 5-5: Systems - Service Template Page
28
Figure 5-6: Service Template List
29
Table 5-1: Service Template Buttons
29
Service Template Controls
30
Figure 5-7: Customizing a Template
30
Service Template Parameter Tree
32
Figure 5-8: Parameter Tree
32
Template Properties
33
Creating a New Service Template
33
Figure 5-9: New Template Page
33
Service Template Controls
34
Figure 5-10: Assigning a Parameter
34
Services Page
35
Figure 5-11: Services List
35
Table 5-2: Service Template Buttons
35
Service Controls
36
Available Service Templates
36
Service Properties
36
Figure 5-12: Customizing a Service
36
Add a Service Template to the Service List
37
Systems Page
37
Figure 5-13: Systems Page
37
Table 5-3: Service Template Buttons
37
Device Properties
38
Figure 5-14: New System Window
38
Discovery Menu
39
Figure 5-15: Update System Window
39
Figure 5-16: Discovery Menu
39
Settings Page
40
Figure 5-17: Settings Page
40
Ranged Discovery Page
41
Import Device Labels
41
Figure 2-4: CP-2116E
41
Figure 5-18: Ranged Discovery Page
41
Figure 5-19: Import Device Labels Page
41
Vistalink Alarm Server
42
Figure 5-20: Vistalink Alarm Server
42
Source Proc Menu
43
Source Proc Page
43
Figure 5-21: Source Proc Menu
43
Figure 5-22: Source Proc Page
43
Destination Proc Page
44
Figure 5-23: Destination Proc Page
44
Macros Page
45
Figure 5-24: Macros Page
45
Help Menu
46
Help Page
46
Panel Version
46
Figure 5-25: Help Menu
46
Figure 5-26: Help Page
46
Product Support
47
Figure 5-27: Product Support Tab
47
Configuration
48
Figure 5-28: Configuration Tab
48
Figure 5-29: Opening Config.cf Dialog Box
48
Logs Tab
49
Figure 5-30: Logs Tab
49
Figure 5-31: Opening Logs.lf Dialog Box
49
Preferences Page
50
Visual Settings
50
Figure 5-32: Preferences Page
50
Import/Export Page
51
Figure 5-33: Import/Export Page
51
Upgrade Menu
52
Figure 5-34: Install Firmware Page
52
Adding an Evertz System to Control
53
Cp-2116E Control of Mvp System
53
Figure 6-1: Systems Page
53
Figure 6-2: Create a MVP System
54
Adding Snmp Services
55
Figure 6-3: Create a SNMP Service
55
Adding an Eqx Server
56
Figure 6-4: Add EQX Server
56
Creating Source-Service Mapping
57
Navigating the Control Panel
59
Source (Src) Button
59
Figure 7-1: Front Panel Display
59
Figure 7-2: SRC Layout
59
Figure 7-3: SRC Keypad Display
60
Destination (Dst) Button
61
Figure 7-4: DST Layout
61
Figure 7-5: DST Keypad Display
62
Up & down Arrows
63
Clear Next Source Button
63
Figure 7-6: up & down Arrows Display
63
Figure 7-7: Clear Next Source Button
63
Level Button
64
Figure 7-8: Level Button Display
64
Figure 7-9: Selecting the Video Button
64
Figure 7-10: Select the ALL/NONE Button
65
Figure 7-11: Selecting the BREAK AWAY Button
65
Selecting the "More" Button
66
Figure 7-12: Selecting the "MORE" Button
66
Figure 7-13: Selecting the "CHNG PRFL" Button
67
Figure 7-14: Selecting the "ENABLE TOGGLE" Button
67
Figure 7-15: Selecting the "LOCK DST" Button
68
Figure 7-16: Selecting the "PROTECT" Button
69
Figure 7-17: Selecting the "TIELINES" Button
69
Figure 7-18: Selecting the "ONE DST VIEW" Button
70
Figure 7-19: Selecting the "TAKE" Button
71
Figure 7-20: Selecting the "TOGGLE TAKE" Button
71
Figure 7-21: Selecting the "SALVO" Button
72
Figure 7-22: Selecting the "INFO" Button
73
Figure 7-23: Selecting the "SRC INFO" Button
73
Advertisement
Advertisement
Related Products
evertz CP-2116E
evertz CP-2232E
evertz CP-1024E
evertz CP-2272E
evertz CP-3126PROC
evertz CP-3100E
evertz CP-2200E
evertz EMC-DCP
evertz VistaLINK 9000NCP
evertz VistaLINK 9000NCP2
evertz Categories
Media Converter
Network Hardware
Transmitter
Amplifier
Receiver
More evertz Manuals
Login
Sign In
OR
Sign in with Facebook
Sign in with Google
Upload manual
Upload from disk
Upload from URL