Sign In
Upload
Manuals
Brands
Busch-Jaeger Manuals
Intercom System
H81381P2-S-03
Busch-Jaeger H81381P2-S-03 Manuals
Manuals and User Guides for Busch-Jaeger H81381P2-S-03. We have
2
Busch-Jaeger H81381P2-S-03 manuals available for free PDF download: System Manual, Product Manual
Busch-Jaeger H81381P2-S-03 System Manual (312 pages)
Brand:
Busch-Jaeger
| Category:
Intercom System
| Size: 19 MB
Table of Contents
Table of Contents
2
Overview of IP Technology
7
Cabling and Connection
7
Fundamentals of Structured Cabling
7
Network Types
11
IP Addressing Assignment Modes
13
Precondition
13
Automatic (DHCP) / Manual Mode
14
ABB Legacy Mode
16
Ports & Services in a Welcome IP System
20
Poe Switch Selection
21
Overview of Product Range
23
Outdoor Stations
23
Overview
23
IP Touch 5 os
25
IP Pushbutton os
28
Mini os
31
Indoor Stations
35
Overview
35
IP Touch 7
39
IP Touch 10
42
IP Touch Lite 7
43
Audio IP
46
System Devices
50
Smart Access Point
50
Guard Unit
54
IP Actuator
57
IP Elevator Controller & Lift Control Relay Module
59
Interface Module
63
Power Supply
65
Outdoor Station Modules
66
Overview
66
A/V Module
67
Touch 5" Module
70
Display Module
72
Keypad Module
73
Round Pushbutton Module
75
Bar Pushbutton Module
78
Info Module
80
Installation Materials
82
Video Outdoor Station Frame
82
Surface-Mounted Box
84
Flush-Mounted Box
86
Pre-Mounting Box
88
Accessories
90
Outdoor Stations
90
Installation Guidelines
91
Outdoor Stations
91
Preparation
91
Installation Height
91
The Rule of Assembled Modules
92
Installation Overview
94
Single Column os
95
Multiple Columns os
101
Indoor Stations
106
Location
106
IP Touch 7
107
IP Touch 10
113
IP Touch Lite 7
120
Audio IP
125
System Devices
127
Smart Access Point
127
Guard Unit
128
IP Actuator and IP Elevator Controller
129
Lift Control Relay Module
130
Configuration Process
131
Multi Apartment Configuration with the Smartap
131
Topology (DHCP)
131
Topology (Legacy)
132
Adding Devices Via the Smartap Auto Scan
133
Adding Devices Via the Smartap Manually
138
Adding Devices Via the Smartap & APP
140
Devices Diagnosis
147
Managing the Trusted Devices
150
Single House Configuration Without the Smartap
151
Topology (DHCP)
151
Topology (Legacy)
152
Preparation
153
Configuring the Master IS
154
Configuring the Subsidiary IS
163
Adding New Trusted Devices Via Auto Search
166
Adding New Trusted Devices Manually
169
Removing the Trusted Device
173
Grouping and Forwarding
174
Grouping Management Function
174
Forwarding Call Feature
180
Forwarding Call for Indoor Stations
180
Forwarding Call for Guard Units
182
Linking Guard Units
184
Firmware Update
187
Updating Overview
187
Updating the Firmware - Single Family Home Mode with Internet
188
Updating the Firmware of the Panel Online
188
Updating the Firmware of the IP Actuator or the 2Nd os Via APP
192
Updating the Firmware - Single Family Home Mode Without Internet
194
Updating the Firmware of the Panel Via SD Card
194
Updating the Firmware of the IP Actuator or the 2Nd os Via SD Card
197
Updating the Firmware - Smartap with Internet
199
Updating the Firmware of Smartap Online
199
Updating the Firmware of Other Devices Online
201
Updating the Public Devices Online in Batches
202
Updating the Firmware - Smartap Without Internet
203
Updating the Firmware of Smartap Locally
203
Updating the Firmware of Other Devices Locally One by One
207
Updating the Firmware of Other Devices Locally in Batches
209
Smart Home Integration
211
Api
212
API Overview
212
Topology
213
Precondition
213
Enabling Local API
214
Creating a Local API User
215
Sip
217
SIP Overview
217
Topology
218
Accessing "SIP" Screen on the Smartap
219
Configuring the Smartap as SIP Server
220
Creating a SIP Account for each 3Rd Party Panel
222
Configuring the 3Rd Party Panel
225
Configuring IP Touch 5 os
226
SIP Client Settings
226
3Rd Party Door Opener Settings
227
Adding the 3Rd Party Panels to the Name List One by One
228
Adding the 3Rd Party Panels to the Name List in Batches
230
Configuring Audio IP
232
Appendix
233
Initial Setup of the Smartap
233
Viewing the Signature of the Device
252
Clearing the Signature of the Device
258
Configuring the Physical Address and IP Mode
259
Restoring to Factory Default
271
Resetting the Password for the Primary Admin
280
Configuring the IP Mode
282
Managing the Trusted Devices
293
Trusting All Devices
309
Advertisement
Busch-Jaeger H81381P2-S-03 Product Manual (72 pages)
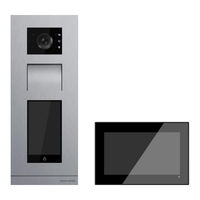
IP Pushbutton outdoor station
Brand:
Busch-Jaeger
| Category:
Intercom System
| Size: 4 MB
Table of Contents
Table of Contents
2
Notes on the Instruction Manual
4
Safety
4
Intended Use
5
Environment
6
Busch-Jaeger Devices
6
Product Description
7
Device Type
7
Control Elements
8
Terminal Description
9
Lock Type and Connection
10
Technical Data
11
Mounting/Installation
12
Requirement for the Electrician
12
Mounting
13
Preparation
13
Installation Height
13
Surface-Mounted Installation
15
Flush-Mounted Installation
16
Cavity Wall Installation
18
Dismantling
19
Replacing the Nameplate
19
Commissioning
20
Configure the Settings on Indoor Station
20
Enter Engineering Mode of Outdoor Station
20
Accessing the "Outoodr Stations" Screen
21
Configuring the Device Type
22
Configuring the Lock
28
Configuring the "Door Alarm" Function
30
Configuring the "Anti-Flicker" Function
31
Configuring the Language
32
Configuring the Ringtone Volume
33
Configuring the "Button Tone" Function
34
Configuring the "Voice Prompts" Function
35
Configuring the Push Buttons
36
Configuring the "Time Sync" Function
38
Configuring Call Forward
39
Configuring Wiegand Output
40
Configuring the Lift
41
Viewing the Information
42
Updating the Firmware
43
Configure the Settings on "Smart Access Point
45
Adding the Outdoor Station
45
Accessing the "Outoodr Stations" Screen
47
Viewing the Serial Number
48
Viewing the Version
48
Configuring the Physical Address
49
Configuring the IP Address
52
Configuring the Lock
53
Configuring the "Time Sync" Function
54
Configuring the Lift
55
Configuring the "Surveillance Call" Function
56
Configuring the Trusted Devices
57
Updating the Firmware
59
Card Management
62
Restoring to Factory Default
65
Operation
66
Calling a Resident
66
Calling a Guard Unit
67
Turn on a Light
68
Cyber Security
69
Disclaimer
69
Performance and Service
69
Deployment Guideline
70
Upgrading
70
Backup/Restore
70
Malware Prevention Solution
70
Password Rule
70
Notice
71
Advertisement
Related Products
Busch-Jaeger Busch-Welcome H8138.T 03 Series
Busch-Jaeger Busch-Welcome H81381T-S03
Busch-Jaeger Busch-Welcome H81381TW-03
Busch-Jaeger H81381P1-S-03
Busch-Jaeger H81381P3-S-03
Busch-Jaeger H81381P1-W-03
Busch-Jaeger H81381P2-W-03
Busch-Jaeger H81381P3-W-03
Busch-Jaeger Busch-Welcome IP H81381P-03 Series
Busch-Jaeger H81316P1-A-03
Busch-Jaeger Categories
Security Sensors
Intercom System
Controller
Temperature Controller
Radio
More Busch-Jaeger Manuals
Login
Sign In
OR
Sign in with Facebook
Sign in with Google
Upload manual
Upload from disk
Upload from URL