TP-Link RE590T User Manual
Ac1900 touch screen wi-fi range extender
Hide thumbs
Also See for RE590T:
- Quick installation manual (2 pages) ,
- Quick installation manual (59 pages)
Table of Contents
Advertisement
Advertisement
Table of Contents

Related Manuals for TP-Link RE590T


Summary of Contents for TP-Link RE590T
-
Page 1: User Guide
RE590T User Guide AC1900 Touch Screen Wi-Fi Range Extender REV1.0.0 1910011426... -
Page 2: Table Of Contents
Contents About This Guide Chapter 1 Get to Know About Your Extender 1. 1. Product Overview ............3 1. -
Page 3: About This Guide
In addition to this guide, a Quick Installation Guide is also released with each TP-LINK extender, you are suggested to configure your extender for quick Internet setup by following the published Quick Installation Guide before you get started with a further configuration. -
Page 4: Chapter 1 Get To Know About Your Extender
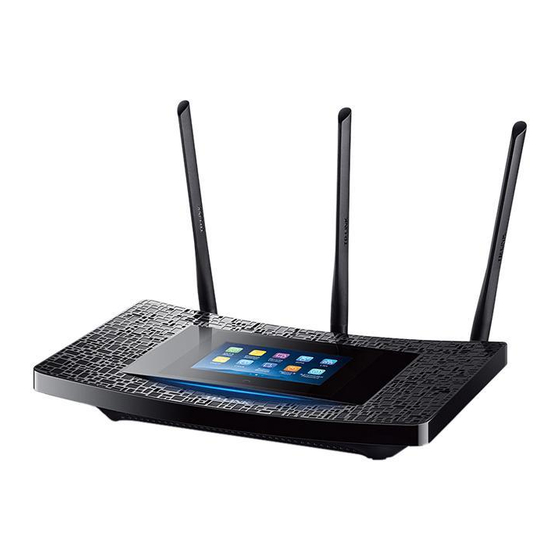
Chapter Get to Know About Your Extender This chapter introduces what the extender can do and shows its main features and appearance. This chapter contains the following sections: • Product Overview • Main Features • Panel Layout... -
Page 5: Product Overview
Product Overview What This Product Does The RE590T AC1900 Touch Screen Wi-Fi Range Extender is dedicated to Small Office/ Home Office (SOHO) wireless network solutions. It will enlarge your existing wireless network and mobility while also allowing you to connect a wired device to a wireless environment. -
Page 6: Main Features
• Dual core 1GHz processor ensures no interruption when simultaneously processing multiple wireless or wired tasks. • TP-LINK Tether App allows easy access and management using any mobile device. • Works with any Wi-Fi router or wireless access point. Panel Layout... - Page 7 Chapter 1 Get to Know About Your Modem Router Home Screen Signal Strength Wireless Status Total Clients Indicatest the Wi-Fi signal Tap here to view the client 2.4GHz / 5GHz On: strength between the information and to block The extender is connected to the router’s extender and the router.
- Page 8 DVR, etc. With the extender powered on, use a pin to press and hold the Reset button Reset until the RE590T logo displays. Used for wireless operation and data transmit. Upright them for the best Wi-Fi Antennas performance.
-
Page 9: Chapter 2 Quick Setup For Internet Connection
Chapter Quick Setup for Internet Connection This chapter introduces how to connect and configure your extender to extend the existing wireless coverage by repeating the wireless signal. Furthermore, the extender can also be used as a wireless adapter that connects Ethernet-only devices to your Wi-Fi network. -
Page 10: Connec The Hardware
Chapter 2 Quick Setup for Internet Connection Connec the Hardware 1. Install the antennas and position them vertically. 2. Plug the extender’s adapter into an elextrical outlet near your router. Then turn on the extender and wait until the system boot on the screen completes. Configure the extender Here we will introduce your three methods to configure the extender. - Page 11 Chapter 2 Quick Setup for Internet Connection 3. Select your host router’s 2.4GHz wireless network and enter its password, then tap Next. 4. Select your host router’s 5GHz wireless network and enter its password, then tap Next. Note: If your host router does not support the 5GHz band, tap Skip.
- Page 12 Chapter 2 Quick Setup for Internet Connection 5. Either keep the default SSIDs or customize them for both 2.4GHz and 5GHz extended networks, then tap Next. Note: Please swip up for the 5GHz settings. 6. Verify your wireless settings and tap Finish. Corresponding Wi-Fi signal icon(s)( 2.4GHz / 5GHz) at the top left of the touchscreen should be lit.
- Page 13 Chapter 2 Quick Setup for Internet Connection 2 2 2 Method TWO: Using WPS (Wi-Fi Protected Setup) 1. Press the button on your host router. 2. Tap on the menu screen of the extender, and tap Start WPS. Once the WPS connection is successful, a success message dispalys.
- Page 14 Chapter 2 Quick Setup for Internet Connection 3. Select your region, then click Next. Note: Per FCC regulations, all Wi-Fi products marketed in the U.S. are fixed to the U.S. region only. 4. Select your host router’s 2.4GHz network and enter the password, then click Next.
- Page 15 Chapter 2 Quick Setup for Internet Connection 5. Select your host router’s 5GHz network and enter the password, then click Next. Note: If your router does not support the 5GHz band, click Skip. 6. Either copy the host’s SSIDs or customize them for both 2.4GHz and 5GHz extended networks, then click Next.
- Page 16 Chapter 2 Quick Setup for Internet Connection 7. Verify your wireless settings and click Finish.
-
Page 17: Relocate The Extender
Chapter 2 Quick Setup for Internet Connection Relocate the extender 1. Place the extender halfway between your host router (Host Network) and the Wi-Fi dead zone. 2. Make sure the extender receives a strong signal (recommended signal strength ) from your host router. If not, relocate it closer to your router. Note: Make sure to place the extender away from all Bluetooth devices and other household electronics. - Page 18 Chapter 2 Quick Setup for Internet Connection 1. Connect to your extender to your Wi-Fi network by using either way introduced before. 2. Connect your Ethernet-only device(s) to the extender’s Ethernet port(s) via Ethernet cable(s).
-
Page 19: Chapter 3 Further Configuration
Chapter Further Configuration This chapter introduces configurations of the extender’s various features, such as Devices Control, DHCP, Clock, etc. Follow this chapter, you can configure most features on touchscreen. Some other features, such as Firmware Upgrade, Backup & Restore, System Log, etc, can only be configured through web-based utility. This chapter contains the following sections: •... -
Page 20: Quick Setup
Chapter 3 Further Configuration Quick Setup Please refer to the Method ONE: Using Touchscreen App under Chapter 2 Quick Setup for Internet Connection to connect the extender to your existing wireless network. Wireless Settings The Wireless Settings app helps you customize the wireless settings including the region, host network and extended network according to your needs. - Page 21 Chapter 3 Further Configuration Set your host network 1. Tap Wireless Settings on the menu screen, then tap Host Network. 2. Tap 2.4GHz 5GHz menu to choose to set 2.4GHz or 5GHz host network. 3. Select the Connect To Host Network checkbox.
-
Page 22: Devices Control
Chapter 3 Further Configuration 4. Either tap Copy Host SSID to copy the host router’s SSID, or tap Extended SSID create a new name for the extended network. 5. Select the Hide SSID checkbox if you want to hide your extender’s SSID from the Wi-Fi network list, and your wireless device will need to manually join the network. -
Page 23: Wps
Chapter 3 Further Configuration 4. The blocked device(s) will be added to Devices in Blacklist automatically. Note: If you want to add a device manually or delete a blocked device, tap Edit on the Devices In Blacklist page. Done! Now devices in the blacklist cannot connect to your extender. Please refer to the Method TWO: Using WPS (Wi-Fi Protected Setup) under Chapter 2... -
Page 24: Lan
Chapter 3 Further Configuration By default, your extender is set to obtain an IP address automatically from the host router. The LAN app allows you to use a specific IP address appropriate to your network demand. Note: We do NOT recommend you change the IP address unless you are quite sure about the IP setting for special network demand. - Page 25 Chapter 3 Further Configuration You can also manually reserve an IP address for a client that is connected to your extender. Once reserved, the IP address will only be assigned to the same client by the DHCP server. Set the DHCP server 1.
-
Page 26: Clock
Chapter 3 Further Configuration 2. Enter the MAC Address of the device for which you want to reserve an IP address. 3. Specify the IP Address which will be reserved for the device. 4. Enter the Description for the device. 5. -
Page 27: Screen Settings
Chapter 3 Further Configuration Set time zone 1. Tap Clock on the menu screen to open the clock, and tap 2. Tap Time Zone to select your time zone and tap Done. 3. Tap Save. Set clock type 1. Tap Clock on the menu screen to open the clock, and tap 2. -
Page 28: Reboot & Reset
Chapter 3 Further Configuration Reboot & Reset With Reboot & Reset app, you can restart your extender or reset it to its factory default settings. Reboot & Reset on the menu screen. • Tap Reboot, the extender will shut down and boot again. •... -
Page 29: Firmware Upgrade
3 12 Firmware Upgrade TP-LINK is dedicated to improving and richening the product features, giving you a better network experience. We will release the latest firmware at TP-LINK official website, you can download the latest firmware file from our website and upgrade the firmware to the latest version. -
Page 30: System Log
Chapter 3 Further Configuration 3. Click Backup to save a copy of the current settings. A conf. bin file will be stored to your computer. Restore 1. Launch a web-browser on your computer, and type http://tplinkrepeater.net into the address bar, and enter the username and password you have set before, then click Login. - Page 31 Chapter 3 Further Configuration 3. You can filter out and view the specific logs by choosing log type and level. 4. Click Save Log to save all the logs in txt file to your computer.
-
Page 32: Appendix A: Troubleshooting
• While the extender is powered on, use a pin to press and hold the Reset button on the rear panel until the RE590T logo displays. T3 What can I do if I forgot my wireless network password? The password of the extended network is the same as your host network. - Page 33 4 ) Click settings, deselect the following three options and click OK; 5 ) Go to Advanced > Restore advanced settings, click to save the settings.
- Page 34 • Change a web browser or computer and try to log in again. • Reset the extender to factory default settings, then connect your computer to the extender and try to log in again. If login fails, please contact the technical support.
-
Page 35: Appendix B: Specifications
Appendix B: Specifications HARDWARE FEATURES Interfaces 4*10/100/1000Mbps Ethernet Ports(RJ45) Button Reset Button, Power On/Off Button Dimensions 11.2 x 6.2 x 2.1 in. (284 x 157 x 52 mm) (W x D x H) Antenna 3 dual band detachable antennas External Power 12V/2.5A Supply Screen Type: Capacitive... - Page 36 Specifications are subject to change without notice. is a registered trademark of TP-LINK TECHNOLOGIES CO., LTD. Other brands and product names are trademarks or registered trademarks of their respective holders. No part of the specifications may be reproduced in any form or by any means or used to make any derivative such as translation, transformation, or adaptation without permission from TP-LINK TECHNOLOGIES CO., LTD.
- Page 37 FCC STATEMENT This equipment has been tested and found to comply with the limits for a Class B digital device, pursuant to part 15 of the FCC Rules. These limits are designed to provide reasonable protection against harmful interference in a residential installation. This equipment generates, uses and can radiate radio frequency energy and, if not installed and used in accordance with the instructions, may cause harmful interference to radio communications.
- Page 38 CE Mark Warning This is a class B product. In a domestic environment, this product may cause radio interference, in which case the user may be required to take adequate measures. National Restrictions This device is intended for home and office use in all EU countries (and other countries following the EU directive 1999/5/EC) without any limitation except for the countries mentioned below: Reason/remark...
- Page 39 Cet appareil est conforme aux norms CNR exemptes de licence d’Industrie Canada. Le fonctionnement est soumis aux deux conditions suivantes: 1. cet appareil ne doit pas provoquer d’interférences et 2. cet appareil doit accepter toute interférence, y compris celles susceptibles de provoquer un fonctionnement non souhaité...
-
Page 40: Safety Information
• 注意防潮,請勿將水或其他液體潑灑到本產品上。 • 插槽與開口供通風使用,以確保本產品的操作可靠並防止過熱,請勿堵塞或覆 蓋開口。 • 請勿將本產品置放於靠近熱源的地方。除非有正常的通風,否則不可放在密閉 位置中。 • 請不要私自打開機殼,不要嘗試自行維修本產品,請由授權的專業人士進行此 項工作。 Продукт сертифіковано згідно с правилами системи УкрСЕПРО на відповідність вимогам нормативних документів та вимогам, що передбачені чинними законодавчими актами України. Safety Information • When product has power button, the power button is one of the way to shut off the product;... -
Page 41: Declaration Of Conformity
TP-LINK TECHNOLOGIES CO , LTD DECLARATION OF CONFORMITY For the following equipment: Product Description: AC1900 Touch Screen Wi-Fi Range Extender Model No.: RE590T Trademark: TP-LINK We declare under our own responsibility that the above products satisfy all the technical regulations...
Need help?
Do you have a question about the RE590T and is the answer not in the manual?
Questions and answers