Advertisement
Table of Contents
- 1 Table of Contents
- 2 Safety Label Location
- 3 Safety Messages
- 4 Components
- 5 Control Panel
- 6 Controls
- 7 Before Starting Engine
- 8 Operation
- 9 Stopping Engine
- 10 Maintenance
- 11 Maintenance Schedule
- 12 Transporting and Storage
- 13 Wattage Information
- 14 Trouble Shooting
- 15 Specification
- 16 Wiring Diagram
- Download this manual
Advertisement
Table of Contents

Related Manuals for DAISHIN SGB12000HSa

Summary of Contents for DAISHIN SGB12000HSa
- Page 1 PORTABLE GENERATOR INSTRUCTION MANUAL SGB12000HSa SGBT14000HSa WWW.DAISHIN-JAPAN.CO.JP P・No.15750210000...
- Page 2 However, similar to all mechanical products, your machine will occasionally require adjustments and maintenance. This manual should be read carefully before operating or performing any adjustments on your machine. Please contact DAISHIN dealer if technical assistance is required. Please be advised that unit was designed / manufactured for specific applications. So please do not modify and use the unit for any application other than which it was designed for.
- Page 3 Damage Prevention Messages You will also see other important messages that are preceded by the word. NOTICE This word means: Your generator or other property could be damaged if you don't follow instructions. The purpose of these messages is to help prevent damage to your generator, other property, or the environment.
-
Page 4: Table Of Contents
Table of Contents 1. SAFETY LABEL LOCATION ..........4 2. SAFETY MESSAGES ............6 3. COMPONENTS ..............7 4. CONTROLS ................ 10 5. BEFORE STARTING ENGINE ..........12 6. OPERATION ............... 13 7. STOPPING ENGINE ............15 8. MAINTENANCE ..............16 9. -
Page 5: Safety Label Location
1. SAFETY LABEL LOCATION These labels warn you of potential hazards that can cause serious injury. Read them carefully. If a label comes off or becomes hard to read, contact your DAISHIN dealer for a replacement. - 4 -... - Page 6 - 5 -...
-
Page 7: Safety Messages
2. SAFETY MESSAGES Your safety and the safety of others are very important. We have provided important safety messages in this manual and on the generator. Please read these messages carefully. Operator responsibility ・ Know how to stop the generator quickly in case of emergency. ・... -
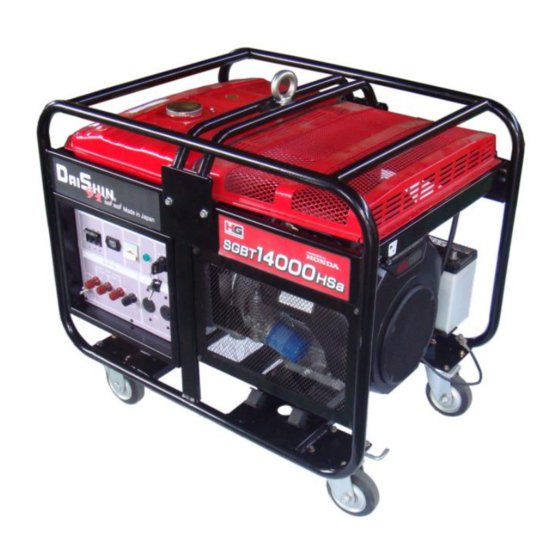
Page 8: Components
Keep flammable materials away from the generator. ・ The muffler becomes very hot during operation and remains hot for a while after stopping the engine. Be careful not to touch the muffler while is in hot. Let the engine cool before storing the generator indoors. ・... -
Page 9: Control Panel
A battery liquid is not in CASTER at the time of the factory shipment. Fill a suitable battery liquid before the use. CONTROL PANEL SGB12000HSa (220V 50Hz) CIRCUIT BREAKER VOLT METER PILOT LAMP HOUR METER ENGINE KEY SWITCH GROUND TERMINAL... - Page 10 SGBT14000HSa (220/380V 50Hz) CIRCUIT BREAKER VOLT METER PILOT LAMP HOUR METER ENGINE KEY SWITCH GROUND TERMINAL AC TERMINALS AC RECEPTACLES CASTER KIT NUT M8 CASTER FLANG BOLT M8-20 - 9 -...
-
Page 11: Controls
4. CONTROLS Engine key switch To start and stop the engine. Switch position: Off: To stop the engine. Key can be removed/ inserted. On: To run the engine after starting. Start: To start the engine by turning the starter motor. START ENGINE KEY SWITCH Return the key to the “ON”... - Page 12 Choke knob The choke is used to provide proper starting mixture when the engine is cold. It can be opened and closed by operating the choke rod manually. Pull the knob out toward “CLOSED” to enrich the mixture. PULL THE KNOB CLOSED POSITION Circuit Breaker The Circuit breaker will automatically cut off the circuit if there is a short circuit or a...
-
Page 13: Before Starting Engine
5. BEFORE STARTING ENGINE Fill recommended engine oil to the upper limit mark if the oil is short. Change oil if it becomes dirty or discolored. Oil capacity at upper limit mark: See attached HONDA OWNER’S MANUAL. UPPER LIMIT LOWER LIMIT Remove the tank cap and check the fuel level. -
Page 14: Operation
6. OPERATION STARTING THE ENGINE (Refer to HONDA OWNER’S MANUAL for engine.) Make sure that disconnect all electrical loads from panel receptacles. The generator may be hard to start if a load is connected. Turn the fuel valve to the “ON” position. If you want to start operate the choke manually, move the choke knob to the “CLOSED”... - Page 15 When the speed of the starter motor drops after a period of the time, it is the indication that the battery should be recharged. After the engine starts, let the engine switch return to “ON”. If you have manually closed the choke, move it to the “OPEN” position as the engine warms up.
-
Page 16: Stopping Engine
7. STOPPING ENGINE Turn the circuit breaker knob to the “OFF” position. Turn the engine key switch to the “OFF” position. Disconnect all electrical loads from panel receptacles. Turn the fuel valve to the “OFF” position. Never leave an appliance plugged into the generator when you stop the generator as damage could result to the generator and / or appliance. -
Page 17: Maintenance
8. MAINTENANCE Periodic inspection and adjustment of HONDA ENGINE & Generator is essential if high-level performance is to be maintained. Regular maintenance will also ensure a long service life. The required service intervals and kind of maintenance to be performed are described on HONDA OWNER’S MANUAL, so please see HONDA OWNER’S MANUAL. - Page 18 (1) Service more frequently when used in dusty areas. (2) These items should be service by your dealer, unless the owner has the proper tools and is mechanically proficient. See the service manual. (3) For professional commercial use, log has of operation to determine proper maintenance intervals.
- Page 19 Engine oil change Drain the oil while the engine is warm to assure rapid and complete draining. 1) Remove the drain plug and sealing washer, oil filler cap, and drain the oil. 2) Reinstall the drain plug and sealing washer. Tighten the plug securely. 3) Refill with the recommended oil and check the level.
- Page 20 3) Clean the filter mounting base, and coat the seal of the new oil filter with clean engine oil. Oil filter Used only a genuine HONDA oil filter or a filter of equivalent quality specified for your model. Using the wrong filter, or a non-HONDA filter which is not of equivalent quality, may cause engine damage.
- Page 21 Refueling Fuel tank capacity: 35ℓ (9.25 USG) Check the fuel level gauge, and refill the tank if the fuel level is low. Gasoline is highly flammable and explosive, and you can be burned or seriously injured when handling fuel. ・Stop engine and keep heat, sparks, and flame away. ・Handle fuel only outdoors.
- Page 22 Spark plug service Recommended spark plugs: J16CR-U (DENSO) , ZGR5A (NGK) To ensure proper engine operation, the spark plug must be properly gapped and free of deposits. If the engine has been running, the muffler will by very hot. Be careful not to touch the muffler.
- Page 23 The spark plug must be securely tightened. An improperly tightened spark plug can become very hot and could damage the engine. Never use spark plugs which have an improper heat range. Use only the recommended spark plugs or equivalent. Air cleaner service A dirty air cleaner will restrict air flow to the carburetor.
- Page 24 Never try to brush off dirty; brushing will force dirt into the fibers. Replace the paper element if it is excessively dirty. Outer filter; clean in warm soapy water, rinse and allow to dry thoroughly. Squeeze it well after dipping it into the clean engine oil. 6) Wipe dirt from the inside of the air cleaner body and cover, using a moist rag.
- Page 25 Fuse replacement If the fuse is blown, the engine will not start until it is replaced. 1) Turn the engine switch OFF 2) Remove the fuse holder and replace the fuse. Use only a 30A fuse. If frequent fuse failure occurs, determine the cause and correct the problem before attempting to operate the generator further.
- Page 26 3) Remove the battery from the battery tray. Inspection 1) Remove the battery cell caps. 2) Inspect the electrolyte level of each cell. The electrolyte level must be maintained between the UPPER and LOWER limit marks. 3) If the electrolyte level is near the LOWER mark, add distilled water as necessary.
- Page 27 Charging The battery is rated at 28AH(ampere-hour). 10% of the ampere-hour rating should be used as the charging current. A battery charger should be used that can be adjusted to deliver 1.4 amps. The battery gives off expiosive hydrogen gas during normal operation. A spark or open flame can cause the battery to explode with enough force to kill or seriously hurt you.
-
Page 28: Transporting And Storage
After removal from storage, drain the stored gasoline into a suitable container, and fill with fresh gasoline before starting. * Use gasoline conditioners that are formulated to extend storage life. Contact your authorized DAISHIN dealer for conditioner recommendations. - 27 -... - Page 29 1) Drain the carburetor by loosening the drain screw. Drain the gasoline into a suitable container. Gasoline is extremely flammable and is explosive under certain conditions. Perform this task in a well ventilated area with the engine stopped. Do not smoke or allow flames or sparks in the area during this procedure.
-
Page 30: Wattage Information
3) Remove the spark plug, and pour about a tablespoon of clean engine oil into the cylinder. Crank the engine several revolutions distribute the oil, then reinstall the spark plug. 4) Slowly pull the starter grip until resistance is felt. At this point, the piston is coming up on its compression stroke and both the intake and exhaust valves are closed. -
Page 31: Trouble Shooting
11. TROUBLE SHOOTING When the engine will not start: - 30 -... - Page 32 No electricity at the A.C RECEPTACLES: - 31 -...
-
Page 33: Specification
12. SPECIFICATION Models SGB12000HSa SGBT14000HSa Frequency (Hz) 50Hz Type Revolving field self excited AC generator Voltage Regulation System Generator Phase Single Three AC Output Rat. 9.0kVA 10.0kVA AC Output Max. 10.0kVA 11.0kVA AC Voltage 220V 220/380V Rated Power factor Model... -
Page 34: Wiring Diagram
13. WIRING DIAGRAM SGB12000HSa (220V, 50Hz) - 33 -... - Page 35 SGBT14000HSa (3P, 380V/220V, 50Hz) - 34 -...
- Page 36 DAISHIN INDUSTRIES LTD. 1520-1,FUNATSUKE,YORO-CHO, YORO-GUN,GIFU 503-1382 JAPAN PHONE : 81-(0)584-36-0501 : 81-(0)584-36-0504 : http://www.daishin-japan.co.jp MAIL : overseas@daishin-japan.co.jp...
Need help?
Do you have a question about the SGB12000HSa and is the answer not in the manual?
Questions and answers