Table of Contents
Advertisement
Quick Links
Advertisement
Table of Contents

Subscribe to Our Youtube Channel
Related Manuals for Betamotor MINICROSS R150 4T


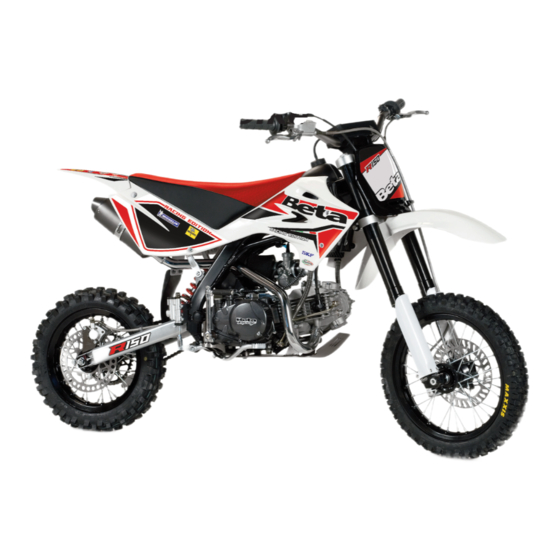
Summary of Contents for Betamotor MINICROSS R150 4T
- Page 1 R125 4T Minicross. R150 4T Det kan forekom- Minicross me små afvigelser. Service Manual Holtvej 8-10, Høruphav, 6470 Sydals Telefon: +45 73 15 11 00 Fax: +45 73 15 11 01 info@scanmi.dk · www.scanmi.dk CVR: 27 73 31 07 www.betamotor.dk Juli 2011...
- Page 2 T A B L E...
- Page 3 T A B L E INFORMATIONS ATTENTION After the first training hour, check all the tightenings and in particular manner: • Footboard supports • Shock absorber cover • Wheel rims • Shock absorber • Engine bolts and nuts • Crown...
- Page 4 T A B L E INFORMATIONS way without paying attention to REMEMBER THAT The means you own is not a toy, the I manual’s indication can you must use it with competence, cause you serious hurts, permanent attention and respect towards the and/or even mortal ones.
- Page 5 T A B L E INFORMATIONS BETAMOTOR S.p.A. reserves the right to change the data and features described in this manual and to modify its products at any time.
-
Page 6: Table Of Contents
T A B L E INFORMATIONS Symbols ............6 SECTION 3: MAINTENANCE AND CHECKS Description ...........6 Maintenance, description .......30 Safety, advice and recommandations ..7 Maintenance and checking to perform ..31 Ecologic drive ..........12 Gearbox oil ..........32 Brake pump oil ..........33 SECTION 1: GENERAL INFORMATION Air filter ............34 Main parts ..........14 Spark plug ..........35... -
Page 7: Symbols
T A B L E INFORMATIONS SYMBOLS DESCRIPTION WARNING • This manual is Your guide to the The guarantee is considered null SAFETY/WARNING use and simple maintenance of and the manufacturer is released If the parts indicated with this the Minicross. of all responsibility in the case of symbol are not respected this could any intervention carried out by... -
Page 8: Safety, Advice And Recommandations
T A B L E INFORMATIONS SAFETY, ADVICE AND • If you wear sight glasses let an adult WARNING RECOMMANDATIONS inspect they are clean and suitable to Other operations that are not be used when driving the means. • Make an adult teach you how to described in this manual require correctly use your Minicross: This Minicross has been... - Page 9 T A B L E INFORMATIONS Always tell an adult Any alteration or modification • Minicross is not equipped with a if you notice anything of the Minicross made to the stationing stand so please make strange while riding; for original purchase makes the sure that you have stopped it in your safety, and to keep...
- Page 10 T A B L E INFORMATIONS This vehicle is not authorized for • Only drive with sufficient light • Do not start driving if you do not use on public roads. for your safety and the other’s feel in perfect health conditions, one.
- Page 11 T A B L E INFORMATIONS • Go slow before facing and closing • When you stop or you must park ON MINICROSS YOU CANNOT TAKE the curves and variations of the the Minicross, before getting off, • Do not wear flying garments, kind of round.
- Page 12 T A B L E INFORMATIONS • Do not rest the vehicle on its side, • Drive on grounds or roads that • Drive in a non neat way or in and be sure to use the kickstand are excessively loose or stony or strange positions or laid on the only on firm ground (not sand with deep holes.
-
Page 13: Ecologic Drive
T A B L E INFORMATIONS ECOLOGIC DRIVE • If you have the full control of • If you can easily use the gas the means even when this is throttle and you have well The noise and the pollution stopped and you can steadily understood its working. -
Page 14: Section 1: General Information
T A B L E SECTION 1: GENERAL INFORMATION INDEX MAIN PARTS VEHICLE IDENTIFICATION DATA PLATES ON THE VEHICLE HAND DRIVE CONTROLS TECHNICAL SPECIFICATIONS ELECTRICAL DIAGRAM... - Page 15 T A B L E SECTION 1: GENERAL INFORMATION MAIN PARTS 1 Gasoline tank plug 2 Air filter 3 Stand 4 Fuel tap 5 Fuel tank 6 Kick-starter 7 Silencer 8 Rear brake pedal 9 Fork 10 Saddle 11 Rear mudguard 12 Front mudguard 13 Big fork 14 Muffler...
-
Page 16: Vehicle Identification Data
T A B L E SECTION 1: GENERAL INFORMATION VEHICLE IDENTIFICATION DATA Frame identification The identification data A are stamped on the steering tube r.h. side. Motor identification Motor identification data B are stamped on the rear part of the engine assembly. -
Page 17: Plates On The Vehicle
T A B L E SECTION 1: GENERAL INFORMATION PLATES ON THE VEHICLE Danger of burning Obligation to use gloves Obligation to use the helmet Obligation to use motor-biker shoes Obligation to use motor-biker glasses Obligation to use the motor- biker suit Danger of organs in movement... -
Page 18: Hand Drive Controls
T A B L E SECTION 1: GENERAL INFORMATION HAND DRIVE CONTROLS Front brake lever Gas throttle Clutch lever Engine stop push button Rear brake pedal... -
Page 19: Technical Data
T A B L E SECTION 1: GENERAL INFORMATION TECHNICAL DATA Rims - front 14” x 60/100 (aluminum) - rear 12” x 2.75(aluminum) Vehicle weight • ready to operate (unfueled) .....61 (kg) Brakes • allowed load ..........75 (kg) - disk-type with hydraulic control Ø 200 mm Dimensions Engine •... -
Page 20: Electrical Diagram
T A B L E SECTION 1: GENERAL INFORMATION ELECTRICAL DIAGRAM Legend 1 Generator 2 High Voltage coil 3 Spark plug 4 Engine stop push button Brown Black... -
Page 21: Section 2: Operation And Use
T A B L E SECTION 2: OPERATION AND USE INDEX CHECKS AND MAINTENANCE BEFORE AND AFTER USE REFUELING AND MANAGEMENT OF THE FUEL HOW TO STOCK AND MANAGE FUEL RECOMMENDED LUBRICANTS AND LIQUIDS BREAKING IN STARTUP... -
Page 22: Checks And Maintenance Before And After Use
T A B L E SECTION 2: OPERATION AND USE CHECKS AND MAINTENANCE BEFORE AND AFTER USE In order to avoid problems connected to the operation of the vehicle, it is advisable to perform a number of checks and maintenance operations before and after use. -
Page 23: How To Fuel Up Into The Minicross
T A B L E SECTION 2: OPERATION AND USE HOW TO FUEL UP INTO THE MINICROSS Remove cap A. The fuel tank will hold approxi- mately 2 liters, 0.300 liters of which is reserve. Only refuel with fuel unleaded petrol. - Page 24 T A B L E SECTION 2: OPERATION AND USE • Place in an open and well-aired • Put one end of the gasoline Take all the precautions to avoid dispersions of fuel in the environ- place, far from free flames pipe in the can in a quantity so ment.
-
Page 25: How To Stock And Manage Fuel
T A B L E SECTION 2: OPERATION AND USE • Close the tank and put it in a • Keep the containers far from the suitable environment. sunshine • Open the gasoline cock in the • Keep the containers in places emergency fuel position and closed and aired and equipped use the vehicle by following the... -
Page 26: Recommended Lubricants And Liquids
T A B L E SECTION 2: OPERATION AND USE RECOMMENDED LUBRICANTS AND LIQUIDS For better operation and longer vehicle life, we advise you to use the products listed in the following chart: TYPE OF PRODUCT TECHNICAL SPECIFICATION TRANSMISSION OIL SAE 10W/50 GREASE FOR JOINTS AND RODS BARDAHL MPG2... -
Page 27: Breaking In
T A B L E SECTION 2: OPERATION AND USE BREAKING IN Run in the vehicle over about 500 km or No. 10 refuelings; During this time: - Avoid travel at high speeds - Change speed often so that the parts will break in uniformly and in a shorter time - Avoid turning the throttle more than 3/4 of the way. -
Page 28: Startup
T A B L E SECTION 2: OPERATION AND USE STARTUP Kick-starter - Open fuel tank valve A OFF = closed ON = open RES = reserve - Check that the gears are in neutral. - Depress the kick-starter with a sharp movement of the foot and slightly turn the gas control. -
Page 29: Section 3: Maintenance And Checks
T A B L E SECTION 3: MAINTENANCE AND CHECKS INDEX MAINTENANCE, DESCRIPTION MAINTENANCE AND CHECKING TO PERFORM GEARBOX OIL AIR FILTER SPARK PLUG BRAKES CHECKS AFTER CLEANING MAINTENANCE SCHEDULE HOW TO TRANSPORT THE VEHICLE HOW TO DISPOSE THE VEHICLE SUITABLE APPARELS... -
Page 30: Maintenance, Description
T A B L E SECTION 3: MAINTENANCE AND CHECKS MAINTENANCE, • In case o breakage and/or lost DESCRIPTION of the stand do not replace it with means of fortune, ask for the original part from the dealer’s. In order to have an efficient •... -
Page 31: Maintenance And Checking To Perform
T A B L E SECTION 3: MAINTENANCE AND CHECKS MAINTENANCE AND • Check that all the parts of the • Check the tires wear and tear CHECKING TO PERFORM mini-cross are at their seat and condition and their pressure. well fixed. -
Page 32: Gearbox Oil
T A B L E SECTION 3: MAINTENANCE AND CHECKS GEARBOX OIL Warning: Note: Never drive if the oil level is below Change the gear box oil after the Check the MIN mark on the oil dipstik. first 500 km or after No. 10 refuelings. •... -
Page 33: Brake Pump Oil
T A B L E SECTION 3: MAINTENANCE AND CHECKS BRAKE PUMP OIL Oil change - Always renew the oil white the engine is hot, taking care not to Front brake touch the engine and the oil Check the level by means of oil - Place a container under the window A. -
Page 34: Air Filter
T A B L E SECTION 3: MAINTENANCE AND CHECKS AIR FILTER Clean the filter every time the vehicle is used cross-country. To remove the filter, is necessary unscrewing screws A and then proceed as follow: - Remove filter - Wash the filter with petrol - Dry the filter - Wet the filter with filter oil, removing any excess oil so... -
Page 35: Spark Plug
T A B L E SECTION 3: MAINTENANCE AND CHECKS SPARK PLUG Do not start the motor if the spark plug or the pipes are out of their relevant housings. Danger of electrical shock. Keeping the spark plug in good c o n d i t i o n w i l l r e d u c e f u e l Note:. -
Page 36: Brakes
T A B L E SECTION 3: MAINTENANCE AND CHECKS BRAKES Check Pads Brakes To check the front brake for wear, simply observe the caliper from the front, where it is possible to see the ends of the two pads. These pads should have at least a 2 mm. -
Page 37: Checks After Cleaning
T A B L E SECTION 3: MAINTENANCE AND CHECKS CHECKS AFTER CLEANING After cleaning the motorcycle, it is good practice • Disassemble the flywheel cover and dry the water if necessary • In case of disassembly/assembly of the ignition system, check the tightening torque of the fixing screws. -
Page 38: Maintenance Schedule
T A B L E SECTION 3: MAINTENANCE AND CHECKS MAINTENANCE SCHEDULE... -
Page 39: How To Transport The Vehicle
T A B L E SECTION 3: MAINTENANCE AND CHECKS HOW TO TRANSPORT THE HOW TO DISPOSE THE SUITABLE APPARELS VEHICLE VEHICLE • Only after having worn long To transport the Minicross you Remember that the mini-cross sleeve apparels and with a must: is made with material that can certain thickness (better if in... - Page 40 T A B L E SECTION 3: MAINTENANCE AND CHECKS • Only after having worn a pair of good gloves that may avoid scratches on the hands, stiffening, tiredness, and that protect them in case of fall or of means upsetting.
-
Page 41: Section 4: Adjustments
T A B L E SECTION 4: ADJUSTMENTS INDEX ADJUSTMENT OF BRAKES ADJUSTMENT OF CLUTCH ADJUSTMENT OF IDLING SPEED ADJUSTMENT OF GAS CLEARANCE ADJUSTMENT FORK CHECK AND ADJUSTMENT OF STEERING GEAR TIGHTENING THE CHAIN ADJUSTMENT OF REAR SHOCK ABSORBER... -
Page 42: Adjustment Of Brakes
T A B L E SECTION 4: ADJUSTMENTS ADJUSTMENT OF BRAKES Front brake The front brake is disk type with hydraulic control, and therefore requires no adjustment. Rear brake The rear brake is disk type with hydraulic control. Adjust the pedal height A by means of register B. -
Page 43: Adjustment Of Clutch
T A B L E SECTION 4: ADJUSTMENTS ADJUSTMENT OF CLUTCH Generally, the only operation that is performed on the clutch is adjust- ment of the position of lever A. To perform the adjustment, lift rubber dust cover C and tum adjuster B. -
Page 44: Adjustment Of Idling Speed
T A B L E SECTION 4: ADJUSTMENTS ADJUSTMENT OF IDLING SPEED In order to perform this operation correctly, we advise you to do it when the engine is hot, connecting an electric revolution counter to the spark plug wire. Then use a screwdriver on register screw A to calibrate the minimum. -
Page 45: Adjustment Forks
T A B L E SECTION 4: ADJUSTMENTS ADJUSTMENT FORKS The forks that can be adjusted in both spring preload and rebound (return). The adjustment is performed by means of specially designed external adjusters. Adjuster A is used to alter tha spring preload. -
Page 46: Check And Adjustment Of Steering Gear
T A B L E SECTION 4: ADJUSTMENTS CHECK AND ADJUSTMENT OF STEERING GEAR Periodically check the play in the steering sleeve by moving the fork back and forth as shown in the figure. Whenever you feel play, adjust as described below: - unscrew the 4 screw A (two for side) - remove handlebar paying particular attention to supports B. -
Page 47: Tightening The Chain
T A B L E SECTION 4: ADJUSTMENTS TIGHTENING THE CHAIN C h e c k i n g t h e d r i v e c h a i n periodically to ensure longer chain life. Always keep it lubricated and clean of deposited dirt. -
Page 48: Adjustment Of Rear Shock Absorber
T A B L E SECTION 4: ADJUSTMENTS ADJUSTMENT OF REAR SHOCK ABSORBER Adjustment of spring load For increase the spring resistence turning nut A clockwise. For decreases the spring resistence turning nut A anticlockwise. In the event of any malfunction, contact our authorized customer service network. -
Page 49: Section 5: What To Do In An Emergency
T A B L E SECTION 5: WHAT TO DO IN AN EMERGENCY INDEX TROUBLESHOOTING... - Page 50 T A B L E SECTION 5: WHAT TO DO IN AN EMERGENCY PROBLEM CAUSE REMEDY The engine doesn’t start Fuel system (tubes, fuel tank, Clean the system valve) is blocke Air filter is very dirty Proceed as indicated on pages No current arriving at spark plug Clean or replace spark plug.
- Page 51 T A B L E SECTION 5: WHAT TO DO IN AN EMERGENCY PROBLEM CAUSE REMEDY Piston knocks Ignition too early Check phases Carbon deposits inside cylinder Consult one of our Authorized or on spark plug Dealers Engine overheats and loses Silencer partially obstructed Consult one of our Authorized power...
- Page 52 T A B L E SECTION 5: WHAT TO DO IN AN EMERGENCY PROBLEM CAUSE REMEDY Brakes or throttle are jammed, Steel cables are blocked. Clean or replace the cables. or do not go back into place Rotation points of levers or Clean the rotation points or after being used and released.
-
Page 53: Alphabetical Index
T A B L E ALPHABETICAL INDEX Adjustment of brakes ....42 Ecologic drive ......12 Plates on the vehicle ....16 Adjustment of clutch ....43 Electrical diagram ....19 Adjustment of forks ....45 Recommended lubricants Adjustment of gas clearance ... 43 Gearbox oil .......32 and liquids ......26 Adjustment of idling speed ..44 Adjustment of rear... - Page 54 T A B L E Edition March 2007 Lem Motor s.r.l.
Need help?
Do you have a question about the MINICROSS R150 4T and is the answer not in the manual?
Questions and answers