Advertisement
Advertisement
Table of Contents

Subscribe to Our Youtube Channel
Related Manuals for Harley Benton LP-Style


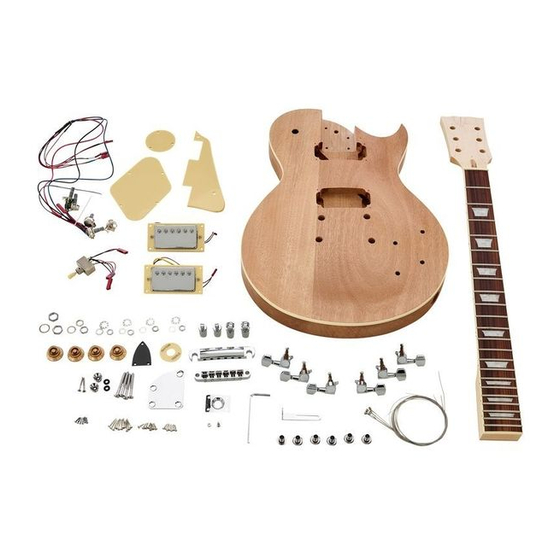
Summary of Contents for Harley Benton LP-Style
- Page 1 ‘ wner anual lP-s uitar tyle...
-
Page 2: Table Of Contents
Introduction ......................... 3 Body finish ........................4 Neck finish ........................4 Assembling of tuners ....................5 Neck..........................6 Wiring ........................... 6 Bridge assembly ......................12 Strap buttons ......................13 Setting up ........................13 Notes ......................... 15 Harley Benton E-Guitar Kit LP-Style... -
Page 3: Introduction
Introduction Thank you for buying the guitar kit. All the wood, hardware and electrical components of the guitar are c ontainedinthispackage.Pleasereadthefollowinginstructionsforassemblyandfinishing. www.thomann.de... -
Page 4: Body Finish
Choose a good quality, clear or lightly tinted wood lacquer aerosol for the neck and begin at the front and sides oftheheadstock.Startwithagradual,evenpasstoapplyathincoat,allowdrying(tobetouchable)andrepeat thistwoorthreetimes.Takecarenottoapplytoomuch,whichmaycauseruns.Ifthishappens,sanddown the area and re-apply evenly. Aftertheheadstockhasbecomedry,turntheneckoverandlayitdownonitsfingerboard.Repeattheabove processfortherestoftheexposedmaple. Allow two to three days for the lacquer to fully harden and then, if desired, polish the lacquered surfaces to get a suitable shine. Harley Benton E-Guitar Kit LP-Style... -
Page 5: Assembling Of Tuners
Assembling of tuners Beforeattachingthenecktothebody,fitthetuningmachine-headstotheheadstockbyinsertingthethread through the pre-drilled holes and setting a washer and bush over it. Screw down the bush onto the thread until itfitstightlytothetouchandthenadjusttherearofthemachine-headsothatthetuningbuttonsitsvertically above the top edge of the headstock. Tightenthenutonthefrontfaceofthetuneruntilitisfirmbyusingaspannerofthecorrectsize.Repeatthis fortheremainingfivetuners. www.thomann.de... -
Page 6: Neck
First take out the cables that are to be connected connected to the potentiometers. Put the end with the three connectors into the channel from the control cavity side until they reach the switch cavity. Harley Benton E-Guitar Kit LP-Style... - Page 7 Wiring Then put the potentiometers on the right positions as shown in the following picture. The Tone and Volume potentiometers on the downside should be connected to the neck pickup. The Tone and Volume potentiometer on the upper side should be connected to the bridge pickup. www.thomann.de...
- Page 8 Wiring Takeoutthecablewithoutconnector(stringgroundingcable)andinsertitintothepre-drilledbridgehole throughthechannel.Justleaveitinthebridgehole.Itwillconnecttoearthwhenthebootsofthebridgeare pressedonit.Stringgroundingreducesnoise(hum). Lead the cables of the pickups from the pickup cavity through the channel to the control cavity and connect them to the potentiometers accordingly. Harley Benton E-Guitar Kit LP-Style...
- Page 9 Wiring Secure the frames with dome-head screws into the pre-drilled holes. Take out the cable that does not connect to the po- tentiometersandconnectitonthejackplatethrough thejackhole.Screwthejackplateonthepre-drilled holes. www.thomann.de...
- Page 10 Wiring Connect the switch with the three cables coming from the control cavity according to the marking numbers locatedontheconnectors.Puttheswitchontherightpositionandfixitfromthefrontside. Therearbodyplasticplatesnowcanbefittedtocoverthecontrolandswitchcavity.Securetheplateswith dome-head screws into the pre-drilled holes. Harley Benton E-Guitar Kit LP-Style...
- Page 11 Wiring Nowyoucanfixthepickguard.Thisisverysimple,justdoitaccordingtothefollowingpictures. www.thomann.de...
-
Page 12: Bridge Assembly
Bridge assembly Useahammertoknockthethreadsofthebridgeandtailpieceintothepre-drilledholesaccordingly,andfixthe bridge and tailpiece on the screws. Put the knob on the shaft of each potentiometer. Harley Benton E-Guitar Kit LP-Style... -
Page 13: Strap Buttons
Strap buttons Screwthestrapbuttonsintothepre-drilledholesatthebottomedgeofthebodyandatthetopnexttothe switch. Setting up Fitting strings to the guitar is achieved by threading from the tailpiece to the bridge, emerging through the rel- evant saddle on the bridge. Start with the thickest string bottom E in the uppermost position on the bridge. Ensure that the string sits smoothly on its saddle and keep taut whilst winding a couple of turns on the relevant tuner. - Page 14 Oncethedesiredactionisachieved,allthatremainsistosettheintonation.Aftertuningupallthestrings,you justhavetogentlytouchastring,rightabovethetwelfthfretandthenpickthestring.Theresultingchime-like soundisaharmonic(12thfretharmonic).Thisharmonicshouldhavethesamepitchaswhenthestringis pressedatthetwelfthfret.Ifthepitchofthetwonotesdiffers,adjustthesaddleforthisstringbackorforthon thebridge.Listencarefullyandadjustgentlyuntilthetwonotesmatch,toachievecorrectintonation.Repeat this procedure on all strings until the harmonics and the fretted notes sound the same. Pleasealsorememberthatovertime,slightadjustmentsmayneedtobemadeanddifferentgaugesofstrings will need compensating for in the setup. Thepickupheightcannowbeadjustedforbestperformanceandcanbebalancedbyadjustingthescrewsat thetopandbottomofeachpickup.Asageneralrule,holddownthestringsatthe22ndfretandadjustsothat thestringsareatleast2mmclearofthepickup.Anypickupsthatarenoticeablylouderthanotherscanbe madequieterbyadjustingthemfurtherawayfromthestrings. Forfutureadjustments,keeptheseinstructionsasareferenceandenjoyyourcustommadeguitar. Harley Benton E-Guitar Kit LP-Style...
-
Page 15: Notes
Notes www.thomann.de... - Page 16 16 © 2013 • Musikhaus Thomann e. K. • Treppendorf 30 • 96138 Burgebrach • Germany • www.thomann.de Harley Benton E-Guitar Kit LP-Style...
Need help?
Do you have a question about the LP-Style and is the answer not in the manual?
Questions and answers