
Related Manuals for RCA W101


Summary of Contents for RCA W101
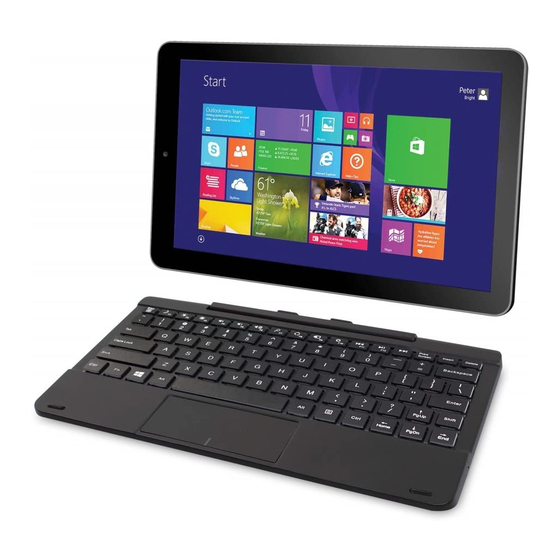
- Page 1 W101 Windows 8.1 Tablet with detachable keyboard User Manual Need Help? Visit support.rcatablets.com...
-
Page 2: Safety Precautions
Safety Precautions Equipment tested for compliance as a W101 complete unit FCC Information This device complies with Part 15 of the FCC Rules. Operation is subject to the following two conditions: (1) This device may not cause harmful interference, and (2) this device must accept any interference received, including interference that may cause undesired operation. - Page 3 • Reorient or relocate the receiving antenna. • Increase the separation between the equipment and receiver. • Connect the equipment into an outlet on a circuit different from that to which the receiver is connected. • Consult the dealer or an exper ienced radio/TV technician for help.
-
Page 4: Important Safety Instructions
IMPORTANT SAFETY INSTRUCTIONS PLEASE READ AND SAVE THIS FOR FUTURE REFERENCE Some of the following information may not apply to your particular product; however, as with any electronic product, precautions should be observed during handling and use. • Read these instructions. •... -
Page 5: Additional Safety Information
• Refer all servicing to qualified service personnel. Servicing is required when the apparatus has been damaged in any way, such as power-supply cord or plug is damaged, liquid has been spilled or objects have fallen into the apparatus, the apparatus has been exposed to rain or moisture, does not operate normally, or has been dropped. -
Page 6: Table Of Contents
Contents Safety Precautions .............1 Important Safety Instructions ........3 Startup ..............6 Overview of Controls ............6 Buttons ................ 7 Keyboard ..............8 Accessory ..............9 Connections ............. 10 Battery Management and Charging ....... 10 USB ................12 Micro SD ................12 HDMI ................ -
Page 7: Startup
Startup Overview of Controls Front camera MIC (microphone) HDMI port DC jack Micro-USB port Headphone jack Power button USB port Windows button Connector RESET button Micro SD card slot Rear camera Volume+/- button EN - 6... -
Page 8: Buttons
Item Description Microphone For voice input. HDMI port Connect to a TV or a display device. DC jack Connect with 5V DC charger. Micro-USB port Use to charge the tablet's battery. Headphone jack Headphone connection for personal listening. Power button Press to enter standby/wake up mode, press and hold to switch On/Off the unit. -
Page 9: Keyboard
Keyboard Overview Connector Use to connect the tablet to keyboard. Keys Windows key Press to open/close the Windows Star t screen. Touch pad Remove tablet from keyboard EN - 8... -
Page 10: Accessory
Tablet docking There are two ways to dock the tablet onto the keyboard. NOTE The keyboard connects to the tablet via the Connector. When the connection is successful, the tablet will automatically adjust its settings to use the keyboard. Accessory The following accessory is included. -
Page 11: Connections
Connections Battery Management and Charging The tablet has a built-in rechargeable battery. Battery Icon The battery icon displays in the taskbar and the Settings charm. Battery icon Description Full battery Your tablet is running on battery power and the battery is discharging. Low battery and need to charge Battery is charging. -
Page 12: Charging The Battery
Charging the Battery Use the AC Adapter or the Micro-USB port to charge the battery. To DC jack (Micro USB To Wall To USB port) Outlet charger USB cable AC Adapter (not included) (included) Note: In order to keep the battery working in best condition, please pay attention to the following: •... -
Page 13: Usb
Connect your tablet to a computer or a USB storage device with the USB cable (not included), to transfer music, pictures and other fi les in both directions. The tablet can be connected to a keyboard, a mouse or other input devices via USB cable and use it just as you would with a PC. -
Page 14: Hdmi
HDMI You can connect the unit to a TV or other display device using an HDMI cable through the HDMI port. To HDMI port HDMI cable (not included) T h e s y s t e m i n t e r fa c e o n t h e u n i t i s a u t o m a t i c a l l y synchronized with your TV screen. -
Page 15: Using Your Tablet
1. Press and hold the Power button for 4~5 seconds until the RCA logo appears. 2. Select the region and language, then tap 3. Carefully read the License terms, and tap Accept. 4. Follow the onscreen instructions to setup your tablet. -
Page 16: Turning Your Tablet Off
Turning your Tablet off Using the Charms Power the tablet Off 1. Swipe in from the right edge of the screen to launch the Charms bar. 2. Tap 3. Tap Power, it will display 3 options (Sleep, Shut down and Restart). Sleep 4. -
Page 17: Using The Touchscreen
mode.If you don’t operate for some time, the tablet will enter sleep mode automatically. Tip: You can go to Settings -> PC and device -> Power and sleep to set the screen timeout. Using the Touchscreen Here are some basic procedures for interacting with the touchscreen. -
Page 18: Windows Start Screen
Zoom By placing two fingers on the screen, you can slide them apart to "Zoom In", or pinch them together to "Zoom Out". Windows Start screen The Windows Start screen displays a list of default and custom live tiles, which act as a shortcut to Mail, Windows Explorer, Weather app, Windows Store, Internet Explorer, and other installed applications. -
Page 19: Customize Bar
Live Tiles on your Star t screen change and update in real time so you can get real-time updates about news or sports, check what your friends are up to, and get the latest weather forecast. You can pin your favorite or frequently used apps as Live Tiles to customize the Start screen. - Page 20 Resize to resize the app tile (Large, Wide, Medium or Resize Small). Turn live tile off to turn live tiles on/off. Turn live tile off Clear selection If you choose two or more app tiles, this icon will be displayed in the Customize bar. Tap to clear all your Clear selection selections.
-
Page 21: Charms Bar
Charms bar To launch the Charms bar, swipe in from the right edge of the screen. Search Share Start Devices Settings Search This tool allows you to look for files, programs or Search applications in your tablet. Share This tool allows you to share applications, photos and more via social networks or email. -
Page 22: Screen Orientation
Start This tool reverts the display to the Start screen. If Start it's already in the Start screen, use it to go back to the last app you opened Devices This tool allows you to access and share fi les with Devices the devices attached to your tablet such as an external display or printer. -
Page 23: Synchronizing Your Tablet
Synchronizing your Tablet Using a Microsoft account If your computer has Microsoft Windows 8.1 installed, you can synchronize user settings of your tablet with your computer using a Microsoft account. When you sign in with your Microsoft account on your tablet, you can automatically synchronize your settings, including internet browser history, application settings, and personal files etc., with other Windows 8.1 PCs and Windows 8.1 tablets. -
Page 24: Split Screen
Split Screen The tablet allows you to open two applications on the same screen, which helps you in multitasking. To split the screen: 1. Open any two applications that you want to perform the split screen. 2. Swipe in from the left to open the second application and hold your fi... -
Page 25: Airplane Mode
2. Tap then tap 3. The device will scan Wi-Fi networks automatically and display the available names. 4. Select an access point from the list of available Wi-Fi connections, than tap Connect. 5. W h e n yo u a r e p r o m p t e d fo r a p a s swo r d , e n t e r yo u r password and tap Next. -
Page 26: Bluetooth
Bluetooth You can use Bluetooth to communicate between the unit and other Bluetooth devices, such as a smartphone. 1. Swipe in from the right edge of the screen to launch the Charms bar. 2. Tap then tap Change PC settings. 3. -
Page 27: Recovery Your Tablet
Recovery your Tablet You can refresh / recover / restore your tablet to original factory settings. Refresh your PC without affecting your fi les This option enables you to refresh your tablet without losing your photos, music, videos, and other personal files. If you want to perform this action: 1. - Page 28 3. Tap Get started. The Reset your PC window opens. 4. Tap Next after you read the warning. Caution: Resetting your tablet erases all data from your tablet, including your account configuration, music, pictures, files, and so on. Ensure that you back up all the required data before you proceed.
-
Page 29: Additional Information
Additional Information Trouble Shooting Tablet displays network or service error message • When you are located in places with poor signals, your tablet may lose its Wi-Fi connection. Try moving closer to the Wi-Fi router. Touch screen response is slow or incorrect If the tablet’s touch screen response is incorrect, please try the following: •... -
Page 30: Copyright And Trademark Notices
Tablet can not show video of opposite side during skype call • The Wi-Fi signal is poor. Please move close to your wireless router, or disconnect other devices from your wireless router, or increase bandwidth of inter net connection. • Please check the Wi-Fi setting. -
Page 31: Specifications
About HDMI High-Definition Multimedia Interface (HDMI) is a high-speed digital interface that can transmit uncompressed high definition video and digital multichannel audio. It delivers high quality picture and sound quality. HDMI is fully backward compatible with DVI. As required by the HDMI standard, connecting to HDMI or DVI products without HDCP (High bandwidth Digital Content Protection) will result in no Video or Audio output. -
Page 32: Limited Warranty
Limited Warranty AVC MULTIMEDIA (“AVC”) makes the following limited warranty. This limited warranty extend to the original consumer purchaser and is limited to non-commercial use of the product. One Year Parts & Labor Warranty AVC products purchased in the United States or Canada are warranted to be free from defects in materials or workmanship for a period of one year from the date of their original retail purchase. - Page 33 Packaging and Shipping Instruction When you send the product to the AVC service facility you must use the original carton box and packing material or an equivalent as designated by AVC. Your Responsibility (1) You must retain the original sale receipt to provide proof of purchase.
- Page 34 the foregoing warranty is exclusive and in lieu of all other warranties, guarantees, agreements and similar obligations of manufacturer or seller with respect to the repair or replacement of any parts. In no event shall AVC be liable for consequential or incidental damages. No person, agent, distributor, dealer or company is authorized to change, modify or extend the terms of these warranties in any manner whatsoever.
Need help?
Do you have a question about the W101 and is the answer not in the manual?
Questions and answers
I need the Manuel for RCA W101SA23T2
The manual for the RCA W101SA23T2 includes safety and compliance information such as:
- To reduce radio or TV interference, try reorienting the antenna, increasing distance between devices, or plugging into a different circuit.
- Unauthorized changes or modifications can void the user’s authority to operate the device.
- The AC adapter is the disconnect device and must remain accessible during use.
- Disconnect the adapter from the socket to fully disconnect power.
- Use only specified controls or procedures to avoid hazardous radiation exposure.
This answer is automatically generated