
Related Manuals for LightwaveRF JSJSLW921


Summary of Contents for LightwaveRF JSJSLW921
- Page 1 Home Thermostat Model No. JSJSLW921 Instruction Manual Professional Series www.lightwaverf.house Version 2...
- Page 2 EN 55022: 2010, EN 61000-3-2: 2006 +A1: 2009 +A2: 2009 Class A, EN 61000-3-3: 2008, EN61000-4-2: 2009, EN 61000-4-3: 2006 +A1: 2008 +A2: 2010, EN 61000-4-4: 2012, EN 61000-4-5: 2006, EN 61000-4-6: 2009, EN 61000-4-11: 2004 For and on behalf of LightwaveRF PLC ---------------------------------------- Name J Shermer...
-
Page 3: How Do I Get Started
Get Started How do I get started? The following setup guide will explain how to link the Home Thermostat to other LightwaveRF heating devices. It is recommended to use the Thermostat in conjunction with the Lightwave Link & Web App. -
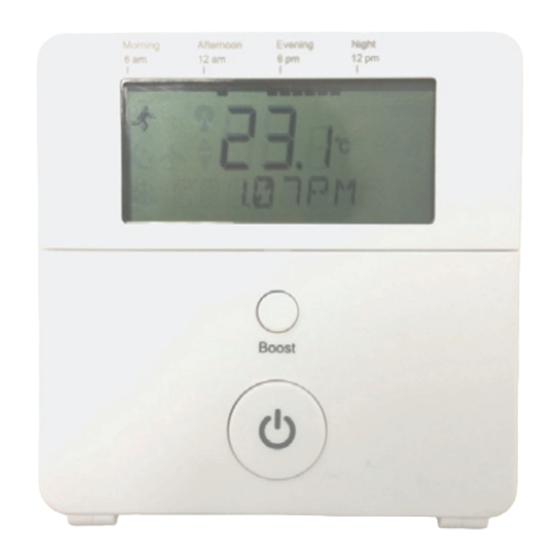
Page 4: Installation
Link button Up / down / OK buttons Program modes Standby button IMPORTANT: Please retain these instructions for guidance on how to link other LightwaveRF Heating devices to the Home Thermostat. For App setup and additional guidance please visit www.lightwaverf.house... -
Page 5: Inserting / Changing The Batteries
Installation Inserting / Changing the Batteries Mounting holes The Home Thermostat requires 2 x AA batteries for operation. The battery compartment can be accessed by removing the backplate. To do this, the screws bottom Thermostat need to be loosened. The backplate can be gently pulled away from the Thermostat body and slid downwards until it comes free from... -
Page 6: Basic Operation
The Home Thermostat is used to control and schedule home heating. It wirelessly links to LightwaveRF Boiler Switch which turns on and o your Boiler. If the Thermostat is also linked to the Lightwave Link, you can also control and schedule your heating via the LightwaveRF App. -
Page 7: Device Setup
(see setting modes); however, rather than returning to the schedule at the next on/o period, the mode will continue to remain active until it is manually cancelled by pressing the Standby button. These functions can also be carried out on the LightwaveRF App. -
Page 8: The Boost Function
Device Setup The Boost function Pressing the Boost button sets a temporary target temperature 1.5 degrees above the current temperature for the duration of 1 hour. If there is a target temperature higher than the current temperature already set, pressing the boost button will match this temperature. -
Page 9: Running Mode
Device Setup Modes Pressing the Mode button toggles between the four Thermostat modes. Each mode contains pre-set programmable target temperatures. When a mode is selected, the Thermostat will be set to these target temperatures until the mode is changed. Running mode The main Thermostat mode is ‘Running’. - Page 10 Device Setup Programming Running mode Press the ‘Program’ button and then press the ‘OK’ button when option ‘1’ appears on the display. The next option screen allows you to choose which days of the week to schedule. You can set all week days to be the same, setup week then weekend days, or each day individually.
- Page 11 Device Setup Setting Away, Holiday and Frost modes Press the ‘Program’ button, scroll using the Arrow keys, and then press the ‘OK’ button when options ‘3 (Away), 5 (Holiday) or 6 (Frost)’ appear on the display. Select a target temperature by scrolling using the Arrow Keys and pressing OK when the desired temperature has been selected.
- Page 12 Using the Thermostat with a Boiler Switch The Home Thermostat schedules the heating by wirelessly controlling the LightwaveRF Boiler Switch which turns the boiler on or o . In the vast majority of installs, it will also be linked to the...
- Page 13 Linking the Thermostat to LightwaveRF heating devices To use a LightwaveRF Home Thermostat with other LightwaveRF heating devices, such as the Boiler Switch, you will need to ‘link’ them. The thermostat can be linked to other LightwaveRF heating devices using the following method.
-
Page 14: App Setup
App Setup Linking to the LightwaveRF Apps To use the LightwaveRF App or Web App to control the Home Thermostat, you will first need to install the ‘Lightwave Link’. This allows any LightwaveRF devices to be linked to and controlled by a smartphone, tablet or PC. -
Page 15: Using The App
Using the App Using the TRV with the LightwaveRF App NOTE: For full instructions on how to use the TRV with the LightwaveRF App or Web App follow the in-App help or visit www.lightwaverf.com. The Heating Page allows you to view every LightwaveRF Heating Device that you have set up on the App. - Page 16 Add other Heating Devices Home Thermostat Boiler Switch Lightwave App (monitors house temp.) (turns boiler on/o ) (control any room from anywhere) Lounge Room Thermostat (controls several TRVs) Lightwave link Heating Remote (runs the show) (sets house temp.) Bedroom 2 Bedroom 1 Window Trigger (open window turns o TRV)
- Page 17 It is really comfortable and convenient to be able to have direct control over the house temperature without having to get up and alter the thermostat or boiler. This can be achieved using the LightwaveRF Home Thermostat, Boiler Switch and Heating Remote. You can turn the temperature up and down, boost the heating for an hour or simply turn it on/o .
- Page 18 2. (Intermediate): Smartphone Control from anywhere Required: Home Thermostat, Lightwave Link, Boiler Switch Installing a LightwaveRF Boiler Switch and linking it to a Lightwave Link and Home Thermostat allows you to control your home heating from anywhere using a smartphone or tablet. If you are staying late at work, you can turn o the heating so as not to waste energy, or turn it on in advance if coming back late on a cold night.
- Page 19 3. (Advanced): Zoned Heating Required: Home Thermostat, Link, Boiler Switch, TRVs With the LightwaveRF App and the Lightwave Link you can create an expandable zoned system that can take care of your entire home. Temperatures can be set for each room or ‘heating zone’, and heating can be planned week by week and room by room.
-
Page 20: Problem: Solution
Troubleshooting Problem: The Thermostat will not consistently operate remotely. Solution: The Remote/Thermostat/Lightwave Link may be encountering interference or may be at the edge of its reliable range of operation. First, ensure that there are no large pieces of metal or bodies of water in the path of the transmission. - Page 21 Yes. Please refer to www.lightwaverf.com for current device limits. Is it legal for me to install a LightwaveRF Thermostat myself? Yes, LightwaveRF products are fully legal to install in your own home. How long do the batteries last? This can vary, but up to one year can be expected with normal use and good quality batteries.
-
Page 22: Specification
Technical Specification Specification RF frequency: 868 MHz Batteries: 2 x 1.5V (AA) Warranty: 2 year standard warranty... - Page 23 Version 2 2 Quadrant Park Mundells Welwyn Garden City Herts AL7 1FS 01707 386035 www.lightwaverf.house...
Need help?
Do you have a question about the JSJSLW921 and is the answer not in the manual?
Questions and answers