Advertisement
Table of Contents
- 1 Safety Information
- 2 Charging the Battery
- 3 Installing the Memory Card
- 4 Operation
- 5 Play Mode
- 6 Video Recording Mode
- 7 Connecting a Video Source
- 8 Setting the Date and Time
- 9 Menu Button
- 10 Other Settings
- 11 The Settings
- 12 Software Version
- 13 Troubleshooting
- 14 Screen Symbols
- Download this manual
Advertisement
Table of Contents

Related Manuals for Sharper Image DigitNow

Summary of Contents for Sharper Image DigitNow
- Page 1 Manual Video Grabber...
- Page 2 Your Package Contains: 1. Video Grabber 2. 5 V power adapter 3. H D MI cable 4. RCA-cable 5. AV-cable 6. USB D ata / power Cable 7. Manual 8 .4G TF Card inside...
-
Page 3: Safety Information
Safety Information: 1. Carefully read and follow the manufacturer's instructions in this manual and save the manual for future reference. 2. Clean with a dry cloth only. 3. Do not use the product close to any heat source. 4. Unplug the product from the wall socket during lightning storms or when it is not being used. -
Page 4: Charging The Battery
Charging the Battery: The built-in battery can be charged in two ways: A Via the power mains B Via the computer's USB port Charge your Video Grabber for at least three minutes before turning it on. -
Page 5: Installing The Memory Card
Installing the Memory Card: TF card must be used. For optimal results, a memory card with speed class 10 is recommended. In order to remove the memory card, gently press inward and then carefully remove the card. Connections Outputs Inputs AV OUT HDMI OUT IN-R... -
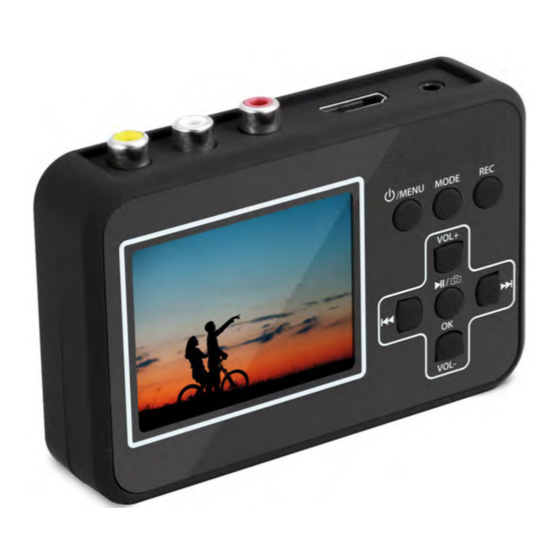
Page 6: Operation
Operation: Start/stop On/Off Select mode recording Menu The buttons within the VOL+ cross perform different functions depending on the mode selected VOL- Play mode: Increase the volume VOL+ Go back in Go forward in the file list the file list Lower the volume Start/stop VOL-... -
Page 7: Connecting A Video Source
Connecting a Video Source: Connect your Video Grabber to the video source in one of the following ways: Source Yellow Yellow CVBS White White AUDIO OUT - L AUDIO OUT - R Source Yellow White AV OUT LCD Monitor Other cables and adapters may also be used; however, such are not included with the Video Grabber. - Page 8 Starting Your Video Grabber: Make sure that the battery is charged and that the memory card is in place. Press the On/Off Menu button for approximately three seconds. VOL+ VOL- Upon being powered up, the Video Grabber starts off in video recording mode and the following information is shown on the display: Video format...
- Page 9 Settings in the Video Recording Mode Press the On/Off Menu button briefly once more to gain access to the settings. 00:51:09 VGA PAL VOL 4 VOL+ VOL- VOL+ VOL- Scroll between the various menu alternatives by using the VOL+ and VOL- buttons. 00:51:09 VGA PAL Press OK to gain access to...
- Page 10 00:51:09 VGA PAL VOL 4 VOL+ VOL- VOL+ VOL- Using the VOL- button, scroll down to: Date input Enter VOL+ VOL- Press OK to reveal an underlying menu. VOL+ VOL- Using the VOL- button, scroll down to: Set. Please note that the blue field is now highlighted.
-
Page 11: Setting The Date And Time
Setting the Date and Time In the video recording mode, briefly press the On/Off Menu button VOL+ VOL- Using the button, scroll down to the year. VOL+ VOL- Set the correct year by using the VOL- and VOL+ buttons. VOL+ VOL- Then use the button to... -
Page 12: Other Settings
Other Settings The other settings in the video recording menu are made in the same way as you set the time and date. The available settings are: Input video format (Size) VGA or QVGA Date and time visible on the recorded film (Time Stamp) This time can be set independently of the time set in the Vooni Video Grabber. - Page 13 Recording: 1. Connect your Video Grabber to the video source. 2. Turn on the video source. 3. Turn on your Video Grabber 4. Press the REC button to begin recording. The counter in the top right-hand corner of the screen turns red. 00:51:09 VGA PAL VOL 4...
-
Page 14: The Settings
Settings in Play Mode: Press the MODE button to select the play mode. 00:51:09 VGA PAL VOL 4 VOL+ VOL- Your Video Grabber is now in play mode. VOL+ VOL- Press the On/Off Menu button briefly once more to get to the settings. -
Page 15: Software Version
VOL+ Press OK to gain access to the underlying menu. VOL- VOL+ VOL- Using the VOL- button, scroll down to your desired alternative. Please note 1 1 3 that the blue field is now highlighted. VOL+ VOL- Press OK to save the The following settings can be settings and return to the made in play mode:... - Page 16 Playback VGA PAL 00:51:09 VOL 4 1. Turn on your Video Grabber VOL+ 2. Use the MODE button to select VOL- the play mode. Your Video Grabber is now in play mode. VOL+ VOL- 3. Select the desired film using the buttons.
- Page 17 Showing Recordings on TV You can connect your Video Grabber to a TV receiver via the AV cable (5) or by using an HDMI cable Yellow CVBS White AUDIO IN - L AUDIO IN - R 3.5 mm video output LCD Monitor If you want to connect to the HDMI on your TV,use the accompanying HDMI (3).
- Page 18 Copying to a Computer By connecting your Video Grabber to a computer,you can process your recorded films and images on the computer itself. A drive routine will automatically be installed onto your computer the first time you connect the device to your computer. Your Video Grabber then appears as a removable disc drive on the computer, so you can copy and rename, or delete your films.
-
Page 19: Troubleshooting
Grabber, the cables may be incorrectly connected or be connect too loosely. Screen Symbols Video recording Memory card mode Play mode Film Available button alternatives Press the On/Off Menu button Exit to leave the setting mode. Press OK to save your OK Set selected setting. . Battery-charge indicator http://www.digitnow.us...
Need help?
Do you have a question about the DigitNow and is the answer not in the manual?
Questions and answers