Table of Contents
Advertisement
ELECTRONIC VACUUM CLEANER
OPERATION MANUAL
Important
G Read this operation manual before operating the cleaner.
G Only individuals who have read this manual and fully understood its contents
may operate the cleaner.
G Follow all operation and maintenance instructions and carry out the daily and
periodic inspections as specified in this manual.
G Observe all applicable laws and regulations regarding the installation and
maintenance of the cleaner.
SERIES
Advertisement
Table of Contents

Related Manuals for Amano Cleam Mac V-Sigma


Summary of Contents for Amano Cleam Mac V-Sigma
- Page 1 ELECTRONIC VACUUM CLEANER SERIES OPERATION MANUAL Important G Read this operation manual before operating the cleaner. G Only individuals who have read this manual and fully understood its contents may operate the cleaner. G Follow all operation and maintenance instructions and carry out the daily and periodic inspections as specified in this manual.
-
Page 2: Important Safety Information
Important Safety Information The safety information in this manual is given in different terms depending on the kind and degree of danger. Before using the unit, be sure to read the safety information. Warning : Things or processes which may cause death or heavy injury if wrongly handled. Caution : Things or processes which may cause injury or physical damage if wrongly handled. - Page 3 The V-∑ series cleaner is designed to vacuum general types of dust that are not flammable or explosive. AMANO will not accept any responsibility for accidents or breakdowns caused as a result of the following misuse. • Fire or explosion caused by dust in the cleaner.
-
Page 4: Table Of Contents
Contents To Ensure Safe Use ........................ 1 Structure and Part Names .......................3 Exterior ..........................3 Control Panel ........................4 Setting Up ..........................5 Operating Environment ..................... 5 Connection of Hose and Pipes ...................5 Connecting the Power ......................7 Remote Control Setup ......................8 Differences between standard model and model with selector switch ......8 Note ........................... -
Page 5: To Ensure Safe Use
To Ensure Safe Use Before operating this equipment, please read and understand the following safety information. Warnings • Never use the vacuum to draw in any of the following materials. · Explosive, flammable dust ..Aluminum, magnesium, titanium, epoxy, organic solvents, etc. ·... - Page 6 Cautions • Always wear gloves when inspecting or changing the filter and other parts. Not wearing gloves may result in an injury or accident. • Do not leave the cleaner on an incline. Always park it on a level area of the floor. Leaving the cleaner on an incline may result in injury or accident.
-
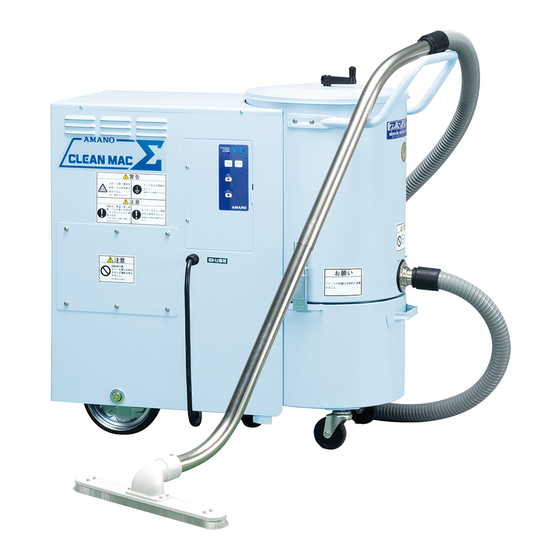
Page 7: Structure And Part Names
Structure and Part Names I Exterior Handle Tank cover Clamp Intake port Control panel Bucket handle Wheel Bucket Caster Manual handle Bucket handle : Use this handle to mount or remove the bucket. Tank cover : Remove the cover when you need to replace the filter, inspect the vibrator, or clean a (cloth) filter. -
Page 8: Control Panel
I Control Panel Operation Switch Use this switch to start and stop. Power Lamp Turns ON (green) when power is sup- plied and blinks (red) when there is a power failure. Filter Shaking Switch Enables you to shake the filter at will (only on automatic shakeout type). -
Page 9: Setting Up
Setting Up I Operating Environment Use the cleaner only in locations that meet the following conditions. Use of the cleaner in appropriate locations may result in poor performance or machine breakage. · Use the cleaner indoors only. It should not be directly exposed to rain, wind, or other adverse weather conditions. ·... - Page 10 3 Grasp the bucket handle and pull the bucket out toward you. 4 Gently lower the cleaner (by its handle) until it is resting on the floor. 5 Take the hose out of the bucket. 6 Once again, lift the cleaner by its handle, so that it is again leaning forward.
-
Page 11: Connecting The Power
Connecting the Power This cleaner requires a 3-phase power supply. Before connecting up the power, make sure that your power supply matches the power ratings given on the cleaner’s nameplate. Warnings • Be sure to use the rated voltage only. Do not place other loads on the same power outlet. -
Page 12: Remote Control Setup
To operate a standard model using remote control, because the selector switch is not included, order the switch from your dealer or an Amano branch office. I Differences between standard model and model with selector switch... -
Page 13: Note
I Note To operate the unit through remote control, perform the wiring and setup work described below. For Your Information • The wiring work for remote control must be performed by a licensed electrician. I Function The operation patterns described below can be selected by changing the settings of the levers 1 and 2 of the DIP switch (SW1), which is mounted on the control panel. -
Page 14: Wiring And Setup Work
I Wiring and Setup Work Checking • For wiring, use a shielded cable with a minimum thickness of 0.3 mm and a minimum withstand voltage of AC 250 V. • The wiring for the remote-control switch must not be longer than 10 m. •... - Page 15 For patterns B, C Selector switch (*1) Connect the wires while pressing these buttons. Shaking switch (*2) Operation OFF switch Operation ON switch Remote-control switch 10 m max. * 1: Closing the terminals No. 5 and 6 on the terminal block enables the unit to operate remotely. To operate remotely a standard model without a selector switch, use a jumper wire to close the terminals No.
-
Page 16: Operating The Cleaner
Operating the Cleaner Warnings • Never use the vacuum to draw in any of the following materials. · Explosive, flammable dust ..Aluminum, magnesium, titanium, epoxy, organic solvents, etc. · Combustible materials ... Gasoline, paint thinner, benzene, kerosene, paint, etc. ·... -
Page 17: Usage Precautions
I Usage Precautions Observe the following conditions during use. Failure to do so may cause the product to operate at reduced performance or lead to a failure or an accident. • This product is intended to be used as an industrial cleaner for collecting and recovering dust. Do not use it for purposes other than those intended. -
Page 18: If The Blower Fails To Start
I If the Blower Fails to Start The phase sequence of the three phases is improper if the “Power Lamp” blinks red at 1-second intervals while the blower motor remains stopped. In this case, you must use the following procedure to correct the problem. 1. -
Page 19: Usage Precautions
I Usage Precautions • Do not use the cleaner to vacuum up water. Vacuuming of water may result in breakage or electric shock. • Always use the handle to move the cleaner. Pulling the cleaner by the hose or by the power cord may damage the hose or cord, or may cause the cleaner to move in an unex- pected direction, resulting in accident. -
Page 20: Never Run The Cleaner With The Hose Blocked
I Never Run the Cleaner with the Hose Blocked Air brought in through the hose is used to cool the blower. Oper- ating the vacuum with the hose partially or completely blocked will cause the blower to heat up, reducing its service life and possibly leading to significant problems. -
Page 21: Central Cleaning Setup
Please con- sult Amano for advice before setting up the system. G Amano offers secondary air intake tubes that can prevent complete blockage. Installation of the secondary tube will protect against complete air blockage in the event that the system is accidentally operated with all valves closed. -
Page 22: Maintenance
Maintenance This section describes daily maintenance and component replacements required to keep the cleaner in good operating condi- tions. Warnings • Never insert or remove the power cable while your hand is wet. Doing so may result in electric shock. •... - Page 23 2. Shake out the filter. Rotate the manual shakeout handle approximately three turns to the left, and then three turns to the right. G Automatic Shakeout Models (when using molded filter) In most cases automatic shakeout provides adequate filter cleaning, so that no manual operation is required. But you can also apply additional shakeout as necessary by holding down the SHAKING switch.
- Page 24 G Filter Shakeout when using Cloth Filter If you are using a cloth filter, you must temporarily remove the filter and shake it out manually. 1. Switch off the blower motor. Press the switch to shut down the blower motor. Then wait 1 minute for the motor to stop before proceeding.
-
Page 25: Emptying The Bucket
I Emptying the Bucket Please complete filter shakeout before removing the bucket to discard the collected dust. Wait for a while after shaking out the filter so as to allow the dust some time to settle. 1. Switch off the blower motor. Press the switch to shut down the blower motor. -
Page 26: Discarding And Replacing Dust Packs (Optional)
I Discarding and Replacing Dust Packs (optional) Use of a dust pack helps you to avoid dust spillage that may otherwise occur when emptying the bucket. The dust pack holds dust in so that it cannot escape during disposal. 1. Remove the bucket. (Follow steps 1 to 3 of the procedure on the preceding page, “Emptying the Bucket.”) 2. -
Page 27: Replacing A Molded Filter
I Replacing a Molded Filter A molded filter should be replaced at least once a year, provided that it remains in good condition. Replace it immediately if inspection reveals that it is torn or damaged, or if shake cleaning fails to clear the filter apertures. 1. -
Page 28: Replacing A Cloth Filter (Models V-2∑ And V-3∑)
I Replacing a Cloth Filter (Models V-2∑ and V-3∑) A cloth filter should be replaced at least once a year, provided that it remains in good condition. Replace it immediately if inspection reveals that it torn or damaged, or if shake cleaning fails to clear the filter apertures. 1. -
Page 29: Replacing A Cloth Filter (Models V-5∑ And V-7∑)
I Replacing a Cloth Filter (Models V-5∑ and V-7∑) A cloth filter should be replaced at least once a year, provided that it remains in good condition. Replace it immediately if inspection reveals that it torn or damaged, or if shake cleaning fails to clear the filter apertures. 1. -
Page 30: Replacing The Floor Brush
I Replacing the Floor Brush Wearing or deformation of the floor brush can cause the cleaner to lose suction force. If the brush becomes worn or bent, replace it as follows. 1. Switch off the blower motor. Press the switch to shut down the blower motor. Wait 1 minute for the blower motor to stop. - Page 31 Check if the belt is broken and visually inspect the belt for Belt deterioration or cracks. (If the belt must be replaced, contact your dealer or an Amano branch office.) Measure the belt deflection [Proper deflection value] The belt should have 6–10 mm of deflection when 50 N of...
-
Page 32: Precautions On Motor Packing
* The cutout has been discontinued from January 2005. Motor Motor packing To replace a packing, order it from your dealer or an Amano branch office, using the part numbers listed below. Motor packing part numbers: Flange For V-2Σ: VJB-6057... -
Page 33: Troubleshooting
If the cleaner appears to operate abnormally, switch off the power immediately to ensure safety. Review the chart below to see if you can locate the cause of the problem. If repair is required, contact your dealer or an Amano branch office. -
Page 34: Periodic Inspection List
Periodic Inspection List Warning • Never attempt to modify this equipment. Modification may lead to fire or electric shock. Caution • Always unplug the power cable from the wall outlet before beginning inspection or maintenance work. Performing maintenance while the cable is connected may result in electric shock. Inspection Interval Part Daily Method... -
Page 35: List Of Consumable Parts And Options
List of Consumable Parts and Options G For V-2∑ and V-3∑ Part Name Part No. Remarks Span-bond filter VJA–250170 For general dust Molded Fine-fil filter VJA–251170 For fine and ultra-fine dust filters Antistatic filter VJA–255150 Anti-static type Cotton filter VJA–220150 For general dust with large amount of fibers Tetron filter VJA–221150... -
Page 36: Appendix
Appendix I Specifications V-2∑ V-3∑ 908×380×920 (W×L×H·mm) Dimensions 95Kg 104Kg Weight ø38mm Intake port diameter Collection capacity Polypropylene bags (mounting and bags sold separately) Dust pack 69dB(A) 72dB(A) Noise 3-phase power 50/60Hz (As specified on nameplate) Power supply 1.5kW 2.2kW Power consumption Air flow (m /min) -
Page 37: External Dimensions
I External Dimensions Unit : mm... -
Page 38: Wiring Diagrams
I Wiring Diagrams G Manual shaking Connect to 4 for V-7Σ 3-phase 200V Fan motor G Automatic shaking Connect to 4 for V-7Σ 3-phase 200V Fan motor Shaking motor M2 motor condenser... - Page 39 G Remote control type Connect to 4 for V-7Σ 3-phase 200V Fan motor Shaking motor M2 motor condenser Connection to 3 is not necessary when the 1. Fan ON shaking is manual 2. Fan OFF 3. Shaking ON/OFF Remote control terminals 4.
- Page 40 AMANO INTERNATIONAL TRADING (SHANGHAI) CO., LTD. Room No. 901, Zhongdian Mansion 1029 Nanquan Road.(N), Pudong, Shanghai, China 200122 AMANO TIME & AIR SINGAPORE PTE. LTD. (Head Office) No.1 Jalan Kilang Timor #02-01 Pacific Tech Centre, Singapore 159303 PT. AMANO INDONESIA Gedung Pusat Perfilman H.Usmar Ismail, Lantai 3 JL.H.R.Rasuna Said Kav.
Need help?
Do you have a question about the Cleam Mac V-Sigma and is the answer not in the manual?
Questions and answers