
Related Manuals for Spypoint Geopad

Summary of Contents for Spypoint Geopad
-
Page 1: User Manual
User manUal GeOPaD Hunting tablet support.spypoint.com tech@spypoint.com 1-888-779-7646 v1.1... - Page 2 This manual will guide you through all the features of your device so that you will get optimal use out of your SPYPOINT product. Our priority is to provide outstanding customer service. If you need support for your product, please contact the SPYPOINT technical support or visit our website. cOnTacT 1-888-779-7646 ...
-
Page 3: Table Of Contents
Table of contents in the box .................. 4 components ................4 Getting started ................6 mysPyPOinT app ..............8 Uploading new photos ............... 10 Configuring the advanced settings ..........11 Included applications ..............13 Managing applications ............... 14 Features ..................15 Installing the screen protector ........... -
Page 4: In The Box
In the box GEOPAD Quick start Screen guide protector SD card USB Cable reader Installation instructions at page 16. Components Front camera SD card reader holder Adjustable strap Speaker USB port/SD card reader Microphone 1/8" audio output jack... - Page 5 frOnT rear BOTTOm siDes...
-
Page 6: Getting Started
Getting started charGinG The TaBleT Using the included USB cable, connect the GEOPAD to a USB power source. It is recommended to charge the tablet completely before first use. TUrninG The TaBleT On/Off To turn the tablet on: Press the power button and hold it until the SPYPOINT logo appears. -
Page 7: Home Screen
hOme screen App icon - Your favorite hunting apps. Tap on the icon to open Back - Returns to the previous page home - Returns to the home screen Recent - Displays recently used apps that are still open all apps - Shows all your apps Time Battery level Brightness control... -
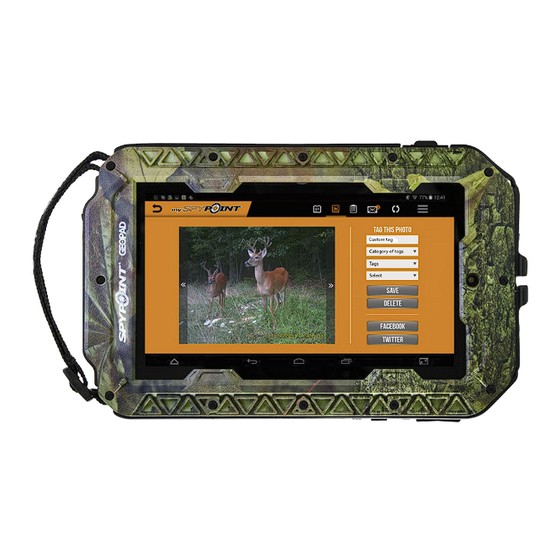
Page 8: Myspypoint App
Online acTivaTiOn Of yOUr mysPyPOinT accOUnT (The mySPYPOINT app & online account are for SPYPOINT trail cameras only) Make sure your GEOPAD is connected to a Wi-Fi network to access the mySPYPOINT website and to do a synchronisation. - Page 9 When a Wi-Fi network is available, tap on cameras and about the last synchro- this icon to apply the last changes to your nization to your mySPYPOINT online mySPYPOINT online account account It is highly recommended that the GEOPAD be fully charged before the first synchronization.
-
Page 10: Uploading New Photos
Your photos will automatically be organized by date and time in the calendar. UPlOaDinG PhOTOs DirecTly inTO The GeOPaD After inserting the SD card, tap on “All apps” Tap on the “Files manager” icon. -
Page 11: Configuring The Advanced Settings
Photos are now available in the GEOPAD’s gallery. It is important to remove the SD card after copying the files. For more information on how to upload new photos, please refer to the tutorial videos on the GEOPAD web page under the “Documentations” tab. - Page 12 The GPs siGnal To allow the GeOPAD to acquire the GPS signal, the sleep delay must be increased. Under “Device”, tap on “Display”. Then, tap on “Sleep”. Finally, choose a sleep delay of at least 5 minutes.
-
Page 13: Included Applications
Allows you to access a wide range of maps; roads, topographic, aerial imagery, google maps, and much more. Once opened, the maps remain available without Wi-Fi access. For more information on the location-based apps, please refer to the documents on the GEOPAD web page under the “Documentations” tab Games... -
Page 14: Managing Applications
Managing applications aDDinG neW aPPs Go to Google Play store An active account with Google Play is necessary Shop for games or applications Tap “install” After the installation, the app icon will appear in “All apps” and will be ready to use UninsTallinG aPPs In the settings menu, under “Device”, tap on “Apps”. -
Page 15: Features
To the question “Do you want to uninstall this app?”, tap on “OK”. The app is now uninstalled from the GEOPAD. Features Screen 7” Platform 4.4.2 Android internal memory 8 GB Resolution 1024 x 600 CPU processor speed 1.3GHz RAM size... -
Page 16: Installing The Screen Protector
Peel off the protective film #1 to expose the sticky side. Align the screen protector to the GEOPAD. As the protector is being applied, use a credit card to push out excess air. Peel off the protective film #2. -
Page 17: Troubleshooting
Troubleshooting Problems Possible solutions The mySPYPOINT synchronisa- • When the GeOPAD is connected with the tion never stops downloading USB cable during the mySPYPOINT app’s first synchronisation, the down load goes on without completing. • Tap on the "Recent" icon and close the mySPYPOINT app. -
Page 18: Limited Warranty
Limited warranty and repair limiTeD WarranTy This SPYPOINT product designed by GG Telecom, is covered by a one (1) year warranty on material and workmanship starting from the original date of purchase. The sales receipt is the client’s proof of purchase and must be presented if warranty service is needed. -
Page 19: Regulation
The customer is liable for loss or damage to the product that may occur during the transport to GG Telecom. We recommend the use of a traceable method of shipping to ensure protection. WWW.sPyPOinT.cOm Regulation FCC Part l5 This equipment has been tested and found to comply with the limitsfor a Class B digital device, pursuant to Part 15 of the Federal Communi- cations Commission (FCC) rules.
Need help?
Do you have a question about the Geopad and is the answer not in the manual?
Questions and answers