
Related Manuals for General PCS55

Summary of Contents for General PCS55
- Page 1 The PalmScope ™ COMPACT RUGGED VIDEO INSPECTION SYSTEM USER’S MANUAL Please read this manual carefully and thoroughly before using this product.
-
Page 2: Table Of Contents
TABLE OF CONTENTS Introduction ... . 3 – 4 Key Features ....5 Safety Instructions ..5 – 6 What’s in the Package . -
Page 3: Introduction
INTRODUCTION Thank you for purchasing General Tools & Instruments’ PCS55 Compact Rugged Video Inspection System (The PalmScope ™ ). Please read this user’s manual carefully and thoroughly before using the instrument. The PalmScope is more than just the smallest full-featured video inspection system available today. - Page 4 Other general automotive applications include inspecting hard-to-reach or hard-to-see areas of the engine compartment or undercarriage. The PalmScope has only five control buttons (power on/off, brightness up, brightness down, video zoom, and video flip), making it very easy to learn to use.
-
Page 5: Key Features
KEY FEATURES • Fits in your pocket or clips to your belt • Probe coils inside case for storage • Drop-proof from height of 1m (39 in.) • Long, flexible-obedient probe with 9mm diameter camera head penetrates tight, hard-to-reach spaces •... -
Page 6: What's In The Package
Never use the system to perform medical inspections. WHAT’S IN THE PACKAGE The PalmScope and its accessories come in a blister pack. In addition to the instrument, the package contains: • A plastic bag containing the four probe tip accessories: the 45° mirror, pickup hook, magnetic pickup, and thread protector •... - Page 7 Fig. 1. The PalmScope, the four probe tip accessories, and the nylon pouch with belt clip Inside the pouch is a small plastic bag containing the following probe tip accessories: A. Pickup hook B. 45° mirror C. Magnetic pickup D. Thread protector...
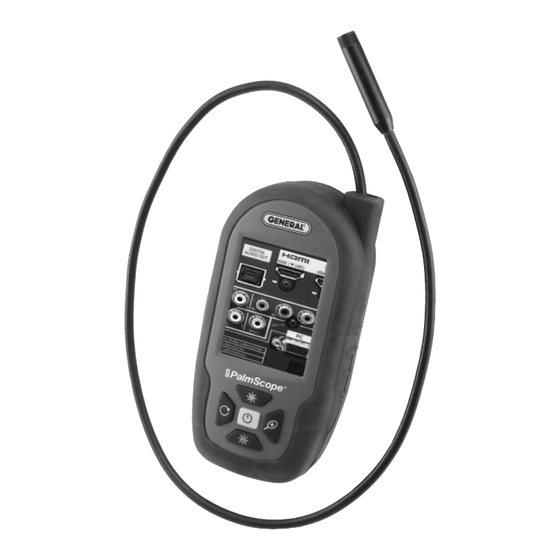
- Page 8 Fig. 2. The controls, indicators and back of The PalmScope A. LCD button. Increases brightness of LED lights button. Inverts video 180° button. Powers unit on and off button. Enlarges video frame up to 4X. Each button press increases zoom level by factor of 0.5 button.
-
Page 9: Setup Instructions
L. Clamshell latches M. Battery compartment N. Battery compartment screws SETUP INSTRUCTIONS INSTALL BATTERIES The PalmScope’s battery compartment (Fig. 2, Callout M) is accessible from the back of the unit. To install batteries, Use a Phillips-head screwdriver to loosen the two screws securing the battery compartment cover (Fig. -
Page 10: Prepare The Probe
PREPARE THE PROBE To gain access to the probe, flip the PalmScope over so its back faces you, place your thumb and index finger at the positions marked OPEN (Fig. 2, Callout L), and gently squeeze the latches (see figure above). The clamshell case will pop open. - Page 11 Each length incurs a tradeoff of probe reach vs. probe rigidity. A longer probe is obviously better for inspecting distant objects. But when uncoiled to its maximum length of 24 in., the probe sags from its own weight, preventing it from being extended horizontally.
- Page 12 To re-coil the probe, begin by holding the unit in front of you as shown in the first photo of the sequence below. Take care that the lanyard does not accidentally get tangled up with the probe as you coil it. If you chose the shorter probe length, you will not have to wrap the unextended probe section at all.
- Page 13 Before squeezing the two halves of the clamshell together to close it, check that the entire length of the probe section inside the clamshell is within the channel and that the camera head (the thicker end of the probe) is within both semicircular sections of the top of the housing comprising the probe’s exit port (Fig.
- Page 14 For this reason it is especially important that the probe is wrapped tightly and remains within the helical channel without “crossing over” the channel boundaries. Before squeezing the two halves of the clamshell together to close it, check that the entire probe is within the channel and that the camera head is within both semicircular sections of the exit port.
-
Page 15: Attach Thread Protector Or Accessory
clamshell is not properly closed until you hear the latches snap. It’s important to note that when re- coiling the probe from either its short or long extended length, you must wrap it very tightly within the channel. If the camera head has not cleared the probe exit port as you finish wrapping the... -
Page 16: Operating Instructions
• The magnetic pickup lets you retrieve lost or dropped metal objects—nuts and bolts, for example—located by the probe. • The thread protector keeps the camera head and its threads from being scratched or damaged by anything the probe bumps into. Attach the thread protector before you use The PalmScope for the first time. - Page 17 3. Press and hold the button (Fig. 2, Callout D) for at least 3 seconds to power on the unit and illuminate the LCD. 4. Point the camera-tipped end of the probe at the target of interest, pushing the probe through holes or bending the probe around objects if necessary.
- Page 18 bottom right of the screen. Push the button several times to zoom in closer at a level of 2.0X, 2.5X, 3.0X, 3.5X and 4.0X. The next push of the button reverts to normal size (1X) viewing. To power off The PalmScope, press and hold the button for at least 3 seconds.
-
Page 19: Specifications
SPECIFICATIONS Display Size/Type: 2.7 in. (686mm) diagonal TFT color LCD Display Resolution: 320 x 240 pixels Monitor Controls: 180° flip, 1X to 4X zoom in 6 steps, brightness + and – Camera Head Diameter: 9mm (0.35 in.) Probe Length & Type: 2 ft. (0.6m) flexible-obedient Camera Field of View: 60°... -
Page 20: Maintenance Tips
MAINTENANCE TIPS • The camera at the tip of the probe is a sensitive, sophisticated device. Do not use the probe as a hammer or to clear debris. • Do not insert or bend the probe by force. Over-bending any section of the probe to a radius of less than 2 in. -
Page 21: Warranty Information
The defective unit must be returned to General Tools & Instruments or to a General-authorized service center, freight prepaid and insured. -
Page 22: Return For Repair Policy
In no event shall General be liable for any incidental, special, consequential or punitive damages, or for any cost, attorneys’ fees, expenses, or losses alleged to be a... - Page 23 Service Center at this address: General Tools & Instruments 80 White Street New York, NY 10013 212-431-6100 Remember to include a copy of your proof of purchase, your return address, and your phone number and/or e-mail...
- Page 24 New York, NY 10013-3567 PHONE (212) 431-6100 FAX (212) 431-6499 TOLL FREE (800) 697-8665 e-mail: sales@generaltools.com www.generaltools.com PCS55 User’s Manual Specifications subject to change without notice ©2013 GENERAL TOOLS & INSTRUMENTS NOTICE - WE ARE NOT RESPONSIBLE FOR TYPOGRAPHICAL ERRORS.
Need help?
Do you have a question about the PCS55 and is the answer not in the manual?
Questions and answers