Table of Contents
Advertisement
Quick Links
Advertisement
Table of Contents

Related Manuals for Eventide H9


Summary of Contents for Eventide H9
- Page 1 H9 Harmonizer User Guide...
-
Page 2: Warnings
WARNINGS Use only with supplied power supply. Avoid spilling liquids onto/into the unit. Do not expose to excessive heat or moisture. Do not open – there are no user serviceable parts inside. This equipment has been tested and found to comply with the limits for a Class B digital device pursuant to Part 15 of FCC rules. - Page 3 Eventide and Harmonizer are registered trademarks of Eventide Inc. iPod, iPhone, iPad and iOS are trademarks of Apple Inc., registered in the U.S. and other countries. “Made for iPod,” “Made for iPhone,” and “Made for iPad” mean that an electronic accessory has been designed to connect specifically to iPod, iPhone, or iPad, respectively, and has been certified by the developer to meet Apple performance standards.
-
Page 4: Table Of Contents
ETUPS Guitar > H9 > Amp - Mono In/Mono Out ........... 12 Guitar > H9 > Amp 1/Amp2 – Mono or Stereo In/Stereo Out ....12 Guitar > Amp Effects Send > H9 > Amp Effects Return ....... 12 Mixer Effects Send> H9 > Mixer Effects Return .......... 12 SETTING LEVELS ................... - Page 5 ................15 ELAY YPASS YPASS DSP+FX B ....................15 YPASS ..................15 ELECTING YPASS – S ................16 ILLDRY ETURN PRESETS, ALGORITHMS, PARAMETERS ............17 ......................17 RESETS .................... 17 ELECTING RESETS Select/Cue/Load ..................17 Select/Load Instantly .................. 17 ................17 DJUSTING RESET ARAMETERS...
- Page 6 [BLUE] – B ................32 LUETOOTH ETTINGS [PIN] – Number for Pairing with your iOS Device ........32 [NAME] – Your H9’s Bluetooth Name (H9-xxxx) ......... 32 [BYPASS] – S ............... 32 ELECT YPASS [BYPTYP] – Choose Bypass Type (DSP, RELAY, DSP+FX) ......33 [KILDRY] –...
- Page 7 [PDLCAL] – Expression Pedal Calibrate (ON, OFF) ........43 [EXPTIP] – Select function of Auxiliary Switch Tip [SWITCH, PEDAL] ..44 [SER*] – Serial Number (H9-xxxxx) ............. 44 [SW VER] - Software Version ..............44 RESTORING FACTORY SETTINGS/SOFTWARE UPDATES ........ 45 ..............
-
Page 8: Introduction
We’ve worked hard to make the H9 easy to use. We’ve done our best to design an intuitive User Interface to manage and control it. We hope that you will take the time to master it. -
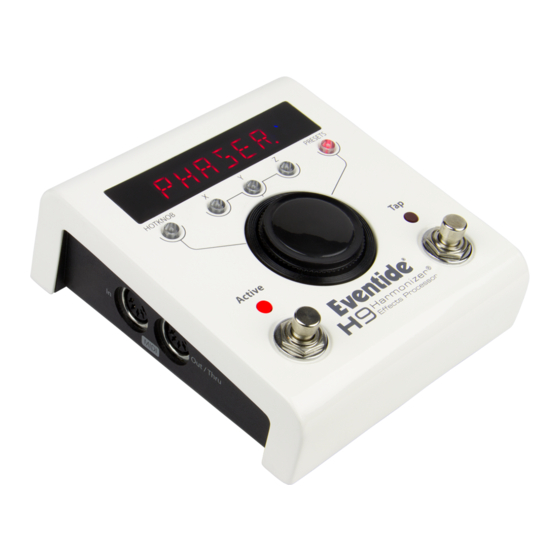
Page 9: Product View And Functions
H9 User Guide The Basics The Basics There are a few basic concepts that you’ll have to grasp to use the H9 successfully. If you read nothing else, please read this section. Bluetooth H9’s Bluetooth function allows you to wirelessly control your H9 from an iOS device or a Windows or Mac computer. -
Page 10: The Algorithms
The Basics The Algorithms The H9 offers a wide range of effects and can hold 99 Presets based on these effects. Each of these effects is based on a unique algorithm. An algorithm is the underlying signal processing structure of the effect – the signal processing software that creates the effect and determines the ways in which the effect can be controlled (the algorithm’s “parameters”). -
Page 11: Hotknob Button
H9 User Guide The Basics judged to be ‘most important’ by the Preset creator. All of our algorithms however have more than three parameters. To access additional parameters, press and hold one of the buttons. “EXPERT” will display. Repeatedly pressing the button will step through all of the parameters for the current Preset. -
Page 12: The Footswitches
H9 User Guide The Basics The Footswitches The Footswitches have several functions: Active/Bypass Select/Cueing Presets Tap Tempo Enable Tuner Setting Levels (See Setting Levels for details) The Left Footswitch is used to bypass/enable the effect or to load a cued preset: To bypass the currently loaded Preset, press the Left Footswitch. -
Page 13: Using The Right Footswitch To Tap Tempo Or Parameter Values
‘in tune’. The display shows the note. Press either footswitch to exit. H9 Power Up When the H9 turns on it remembers what it was last doing and powers up in the same mode, running the same Preset, with the same parameter values, same tempo, same system settings, etc. -
Page 14: Connections
4dBU before clipping. The H9 can be connected directly to your guitar, in series with one or more pedals, in your Amp’s effects loop or to your mixer’s send/return or insert. Given the variety of guitars, effects pedals, amps and mixers, we can’t describe a ‘best’... -
Page 15: Mono/Stereo
Guitar > H9 > Amp - Mono In/Mono Out This is the simplest way to connect the H9. Connect your guitar cable to the H9’s Input 1 and a cable from the H9’s Output 1 to your amp. Input and Output Levels should be adjusted for best performance –... -
Page 16: Setting Levels
Input level is adjusted for best audio performance. For example, the H9 may be connected to a guitar with low level pickups and the guitar signal will not be ‘hot’ enough and the H9 will sound noisy. In this case you’ll want to increase the H9’s input level (input gain). -
Page 17: Input And Output Swell
H9 User Guide Setting Levels Input and Output Swell The expression pedal can be used to give a volume swell, either before or after the effect. This globally can be enabled either , meaning it is active all the time, or on a preset by preset basis. -
Page 18: Bypass
Non-instrument inputs are often low impedance (typically <10k ohm) and will load the guitar output and change its tone. DSP Bypass allows the H9 to act as a buffer, providing a low impedance output (500 ohm) capable of driving any device input or cable length. -
Page 19: Killdry - Send/Return Loop
H9’s Killdry feature can be enabled. When Killdry is enabled, the H9 does not send any dry signal to the outputs; only the Effect. Note that when Killdry is enabled, Bypassing will mute the Effect rather than Bypass it when DSP Bypass is selected. -
Page 20: Presets, Algorithms, Parameters
“Feedback” then, when the Preset is recalled, the X Knob will be set to control “Feedback.” ** Note: The H9 can be set up to change the Tempo value when a Preset is loaded or to ignore the value saved with the Preset. While Tempo values are always saved with the Preset, you may prefer to have your current Tempo stay the same as you switch from Preset to Preset. -
Page 21: Edited Preset Indication
Preset will not be saved. This is intentional. When you save a new Preset, you overwrite the old Preset. The H9 is designed to assure that saving is a deliberate act. The Preset number corresponding to the currently running Preset will flash as a warning that saving in this location will overwrite the currently loaded Preset. -
Page 22: Organizing Your Presets
Active Presets The H9 holds 99 Presets (1 to 99). 99 presets may be more than you need. If you’d like to make it quicker and easier to find and load your Presets, the number of active Presets can be reduced. -
Page 23: Algorithms & Their Parameters
Presets, Algorithms, Parameters Algorithms & their Parameters There are more than 40 algorithms available for the H9. Each algorithm is a unique set of audio processing modules with parametric controls. The algorithms and their parameters are described in the H9 Algorithm Guide. -
Page 24: Tempo
H9 User Guide Tempo Tempo Tempo ON/OFF Tempo is turned ON/OFF by simultaneously pressing the Right Footswitch and the PRESETS button. With Tempo OFF, tapping can be used to adjust delay parameter values (displayed as milliseconds or Hz). With Tempo ON, tempo is in BPM. -
Page 25: Tuner
With the LightRing lit at twelve o’clock you’re in tune. Press either Footswitch to exit. When the Tuner is enabled the H9’s audio output is normally muted – this is the default setting. If instead you prefer you can set the H9 to [BYPASS] directly connecting the H9’s input to its output. -
Page 26: Hotknob
(e.g. [MIX]) or [HOT+] if multiple parameters are assigned. Tip: H9 Control’s Ribbon also works in parallel with the HOTKNOB and Expression Pedal. Program one and you’ve programmed all three. Creating a HOTKNOB Patch To enter HOTKNOB patch mode - press and hold the HOTKNOB button for 2 seconds. -
Page 27: Save Hotknob Patch
H9 User Guide HOTKNOB & Expression Pedal Save HOTKNOB Patch Press and Hold the PRESETS button to save the Preset with your HOTKNOB patch assignment. Clear a HOTKNOB Patch To completely clear a HOTKNOB patch, Press the HOTKNOB button. The HOTKNOB switch LED will come on. -
Page 28: Expression Pedal
If you hear a “hum” only when you’ve connected a control voltage source to the H9’s Expression Pedal input jack, then it is likely that the device generating the control voltage is grounded to a different ground than your audio inputs and outputs. -
Page 29: Auxiliary Switches
7) Press and hold the HOTKNOB button and Right Footswitch simultaneously for a few seconds to exit System Mode. The Aux Switches do not disable the H9’s Footswitches – the local Footswitches are always active. Aux Switches can be programmed to perform a number of functions and they make it easy to connect a dedicated Tap Tempo switch or Performance Switch (Infinite Repeat, Flex, Fast/Slow, Learn) or Preset/Decrement Switch, etc. -
Page 30: Midi
Dump (Backup)/Load (Restore) Presets and/or system settings to/from a computer Control BYPASS/ACTIVE status using MIDI program change H9 automatically selects either USB or DIN5 as MIDI Inputs and Outputs. If USB is connected, DIN5 MIDI activity (including MIDI thru) is ignored. MIDI setup is described in System Mode... -
Page 31: Dump (Back-Up) Presets & System Settings
Exclusive Message that can be sent from the H9 and recorded by a MIDI sequencer or computer. The H9’s Presets and System Settings can then be restored at a later time. This is a useful way to backup saved settings or to reconfigure the unit as it was on your previous project. -
Page 32: Routing
System Mode Routing In most cases, the H9 will be connected in one of the ways described earlier. For more advanced users, it offers a number of extra routing modes, which control the functions of the inputs and outputs. These are usually associated with dedicated wiring and amplifiers and can be selected from the UTILITY/ROUTING section of System Mode. -
Page 33: Wet/Dry (Wet.dry,Stereo)
H9 User Guide System Mode Wet/Dry (WET.DRY,STEREO) In wet dry mode, either one or two inputs can be used. One output will be dry, meaning that the output is the same as the input (or mix if two inputs are used), whereas the other will be wet, using a mono output version of the effect. -
Page 34: System Mode
H9 User Guide System Mode System Mode System Mode is used for settings that affect the overall system such as the Bypass, Aux Switch, MIDI, etc. To Enter/Exit System Mode Press and hold the HOTKNOB button and Right Footswitch simultaneously for a few seconds to enter and exit the System Mode. -
Page 35: System Menu Tree
This is your H9’s “Bluetooth” name that will be displayed on your iOS device. The default name is H9 followed by your H9’s serial number. Note that the NAME is truncated – press the Right Footswitch to traverse the full name. -
Page 36: [Byptyp] - Choose Bypass Type (Dsp, Relay, Dsp+Fx)
Press the HOTKNOB button to select. Turn Knob to enable/disable [KILDRY]. When [KILDRY] is enabled (YES), the dry signal is removed from the output and the H9 only outputs a 100% wet level. For some of the Presets the Intensity control acts as a Wet/Dry Mix control. - Page 37 “Knobs.” KB0-KB9 correspond to the ten parameters of the currently running algorithm. For example, if a Preset based on the Dual Delay algorithm is currently running, KB0 corresponds to the “MIX” parameter. If the H9 is running a Preset based on the Rotary algorithm, KB0 corresponds to the “INTENSITY” parameter.
-
Page 38: [Midi] - Midi Functions
H9 User Guide System Mode Note: When a Preset is loaded, the switches assume the MIN VAL for the assigned parameters. Pressing the switch for the first time after a Preset load, will change the parameter to MAX VAL. To Setup the External Control Source Press the Right Footswitch to select one of three Aux Switches. -
Page 39: [Rcv.ctl] - Receive Continuous Control Message
HOTKNOB (any combination of parameters) and system control. The idea is to first select the H9 parameter or function that you want to externally control (Mix for example) and then select either MIDI Bend or the MIDI CC with which you want to control it. -
Page 40: [Xmt Cc] - Expression Pedal/Aux Switch Transmit Midi Continuous Control
[XMT CC] – Expression Pedal/Aux Switch transmit MIDI Continuous Control The H9’s Expression Pedal and Aux Switches can be used as MIDI controllers. Here’s how it works: Press the HOTKNOB button to select [XMT CC]. You will see two fields (split display) with the left side of the display showing the Control Source and the right side the Destination. - Page 41 Aux Switch Ring [T+R] Aux Switch Tip+Ring Note: Assigning parameter knobs (KB0-KB9) allow you send MIDI messages ‘through’ the H9 when using H9 Control. To Assign the Control Source to a Destination Press the Right Footswitch to select the MIDI Continuous Control that will be assigned to the H9 Control Source.
-
Page 42: [Rcv.map] - Create A Midi Program Change Receive Map
System Mode [RCV.MAP] – Create a MIDI Program Change Receive Map MIDI maps are an efficient way to instantly recall any of the H9’s Presets using your favorite MIDI controller (pedal board, sequencer, etc.). Press the HOTKNOB button to select and create a MIDI Program Change Receive Map. -
Page 43: [Ctl.xmt] - Midi Continuous Controller Transmit Enable (On, Off)
Press the Right Footswitch to select Prg No. field (indicated by the flashing Right Footswitch LED), turn the Encoder to select the corresponding number. Note: MIDI Program Change Transmit must be enabled in order for the H9 to transmit Program Change messages. MIDI Program Change Transmit is turned ON or OFF in the MIDI menu. -
Page 44: [Output] - Midi Transmit/Thru Select (Xmt, Thru, Thru+C, Merge)
Press the HOTKNOB button to select. Turn the Knob to set MIDI Clock Filtering ON or OFF. If ON, H9 can be used with an unstable MIDI Clock source, but will be slower and less precise at tracking clock speed changes. -
Page 45: [Global] - Global Settings
Press the HOTKNOB button to select. Turn the Encoder to choose BYPASS or MUTE. When BYPASS is selected, whenever the H9’s tuner is enabled, the audio input is connected to audio out. When MUTE is selected, audio is muted when tuning. -
Page 46: [Calbrt] - Calibrate Tuner's Reference Frequency (440 Hz)
H9 User Guide System Mode [CALBRT] – Calibrate Tuner’s Reference Frequency (440 Hz) Press the HOTKNOB button to select. Turn the Encoder to adjust the Tuner’s reference frequency from 420 Hz to 460 Hz. 440 Hz standard is the default. This value will also establish the ‘A’... -
Page 47: [Exptip] - Select Function Of Auxiliary Switch Tip [Switch, Pedal]
Press the PRESETS button twice to go to top level System menu. [SER*] – Serial Number (H9-xxxxx) Press the HOTKNOB button to display your H9’s unique serial number. The five digit number will scroll by. You’ll need to know this number to request support and to download software updates. -
Page 48: Restoring Factory Settings/Software Updates
The H9’s software can be upgraded over Bluetooth, USB or MIDI. To use USB, the USB connection to the computer must be in place before powering up or the H9 will default to MIDI. Information on software updating can be found at www.eventide.com. -
Page 49: Midi Implementation Chart
H9 User Guide MIDI Implementation Chart MIDI Implementation Chart Mode 1: Omni On, Poly Mode 2: Omni On, Mono O=Yes Mode 3: Omni Off, Poly Mode 4: Omni Off, Mono X=No Function Transmitted Recognized Remarks Default 1-16 1-16 Basic Channel... -
Page 50: Specifications
H9 User Guide Specifications Specifications Analog I/O Input Impedance 600K ohms (mono or stereo) Output Impedance 470 ohms Recommended Load Impedance 10K ohms or greater Connectors Input 1 (mono) - ¼ inch mono phone jack Input 2 - ¼ inch mono phone jack Output 1 (mono) –... -
Page 51: Limited Warranty
The warranty applies to the original purchaser of a new unit from Eventide or an Authorized Eventide Dealer. It is your responsibility to prove or to be able to prove that you have purchased the unit under circumstances which affect the warranty. A copy of your purchase invoice is normally necessary and sufficient for this. - Page 52 H9 User Guide Limited Warranty You are responsible for getting the unit to our door at no cost to us. We cannot accept collect or COD shipments. We will return the unit to you prepaid, at our expense, using an expeditious shipping method, normally United Parcel Service.
Need help?
Do you have a question about the H9 and is the answer not in the manual?
Questions and answers