Table of Contents
Advertisement
Quick Links
Download this manual
See also:
Owner's Manual
Advertisement
Table of Contents
Troubleshooting

Subscribe to Our Youtube Channel
Related Manuals for SuperMax 19-38

Summary of Contents for SuperMax 19-38
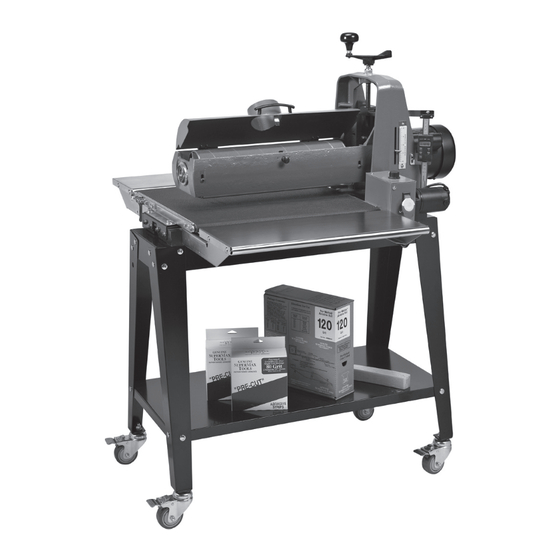
- Page 1 Keep Th is Manual Handy For Quick Reference Owner’s Manual 19-38 Drum Sander IMPORTANT: BEFORE OPERATING YOUR DRUM SANDER READ THE INSTRUCTIONS IN THIS MANUAL FOR UNPACKING AND SETTING UP YOUR MACHINE. (Shown with optional accessories)
- Page 2 • Always feed stock against the drum rotation. maximum performance. • Never place hands or fi ngers under the drum Your 19-38 Drum Sander will pay you back many fold or dust cover. in the years ahead by helping you get better results •...
-
Page 3: Table Of Contents
PERATING UPER Warranty Info ......... 26 Basic Operating Procedures ...... 8 SuperMax Accessories & Supplies ..27 Adjusting Tension Rollers ......8 Selecting Conveyor Feed Rates ....9 Setting Drum Depth of Cut ..... 9 Using Th e Depth Gauge ......9 Monthly Maintenance ...... - Page 4 Th e SuperMax system is basically made up of: 1) a height adjustment handle which raises and lowers the Fig. 1 S nomenclature.
-
Page 5: About The Supermax System
7. Using handle, raise sanding head to high position and remove packing block from under carriage Your 19-38 Drum sander has been shipped mostly arm and motor, if so equipped. (Fig 4) assembled from the factory. If any damage has occurred as a result of shipment, notify the transportation 8. -
Page 6: Connecting Dust Collectors
(page 12) will help assure trouble-free service. Connecting Dust Collectors Dust collection is necessary for all models. Th e 19-38 is equipped with one 4” diameter dust exhaust port at the Fig. 4A Install knob top of the cover. -
Page 7: Checking Height Adjustment
Setting Up Your SuperMax Height Adjustment are necessary, follow the instructions below: Belt tracking adjustments are made while the conveyor Th e drum height is controlled by the height adjustment belt is running. With the conveyor unit on and set at handle (Fig.5). -
Page 8: Basic Operating Procedures
When properly set, the the unit. Tension Rollers should engage or raise up about 1/8” Th e SuperMax off ers considerable control and to accommodate the stock being brushed. versatility through variable feed rates and abrasive Tension Roller Pressure selections. -
Page 9: Selecting Conveyor Feed Rates
Operating Your SuperMax revolution at a time. (See Fig 11). INTELLISAND is operating. (Fig. 11 a) When the load is decreased, INTELLISAND will automatically Tension Roller Pressure increase the feed rate to the pre-selected speed. Th e tension rollers are factory set for the most versatile use. -
Page 10: Monthly Maintenance
Dust Collection. When connecting dust collectors, remember that straight pipe will not restrict airfl ow Th e versatility designed into the 19-38 Drum Sander as much as fl exible tubing. Also, Ys and elbows will allows it to be used for a wide-ranging variety of restrict airfl ow less than Ts. - Page 11 WARNING: Do Not Re-wire machine to 220 volt Th e 19-38 sander is equipped with a “Fast Lever” adjuster mechanism that allows easy changing of the drum alignment in relationship to the conveyor without changing the initial drum alignment.
-
Page 12: Abrasive Selection Guide
19-38 Drum Owner’s Manual Abrasive Selection Guide Grit Common Application 24 Grit Abrasive planing, surfacing rough-sawn boards, maximum stock removal, glue removal. 36 Grit Abrasive planing, surfacing rough-sawn boards, maximum stock removal, glue removal. 50 Grit Surfacing and dimensioning boards, trueing warped boards. -
Page 13: Wrapping Abrasive Strips
SuperMax Tools drum sander. Abrasive strips do not (Fig. 16G). After inserting the strip end, release the have to be pre-measured. Th e end of the roll is fi rst... - Page 14 19-38 Drum Owner’s Manual Fig. 16B Trim about 3” from end of cut taper. Fig. 16C Trimmed tapered end ready to install. Fig. 16D Insert tapered end into outboard slot. Fig. 16E Wrap strip around drum without overlap. Fig. 16F Mark strip where it crosses drum edge.
-
Page 15: Replacing Conveyor Belts
Operating Your SuperMax Replacing Conveyor Belts Conveyor Belt Tracking: Belt tracking adjustments To replace the conveyor belt, the conveyor assembly are made while the conveyor belt is running. After must be removed from the machine. Raise the the proper belt tension is obtained (see above), turn... -
Page 16: Troubleshooting Your
19-38 Drum Owner’s Manual Troubleshooting Your SuperBrush Any operating problems with the SuperBrush check the following listings for potential causes will likely occur most often during the period that and solutions; it may also pay to review the you are becoming familiar with its components and previous sections in this manual on setting up and their adjustments. -
Page 17: Troubleshooting Guide: Conveyor
Troubleshooting Your SuperMax Troubleshooting Guide: Conveyor ROBLEM OSSIBLE AUSE OLUTION Conveyor rollers run 1. Shaft coupling loose. Align shaft fl ats of gear motor intermittently. and drive roller; tighten shaft coupling set screws. Conveyor belt slips 1. Improper conveyor belt Adjust belt tension (page 15). -
Page 18: Troubleshooting Guide: Machine
19-38 Drum Owner’s Manual Troubleshooting Guide: Machine ROBLEM OSSIBLE AUSE OLUTION Drum height adjustment 1. Improper adjustment of Readjust height control works improperly. height control. Knocking sound 1. Bearing worn. Replace bearing while running. Contact dealer Sniping of wood 1. -
Page 19: Electrical Diagram
Wiring Diagram ... -
Page 20: Uper Ax Echnical Ata Parts List For Head Assembly
19-38 Drum Owner’s Manual Index Part Description Size Qty. 1 ..480DS-101 ....Motor ....................... 1 ... 480DS-101MFC .... Motor Fan Cover ..................1 2 ..480BS-134 ....Strain Relief, motor .........7N-2 ......... 1 3 ..480DS-103 ....Main Cord, Motor to Control Box.............. 1 4 .. - Page 21 SuperMax Head Assembly Parts List Index Part Description Size Qty. 55 ..480BS-155 ....Tension Roller Bracket, Inner Left ............1 56 ..480BS-156 ....Screw .............#8-32x1”........4 57 ..480BS-157 ....Spring, Tension Roller ................4 58 ..480BS-158 ....Tension Roller Bracket, Inner Right ............1 59 ..
- Page 22 19-38 Head Assembly...
-
Page 23: Parts List For Conveyor & Motor Assembly
19-38 Drum Sander Owner’s Manual Index Part Description Size Qty. 1 ..480BS-201 ....Gear Motor ..........90 VDC ........1 2 ..480DS-202 ....Strain Relief, Power Cord .......6P3-4 ........1 3 ..480DS-203 ....Power Cord ....................1 4 .. - Page 24 SuperMax - Conveyor & Motor...
-
Page 25: Supermax Specifi Cations
19-38 Drum Sander Owner’s Manual 19-38 Specifications Warranty: Two years on parts and labor, limited; Manufacturer’s warranties on conveyor belts, brush heads and abrasives. Sanding Capacity: Maximum Width: 38” (two passes) Minimum Length: 2-1/4” (varies with application) Maximum Th ickness: 4”... -
Page 26: Warranty Info
Warranty 2 YEAR WARRANTY Limited warranty. We will provide all replacement parts which are found to be defective in materials or workmanship. Manufacturers’ warranties on conveyor belts. -
Page 27: Supermax Accessories & Supplies
Type 2: Polyurethane textured surface with monofi lament backing BRASIVES Item Description Qty. 60-19-036 36 Grit: SuperMax 19-38 Combo - 3-Wraps in Box 60-19-060 60 Grit: SuperMax 19-38 Combo - 3-Wraps in Box 60-19-080 80 Grit: SuperMax 19-38 Combo - 3-Wraps in Box 60-19-100... -
Page 28: Important Safety Information
FOR CUSTOMER SERVICE AND QUESTIONS ABOUT THE OPERATION OR MAINTENANCE OF THIS MACHINE, PLEASE CALL YOUR AUTHORIZED SUPERMAX DEALER. IMPORTANT: BEFORE OPERATING YOUR SUPERMAX READ THE INSTRUCTIONS IN THIS MANUAL FOR UNPACKING AND SETTING UP YOUR MACHINE. PART NO. 921900 ©...
Need help?
Do you have a question about the 19-38 and is the answer not in the manual?
Questions and answers