Table of Contents
Advertisement
Quick Links
Advertisement
Table of Contents

Related Manuals for i-Pix BB1


Summary of Contents for i-Pix BB1
- Page 1 User Manual BB1 6 WAY POWERBAR...
-
Page 2: Table Of Contents
BB1 6 WAY POWERBAR contents INTRO, RIGGING, SET UP & MODES page 3 SAFETY FIRST page 5 THE BB1 page 6 RIGGING page 7 SET UP IDENTIFY page 8 DIMMER CURVE page 9 ADDRESS page 10 MODE page 11 MODES... -
Page 3: Safety First
If you have questions about how to operate the fixture safely, please contact I-Pix. Warning! Class 2M LED product. Do not look into the beam from a distance of less than 40 cm (16 inches). - Page 4 Provide a minimum clearance of 0.1 m (4 in.) around fans and air vents. Do not modify the fixture Apart from I-PIX accessories do not stick filters, masks or other materials directly onto the light. PROTECTION FROM INJURY when rigging Do not hang fixtures from each other.
-
Page 5: The Bb1
5-pin weatherproof connection The BB1 can be used independently, e.g. as a truss or a set toner. It is fitted with a dual set of yokes for easy floor mounting or for quick, tool free rigging onto a truss or metalwork in the air. -
Page 6: Rigging
Always secure the Powerbar to the truss,pipe e.t.c. with a safety bond, attached to the bar through the the safety points on the top of the bar shown in green. Always secure the BB1 to the Powerbar through the safety points on the bottom of the bar shown in green. OPERATING INSTRUCTIONS - Page 6... -
Page 7: Set Up Identify
1 Press either the 1 - 3 or 4 - 6 button once. MENU THE BB1 CONNECTED ABOVE THE USER INTERFACE IS NUMBER 1 THE FURTHEST AWAY FROM THE INTERFACE BEING NUMBER 6 PRESS SEARCHING FOR The powerbox will now search out all connected fixtures. -
Page 8: Dimmer Curve
Changing Dimming Curve of A BB 1 The BB1 has the option of using either one of two dimmer curves. Linear - the output increases directly with the DMX input. Enhanced - the first 10% of the output is directly controlled over the first 50% of the DMX input. -
Page 9: Address
Addressing the BB 1 1 Press either the 1 - 3 or 4 - 6 button once. MENU THE BB1 CONNECTED ABOVE THE USER INTERFACE IS NUMBER 1 THE FURTHEST AWAY FROM THE INTERFACE BEING NUMBER 6 PRESS SEARCHING FOR The powerbox will now search out all connected fixtures. -
Page 10: Mode
Changing The Mode of A BB 1 1 Press either the 1 - 3 or 4 - 6 button once. MENU THE BB1 CONNECTED ABOVE THE USER INTERFACE IS NUMBER 1 THE FURTHEST AWAY FROM THE INTERFACE BEING NUMBER 6 PRESS SEARCHING FOR The powerbox will now search out all connected fixtures. -
Page 11: Modes
- red high byte cell 1 ch4 - re The BB1 has 4 different operating modes to suit different uses, programing styles and dmx configurations ch2 - red low byte cell 1 ch2 - red low byte cell 1... -
Page 12: Stand Alone Functions
Stand Alone Functions The BB1 is able to run in stand alone mode without any need of data from a lighting console . The BB1 is capable of outputting up to 20 programmable memories and 1 chase that can step through these memories. - Page 13 Next you are presented with the strobe STRB, the second variable of your memory wich has a default value of 0 % - no strobe. STRB 000% DOWN In the same way if you wish to alter this value use the UP and DOWN buttons to give you the desired % value.
-
Page 14: Storing A Memory
PRESS EXIT Next press the MEM 01 button once and you will be returned to the first DOWN parameter master intensity MINT and you can reprogram the memory. PRESS MEM 01 If you are unhappy with the memory you have created and wish to change DOWN STORE some of the parameters press the EXIT button once. -
Page 15: Recalling A Memory
Recalling A Memory PRESS MENU 1 Press the MENU button once. CHASE 2 Press the manual MAN button once. PRESS 3 Press the use memory USE MEM button once. USE MEM PROG MEM PRESS MEM 01 Now you will be offered the first memory MEM 01. DOWN DMX MODE This will come on automatically. -
Page 16: Programing A Chase
Programing A Chase 1 Ensure you have programed all the memories that will go to make up the steps of your chase. PRESS MENU 2 Press the “MENU” button once. PRESS CHASE 3 Press the CHASE button once. Now the WAIT TIME will appear this is the first parameter of the chase to be set. WAIT TIME DOWN 001s... - Page 17 PRESS xfade TIME 7 When happy with the crossfade time press the XFADE TIME button once. DOWN 004s chase strt Now chase start CHASE STRT will appear along with the option memory 1 MEM 01 DOWN mem 01 This will be the first step of your chase. PRESS chase strt 8 Choose which memory you would like to be the first step of your chase using the...
-
Page 18: Bb1 Technical Specifications
BB1 Technical Specifications Dimensions: with yoke without yoke • Length 270 mm 220 mm • Width 145 mm 145 mm • Weight 2.5Kg 1.8Kg Mechanical design & materials: • Body one piece cast alloy • Front plastic polycarbonate front cover with stainless steel retaining ring and dual rubber seals for underwater capability •... -
Page 19: Way Power Bar Technical Specifications
6 Way Powerbar Technical Specifications Dimensions: • Length 1380 mm • Height 80 mm • Width 80 mm • Weight 9.8Kg Mechanical design & materials: • Box folded and welded steel • Finish Electro static powder coated black satin Rigging: •... -
Page 20: Way Power Bar ( Hardwired )Technical Specifications
6 Way Powerbar ( Hardwired )Technical Specifications Dimensions: • Length 1380 mm • Height 340 mm • Width 144 mm • Weight 22.9Kg Mechanical design & materials: • Box folded and welded steel • Finish Electro static powder coated black satin •... -
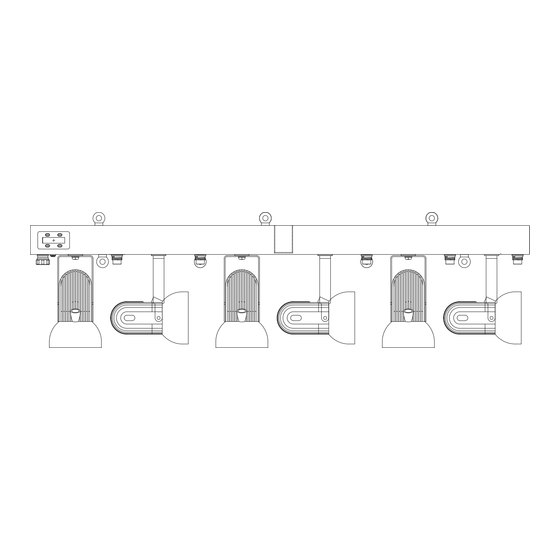
Page 21: Unit Dimensions Drawing
OPERATING INSTRUCTIONS - Page 21... -
Page 22: Trouble Shooting
Please seek professional assistance if there is any doubt as to the efficacy of a remedy or of the exact nature of any encountered problem. I-pix provides the information contained herein only as a guide. No response from the light... - Page 23 Are you fitting right rating/type of fuse into unit? • Contact I-pix for more specific help with your problem, there may be an internal fault in the unit. • If you have the technical knowledge/skills you could look inside the unit and check the internal wiring for a lose connections/shorts and also the power supply is working with a 15v output when there is no load connected to it.
-
Page 24: Internal Information
3 Press the MORE button once. IDENTIFY MORE PRESS RUNTIME CURVE L 4 Press the SOFTVER button once. softver EXIT PRESS SOFTVER 01 05 01 05 is the version of software the lamp is running BB1 WITH SLT CRV OPERATING INSTRUCTIONS - Page 24... -
Page 25: Internal Information
Lamp Information Runtime The BB1contains some usefull internal information, RUNTIME and SOFTVER. RUNTIME lets you know how long each individual L.E.D. has been running as well as how long the lamp as a whole has been running. PRESS MENU 1 Press the 1 - 4 button once. SEARCHING FOR The powerbox will now search out all connected fixtures. - Page 26 PURPOSE - I-PIX Jan 01, 2009 WARRANTY STATEMENT I-Pix (seller) extends warranty on all the L.E.Ds in the BB4 produced by the Seller for one (1) year from original date of shipment, that the goods sold hereunder are new and free from substantive defects in workmanship and materials.
-
Page 27: Appendix 2 Service Contact Details
Broadstone Mill Broadstone Road Houldsworth Village Cheshire SK5 7DL [Located 4 miles from Manchester airport and the city centre] Tel: 44 (0)161 443 4140 E-mail: service@i-pix.com www.i-pix.com BB4 USERS MANUAL - PAGE 30 BB2 USERS MANUAL OPERATING INSTRUCTIONS - Page 27...
Need help?
Do you have a question about the BB1 and is the answer not in the manual?
Questions and answers