Table of Contents
Advertisement
Quick Links
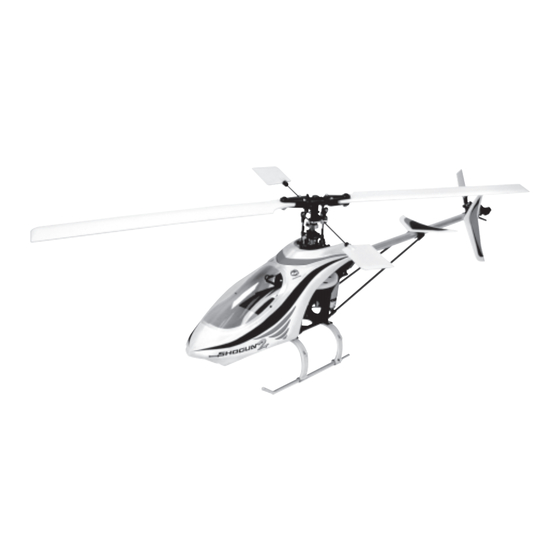
Shogun, the industry leader and creator of the 400-class 500 gram helicopter has once again raised the bar with the Shogun 400 V2. We've taken a
great heli and made it better with all the parts and features loyal Shogun owners have asked for! Leading this long list of upgrades is the new belt drive
system for driving the tail rotor. The belt drive provides a strength and durability level not achievable with a shaft drive design.
But we did not stop there! We packed the Shogun 400 V2 with tons of features you want! Lightweight flybar paddles make the cyclic controls fast
without loosing the stability and smoothness that makes the Shogun so rewarding to fly. We've also widened the landing gear, updated the body style,
included ball linkages for the controls, shifted the tail rotor servo position to the tail boom, and even extended the battery tray to make it easier to install
your favorite LiPO battery.
All of this, combined with our complete line of after-market accessories, as well as our extensive dealer network and online support, means you can
do whatever you want with your Shogun and we'll be there to back you up with the service and parts you want! Get a Shogun and find out what the
world of performance electric helicopters is really all about! Performance, Reliability, and Excitement!
ASSEMBLY MANUAL AND SETUP GUIDE
The EF Helicopters Shogun 400 V2 helicopter is distributed
exclusively by Global Hobby Distributors
18480 Bandilier Circle, Fountain Valley, CA 92708
All contents copyright © 2005, Global Hobby Distributors
Version V1.0 June 2005
Kit Product Number: 163110
The EF Helicopters Shogun 400 V2 helicopter is not intended for first-time helicopter pilots. Although it may be possible to
learn to fly using this helicopter with an experienced instructor, the helicopter is designed for more experienced pilots.
FEATURES AND SPECIFICATIONS:
90% Factory-Assembled w/Balanced Main Rotor Blades
Belt Drive Tail Rotor
Lightweight Paddles
Boom-Mounted Tail Rotor Servo
Wide Landing Gear Stance
Fiberglass Composite Main Frame
Strong, Lightweight Aluminum Tail Boom
3D-Aerobatic, Collective Pitch, 6-Channel Control
Ball-End Control Linkages
Extended Aluminum Battery Tray
Durable Tail Boom Supports
Complete Ball Bearing Set
Online Parts Support
Extensive Hop-Ups and After-Market Parts Available
1
Overall Length: 780mm
Main Rotor Diameter: 645mm
Tail Rotor Diameter: 140mm
Overall Height: 200mm
Weight RTF: 520 grams (Approximate)
Advertisement
Table of Contents

Subscribe to Our Youtube Channel
Related Manuals for EF Helicopter Shogun 400 V2


Summary of Contents for EF Helicopter Shogun 400 V2
- Page 1 Weight RTF: 520 grams (Approximate) Shogun, the industry leader and creator of the 400-class 500 gram helicopter has once again raised the bar with the Shogun 400 V2. We've taken a great heli and made it better with all the parts and features loyal Shogun owners have asked for! Leading this long list of upgrades is the new belt drive system for driving the tail rotor.
-
Page 2: Customer Service Information
You must use the same amount of caution during use as when flying and operating a glow-powered helicopter. We strongly suggest that when you first begin flying the Shogun 400 V2 helicopter that you perform only basic maneuvers, such as hovering, until you are more familiar with the setup and flight characteristics of the helicopter. -
Page 3: Items Needed For Assembly
ITEMS NEEDED FOR ASSEMBLY This section describes our recommendations to help you decide which accessories to purchase for your Shogun 400 V2 helicopter. Remember, this helicopter is small, lightweight and 3D-capable. When choosing accessories, we suggest choosing the lightest available. The lighter the overall weight of the helicopter, the better it will fly. - Page 4 FINAL ASSEMBLY SEQUENCE Now that you're familiar with the main component-parts of your new Shogun 400 V2 helicopter, it's time to get started finishing it. There's really not much to it. Below we outline the main steps for your convenience:...
- Page 5 INSTALLING YOUR SERVOS IMPORTANT The helicopter frame is predrilled to fit servos with single-ended servo mounting lugs. If the servos you use have dual-ended mounting lugs, you will need to drill new 1/16" diameter holes through the frame to install the mounting screws. For the best control response and reliability, it's important to make sure that you use high-quality, ball bearing micro servos.
-
Page 6: Installing Your Battery
Mount your receiver to the mounting space in front of the pitch and roll servos, using a piece of double-sided foam tape. IMPORTANT When installing your receiver, make sure that the servo lead mounting pins are toward the right side of the main frame. This will make it easier to connect the servo leads. - Page 7 ADJUSTING THE TAIL ROTOR BELT TENSION IMPORTANT It's important to make sure that tail rotor belt tension is set properly. If the belt is too tight, the gears and/or the belt could fail, and the drive-train can bind, causing loss of power and control. If the belt tension is too loose, the belt could slip and cause loss of control.
- Page 8 Connect the Z-Bend in the collective control wire to your servo arm, then attach the servo arm to the servo. IMPORTANT When set up properly, the servo arm should be 90º to the servo and the collective pitch plate should be 90º to the vertical frame post. Install the servo arm retaining screw, then move the collective up and down several times to ensure smooth operation.
- Page 9 When satisfied with the alignment, tighten the two clamp screws firmly to secure the servo mount assembly into place. INSTALLING THE ROLL CONTROL LINKAGE Turn on your radio control system and center the roll servo. Double-check that the roll servo is moving in the correct direction. When the roll stick is moved right, the servo output shaft should rotate counterclockwise.
- Page 10 Cut away all but one arm from a servo horn. Install one ball-link into the hole that is 7mm out from the center of the servo horn, using the small screw provided. IMPORTANT If the hole in your servo arm is too large for the screw to thread into, you will need to use a machine screw and nut to install the ball-link to the servo arm.
-
Page 11: Preflight Setup
PREFLIGHT SETUP Before flying your helicopter for the first time, it's important to double-check everything once more and to make sure that you've set the helicopter up properly for its first few flights. Check the alignment of the tail rotor. With the main rotor blades level, look from the back of the helicopter at the tail rotor. - Page 12 ADJUSTING THE COLLECTIVE PITCH - FOR NEW PILOTS OR NON-3D FLYING If you've never flown the Shogun before, or if you are new to helicopters (gas-powered or electric), or if you will not be using your Shogun V2 for 3D flight, then we recommend setting the collective pitch as described in this section. We suggest using positive 7º and negative 3º...
- Page 13 Remove the pitch gauge and reinstall it so that the 7º mark is lined up with the leading edge of the rotor blade. Now, apply full up collective. Using your transmitter's EPA adjustment, adjust the collective so that the base of the pitch gauge is parallel to the flybar.
-
Page 14: Assembly Drawings
3D ASSEMBLY DRAWINGS Continued On Next Page... - Page 15 Continued On Next Page...
- Page 17 OPTIONAL BEVEL GEAR TAIL ROTOR DRIVE INSTALLATION As an option, you can install the bevel gear tail rotor drive mechanism into your Shogun 400 V2 helicopter. To do this, you will need the following parts: 165161 Carbon Tail Rotor Drive Shaft with Bevel Gear...
-
Page 18: Replacement Parts
REPLACEMENT PARTS We stock a complete set of replacement parts for your Shogun 400 V2 helicopter. Listed below are the replacement parts that are available along with their respective part numbers for easy ordering convenience. We suggest ordering directly from your local dealer. - Page 19 REPLACEMENT PARTS, CONTINUED..H020V2 H100V2 M001 M002 165139 165133 165140 165142 Antenna Support Tube Body and Canopy Set Main Shaft (Mast) 380 Motor with Pinion Gear M002G M003 M004 M005V2 165143 165144 165146 165149 Motor Pinion Gear Spindle Shaft Stabilizer Arm Set Tail Boom (with Bearing) M007V M006V...
- Page 20 REPLACEMENT PARTS, CONTINUED..G371V2 B252 B106 B384 165187 165200 165202 165206 Tail Rotor Belt One-Way Bearing Ball Bearing (2x5x2.5L) Ball Bearing (3x8x4L) Sorry, No Photo Available S001 O802 P000 165208 165332 165178 165098 Screw Set Battery Mount O-Rings for Spindle Shaft Decal Set O503 165470...
- Page 21 HOP-UP AND OPTION PARTS, CONTINUED..O502 O001 O101 O505 165323 165250 165320 165326 Alum Main Rotor Grip Set Training Gear Set FG Main Rotor Blades Alum Washout Base Set O506 O510 O534 O801 165327 165328 165317 165309 Alum Elevator Crank Set Alum Swash Plate Assembly Alum Main Rotor Yoke Set Alum Aileron Lever Set...
-
Page 24: Warranty Service Information
WARRANTY SERVICE INFORMATION Before returning your Shogun 400 V2 helicopter for warranty consideration, the status of the unit must be within the guarantee as stated at the bottom of this page. Do not return your helicopter to the place of purchase. They are not authorized or equipped to perform warranty work on EF Helicopters products.
Need help?
Do you have a question about the Shogun 400 V2 and is the answer not in the manual?
Questions and answers