Table of Contents
Advertisement
Advertisement
Table of Contents

Related Manuals for Dessmann G800FP


Summary of Contents for Dessmann G800FP
- Page 1 DESSMANN - FINGERPRINT LOCK User Guide G800FP - G800FPC...
-
Page 2: Table Of Contents
Contents 1 Introduction 1.1 Packing List ..........1.2 Technical Data . - Page 3 CONTENTS CONTENTS 6.5 Mechanical Key ......... . . 6.6 Factory Reset .
-
Page 4: Introduction
Chapter 1 Introduction 1.1 Packing List Thank you for choosing a DESSMANN lock. The following accessories are provided in order to set up and use your smart lock: Item Item 01/ Lock Front Panel 1 Pce 06/ Lock Accessories 1 Set... -
Page 5: Technical Data
1.2. TECHNICAL DATA CHAPTER 1. INTRODUCTION 1.2 Technical Data Lock Front Panel (HxLxW) 302x70x28mm Dimensions Back Panel (HxLxW) 302x70x25mm Weather Resistant Body • Locker Mechanism • Hidden Mechanical Lock • Lock Power Supply 2 sets of 4 AA Batteries Emergency Power Supply 9V Battery Lock Tested More Than Durability... -
Page 6: Product Description
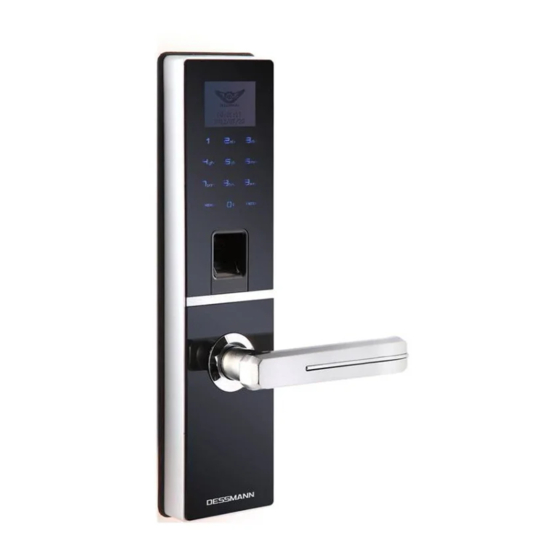
Chapter 2 Product Description Numeric Input Password and Name Keys: MENU: Enter Menu or Go to Previous Menu ENTER: Save or Confirm Scroll Up ↑: Scroll Down ↓:... -
Page 7: Basic Instructions
Chapter 3 Basic Instructions 3.1 Batteries Setup One set of 4 AA batteries or two sets of 4 AA batteries are required to power the lock. 3.2 System Start and Shutdown 3.2.1 Start Make sure the batteries are properly installed, then start the system as follows: •... -
Page 8: Quick Start
Chapter 4 Quick Start Functions Operation 1/ Start the System Enter 2/ Press MENU System Menu 3/ Scan Admin Fingerprint (Default: none) 1/ Enter System Menu 2/ Select ”2.User Setting” Admin 3/ Select ”1.Add Admin FP” 4/ Scan Fingertip Twice 5/ Enter a Name. -
Page 9: Open The Door
4.1. OPEN THE DOOR CHAPTER 4. QUICK START 4.1 Open the Door 4.1.1 with Finger Scan your fingertip on the authentication lens. Push the handle. Best Practices To guarantee an optimal authentication: • Make sure your finger is clean & dry •... -
Page 10: Close The Lock
4.2. CLOSE THE LOCK CHAPTER 4. QUICK START Enter password & press ENTER to unlock the door. Push the handle. Smart Password To confuse people looking at you when you type your password, it can be inputted within a random string of number. -
Page 11: Lock Menu
Chapter 5 Lock Menu DESSMANN lock management software let you easily manage your users. Browse with the arrows keys & press ENTER to confirm each step. 5.1 Enter the System Menu System can only be managed with the admin fingerprint. -
Page 12: Set Password
5.2. SYSTEM SETTINGS CHAPTER 5. LOCK MENU G800FP There are 3 modes offered by G800FP lock to open the door: • Fingerprint Only - Identification with fingerprint only • Fingerprint OR Password - Identification with either fingerprint OR password • Fingerprint AND Password - Identification with fingerprint AND password... -
Page 13: Set Time
5.3. MANAGER USERS CHAPTER 5. LOCK MENU 5.2.3 Set Time We recommend you to properly set the time to fully enjoy all the functions of your lock. Change the values with the keypad. Press ENTER to confirm. 5.2.4 Unlocked Alarm Switch ON or OFF the Unlocked door alarm. -
Page 14: Add Admin Fingerprint
5.3. MANAGER USERS CHAPTER 5. LOCK MENU 5.3.1 Add Admin Fingerprint Scan the new admin fingertip twice. Enter a name for this admin using the keypad. The name can only have a maximum of 6 digits or charac- ters. Press MENU to move to the next character. Press ENTER to confirm. Attention Pay special attention to the following: •... -
Page 15: Add Card (G800Fpc Only)
5.4. INFORMATION CHAPTER 5. LOCK MENU Best Practices To ensure optimal results, register the same finger 2 to 3 times. 5.3.3 Add Card (G800FPC Only) Scan the new card twice. Enter a name for this card using the keypad. The name can only have a maximum of 6 digits or characters. Press MENU to move to the next character. -
Page 16: Users Log
5.4. INFORMATION CHAPTER 5. LOCK MENU 5.4.1 Users Log Users log informs you about: • User Name • Opening Method – F for Fingerprint – C for Card (G800FPC Only) – P for Password – X for Fingerprint & Password •... -
Page 17: Lock Functions
Chapter 6 Lock Functions 6.1 Alarm Functions 6.1.1 Illegal Intrusion Alarm If an illegal intrusion occurs, such a thief trying to pick-lock your door, a buzzer will ring and the following will be displayed: 6.1.2 Multi-attempts Alarm After 3 failed authentications with fingerprint or password, the system will freeze for 3 minutes. 6.1.3 Unlocked Door Alarm If the door is not properly close, a buzzer will ring and the door will display the following for 30 seconds. -
Page 18: Batteries Low
6.2. BATTERIES LOW CHAPTER 6. LOCK FUNCTIONS 6.2 Batteries Low • When the batteries are low, a buzzer will bip as a warning when you open the door & a message will be displayed on the screen at the same time. •... -
Page 19: Locker Function
6.4. LOCKER FUNCTION CHAPTER 6. LOCK FUNCTIONS 6.4 Locker Function 6.4.1 Close Position When the 3 locking bolts are out, turn the locker upwards. The lock will always be close. Nobody can open the door from outside (either with Fingerprint, Password, Card or Mechanical Key). 6.4.2 Open Position When the 3 locking bolts are inside the lock, turn the locker upwards. -
Page 20: Factory Reset
6.6. FACTORY RESET CHAPTER 6. LOCK FUNCTIONS 6.6 Factory Reset Attention Factory reset will delete all the datas in the system: • Admin Fingerprints • User Fingerprints • Password • Log-in Record • Time Steps to proceed to a factory reset: 1. -
Page 21: Product Warranty
Chapter 7 Product Warranty DESSMANN warrants to the original purchaser that the hardware product shall be free from defects in material and workmanship for twelve (12) months from the date of purchase. If a defect covered by this warranty occurs during this warranty period, DESSMANN or a DESSMANN AUTHORIZED REPAIR CENTER will repair the defective hardware product or component, free of charge. -
Page 22: Contact Us
Chapter 8 Contact Us Maintenance, Repair & Operations Tel: +86 571 8711 9266 Fax: +86 571 8711 9299 Mail: mro@dessmannlock.com www.dessmannlock.com...
Need help?
Do you have a question about the G800FP and is the answer not in the manual?
Questions and answers