
Related Manuals for Little Wonder 8221, 8271

Summary of Contents for Little Wonder 8221, 8271
- Page 1 ® LITTLE WONDER Shredding Models 8221 and 8271 © 2005 Little Wonder, Div. of Schiller-Pfeiffer Inc. All Rights Reserved.
-
Page 2: Table Of Contents
Warranty ......Back cover Important Information A. Introduction On behalf of everyone at Little Wonder , we would like to thank you for your purchase of a Little Wonder Shredding TruckLoader. This professional debris handling machine was designed to the highest standards to ensure many hours of uninterrupted service. -
Page 3: Safety And Warnings
Safety and Warnings A. Safety Decals In order to keep operators of the Shredding TruckLoader informed regarding safety and/or unit operation, decals (labels) have been placed on various parts of the unit. Adherence to the warnings and instructions depicted or otherwise conveyed in these decals is absolutely essential to the safe operation of the Shredding TruckLoader. -
Page 4: General Safety Rules
Don’t attempt to repair Shredding TruckLoader. Have repairs made by a qualified Little Wonder dealer or repairman. See that only Little Wonder and recommended engine manufacturer replacement parts are used. -
Page 5: Engine/ Fuel Warnings - "Don'ts
Warnings - "Do’s" Con't. Always store Shredding TruckLoader indoors. When not in use, store Shredding TruckLoader indoors in a sheltered area (a dry place) where it is not accessible to children. The Shredding TruckLoader, as well as fuel, should not be stored in a house. Keep throttle in the “slow”... -
Page 6: Assembly Instructions
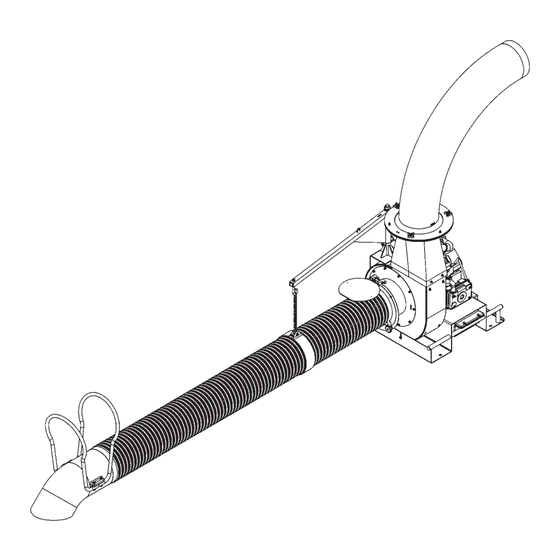
Assembly Instructions: A. Hose Assembly (Figure #1) Remove the Hose from the box. With the assistance of a second person, hold the hose at both ends and stretch it out as far as possible. This will maximize the hose length and open the internal diameter. -
Page 7: Housing
C. Mounting the Boom Arm Assembly to the Housing Boom Column (Figure #3) Slide a Thrust Washer (720428) onto the shaft of the Boom Column Assembly. Apply some #2 lithium based grease to the shaft of the Boom Column. Install the Boom Arm Assembly (720406) onto the shaft of the Boom Column Assembly. -
Page 8: Changing Direction Of Discharge Chute
E. Changing the direction of the Discharge Chute (Figure #4) 1. Loosen the Knobs (720507) by hand and, if needed, the Nuts (720583) with a 1/2” wrench. 2. Rotate the Discharge Chute to the desired position. 3. Retighten the Knobs by hand and the Nuts, if loosened, with the 1/2”... -
Page 9: Arm Assembly
G. Attaching the Chain Loop Assembly to the Boom Arm Assembly (Figure #6) Slip the threaded end of the Chain Loop Assembly (720290) through the hole found at the end of the Boom Arm Assembly (720406). Once through, secure the Chain Loop Assembly with the Nut (720576). -
Page 10: Discharge Extension Kit
L. Discharge Extension Kit Assembly Instructions Contents Included in Kit: 1. Discharge Extension Hose (720436) 2. Hose Clamp (720388) Tools Needed: 9/16" Box Wrench or Socket Wrench w/ 9/16" Socket 2. Socket Wrench w/ 3/8" Socket or Flat Head Screw Driver 3. -
Page 11: Re-Filling The Gas Tank
a) Turn off the engine and wait until all moving parts have come to a complete stop. b) Disconnect the spark plug wires from the spark plugs on the engine. c) Remove the Hose Assembly from the Inlet Flange Assembly. With this removed, open the Inlet Flapper and remove any debris that is clogging the housing. -
Page 12: Maintenance Schedule
Leaded gasoline is not recommended and must not be used on models where exhaust emissions are regulated. Gasoline/Alcohol blends: Gasohol (up to 10% ethyl alcohol, 90% unleaded gasoline by volume) is approved as a fuel for Kohler engines. Other gasoline/alcohol blends are not approved. -
Page 13: Maintenance
7. Thread a 3/4-16 x 5” long grade 5 (or better) bolt into the hub to jack or push the Fan from the crankshaft of the engine. (The Little Wonder #910505 jacking screw is recommended.) **Take note of the orientation of the fan with respect to the keyway upon removal. -
Page 14: Liner Replacement
B. Liner Replacement (Figure #7) Complete Steps 1 thru 7 found in section A (Removing and Replacing the Fan and Talon Ring). 2. Unbolt and remove the hardware securing the Liner to the Housing. Remove the Liner from the housing by wrapping it and pulling it through the front of the housing. -
Page 15: Heavy-Duty Air Cleaner
D. Heavy-Duty Air Cleaner 1. Every 250 hours of operation (more often under extremely dusty or dirty conditions), replace the main paper element and check inner element. Follow these steps. a) Unhook the two retaining clips and remove the end cap from the air cleaner housing. b) Pull the air cleaner element out of the housing. -
Page 16: Storage
Storage: A. Preparing for Long-Term (Two Months or More) Storage Clean the exterior surfaces of the unit (including engine). Change the Oil and Filter while the engine is still warm. The fuel system must be completely emptied, or the gasoline must be treated with a stabilizer to prevent deterioration. -
Page 17: Base Unit View
Base Unit View... -
Page 18: Part Numbers
BALLOON ITEM # PART # 720903 720904 720483 720466 720450 720599 720560 720279 720567 720582 720594 720449 721502 720503 720518 720296 720484 720478 720480 720477 720298 720299 720465 720469 720468 720573 720574 910503 BOLT, SERRATED FLANGE, 5/16-24 x 3/4" LG, LOCKING PATCH 720459 720598 720562... - Page 19 Model #8221 & 8271 Part Numbers BALLOON ITEM # PART # 720257 720214 720590 720408 701312 720402 720403 720406 720289 720428 720580 720290 720576 720487 720291 720292 720588 720261 720412 720583 720507 720404 720405 720485 720486 720264 720265 720266 720267 720388 720390 720597...
-
Page 20: Warranty
THIS WARRANTY shall only be effective if the enclosed Warranty/Registration card is properly filled out and returned to Little Wonder , Div. of Schiller-Pfeiffer, Inc. at time of purchase.
Need help?
Do you have a question about the 8221, 8271 and is the answer not in the manual?
Questions and answers