Table of Contents
Advertisement
Quick Links
Advertisement
Table of Contents

Related Manuals for Nokia 2228


Summary of Contents for Nokia 2228
- Page 1 Nokia 2228 User Guide...
- Page 2 © 2009 Nokia. All rights reserved. Nokia, Navi and Nokia Connecting People are trademarks or registered trademarks of Nokia Corporation. Nokia tune is a sound mark of Nokia Corporation. Other product and company names mentioned herein may be trademarks or tradenames of their respective owners.
- Page 3 Nokia’s licensors. The availability of particular products and applications for these products may vary by region. Please check with your Nokia dealer for details, and availability of language options. Export controls This device may contain commodities, technology, or software subject to export laws and regulations from the US and other countries.
-
Page 4: Table Of Contents
Contents SAFETY..................6 General information .............. 10 Access codes......................10 Nokia support on the web .................. 10 1. Get started................ 11 Install and remove battery ................. 11 Insert UIM card...................... 12 Charge the battery....................13 Switch your device on or off ................14 Normal operating position ................. - Page 5 Gallery ........................42 Media........................45 Organiser ......................... 49 Web........................... 53 Extras........................54 6. Enhancements ..............55 7. Battery and charger information ........56 Nokia battery authentication guidelines............59 Care and maintenance............62 Additional safety information ..........65 Index ..................74...
-
Page 6: Safety
SAFETY Read these simple guidelines. Not following them may be dangerous or illegal. Read the complete user guide for further information. SWITCH ON SAFELY Do not switch the device on when wireless phone use is prohibited or when it may cause interference or danger. -
Page 7: About Your Device
You may also access other third-party sites through your device. Third-party sites are not affiliated with Nokia, and Nokia does not endorse or assume liability for them. If you choose to access such sites, you should take precautions for... -
Page 8: Network Services
Warning: To use any features in this device, other than the alarm clock, the device must be switched on. Do not switch the device on when wireless device use may cause interference or danger. Remember to make back-up copies or keep a written record of all important information stored in your device. - Page 9 not appear on your device menu. Your device may also have a special configuration such as changes in menu names, menu order, and icons. Contact your service provider for more information. This device supports WAP 2.0 protocols (HTTP and SSL) that run on TCP/IP protocols.
-
Page 10: General Information
To define the security settings for your device, select Menu > Settings > Security. ■ Nokia support on the web Check www.nokia.com/support or your local Nokia website for the latest guide, additional information, downloads, and services related to your Nokia product. -
Page 11: Get Started
1. Get started ■ Install and remove battery Note: Always switch the device off and disconnect the charger before removing the battery. 1. To remove the cover, with the back of the device facing you, press the release button, and lift up the back cover. -
Page 12: Insert Uim Card
3. Push down on the other end of the battery to snap the battery into place. 4. Insert the back cover toward the top of the device, and press it down until you hear a click. 5. To remove the battery, remove the cover (see step 1), and insert your finger into the finger... -
Page 13: Charge The Battery
4 in "Install and remove battery", p. 11. ■ Charge the battery Warning: Use only batteries, chargers, and enhancements approved by Nokia for use with this particular model. The use of any other types may invalidate any approval or warranty, and may be dangerous. -
Page 14: Switch Your Device On Or Off
1. Connect the charger to a wall socket. 2. Connect the charger plug to the USB connector at the left side of the device. If the battery is completely discharged, it may take a few seconds before the charging indicator appears on the display or before any calls can be made. -
Page 15: Normal Operating Position
■ Normal operating position Your device has an internal antenna. Use the device only in its normal operating position. Note: Your device may have internal and external antennas. As with any radio transmitting device, avoid touching the antenna area unnecessarily while the antenna is transmitting or receiving. -
Page 16: Your Device
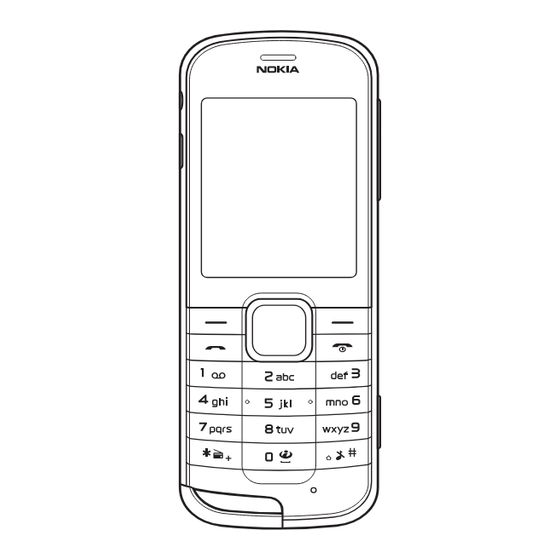
2. Your device ■ Keys and parts 1. Earpiece 2. Volume key 3. Right selection key 4. Power/End key 5. Camera key 6. Microphone 7. Keypad 8. Call key 9. Left selection key 10.Navi™ key; hereafter referred to as scroll key 11.Charger/USB port 12.Headset connector 13.Camera lens... -
Page 17: Standby Mode And Shortcuts
■ Standby mode and shortcuts Depending on your wireless service provider and the model number of your device, some or all of the following selection keys may appear in the standby mode. 1. Signal strength — Shows the signal strength of the wireless network at your current location. -
Page 18: Keyguard
Shortcuts in the standby mode: — To access the list of dialled numbers, press the call key once. — To switch between current profile and silent profile, press and hold # for at least three seconds. — To activate the radio function, press and hold * for at least three seconds. - Page 19 To unlock the keypad, select Unlock, and press * within 2 seconds. If you receive a call when the keypad is locked, it is automatically unlocked, and then locked again when you end the call.
-
Page 20: Call Functions
3. Call functions ■ Make and answer a call To make a call, enter the phone number, including the country code and area code, if necessary, and press the call key. Press the volume key to adjust the volume of the earpiece or headset during the call. -
Page 21: Loudspeaker
■ Loudspeaker Warning: Do not hold the device near your ear when the loudspeaker is in use because the volume may be extremely loud. To activate the loudspeaker during a call, select Loudsp. To deactivate the loudspeaker, select Normal. When a headset is connected, select Heads. - Page 22 • Voice tags are sensitive to background noise. Record voice tags and use them in a quiet environment. • Very short names are not accepted. Use long names, and avoid similar names for different numbers. Note: Using voice tags may be difficult in a noisy environment or during an emergency, so you should not rely solely upon voice dialling in all circumstances.
-
Page 23: Write Text
4. Write text You can enter text using traditional or predictive text input. To change the text input method, and to switch between upper and lower case, press #. To display a list of special characters, press *. ■ Traditional text input Press a number key, 2-9, repeatedly until the desired character appears. - Page 24 If ? is displayed after the word, the word is not in the dictionary. To add the word to the dictionary, select Spell, enter the word using traditional text input, and select Save.
-
Page 25: Menu Functions
5. Menu functions The device functions are grouped into menus. Not all menu functions or option items are described here. In the standby mode, select Menu, scroll to the menu item you want to open, and select it. To exit the current menu level, select Exit or Back. - Page 26 Delivery reports — to receive confirmation when your message is delivered Send callback number — to send a number to which you want to be called back Signature — to attach a signature to outgoing messages. Select Other settings and from the following: Save incoming text messages —...
-
Page 27: Write And Send A Text Message
Write and send a text message 1. Select Menu > Messaging > Text messages > Create message. 2. To send the message to one recipient, select > Contacts, the recipient, and Select. 3. To send the message to many recipients, select >... -
Page 28: Delete Messages
Inbox, Sent items, and Drafts folders All incoming text messages are saved in the Inbox folder. The Outbox folder contains unsent and failed messages. If you have set the device to save the sent messages, they are saved in the Sent items folder. To save the message you are writing to the Draft folder to edit and send later, select Options... -
Page 29: Voice Messages
Voice messages To activate voice mail (network service), contact your service provider. When you subscribe to the service, you receive voice mailbox number. Save the number to your device. For more information, contact your service provider. To listen to your voice messages, select Menu >... -
Page 30: Contacts
■ Contacts To search for a contact, select Menu > Contacts > Names > Options > Search, and enter the first characters of the contact name. Matching contacts are displayed. To change the text input method, select #. To edit the detail, set speed dial, or add voice tag for contact, highlight the contact, and select Details >... -
Page 31: Log
Speed dials Speed dialling allows you call a contact just by pressing and holding a key. To call your voice mailbox, press and hold 1 in the standby mode. To assign a phone number to another number key, select Menu >... -
Page 32: Settings
To view all of the numbers chronologically, select Call log. To view the contacts to whom you most recently sent messages, select Message recipients. To delete calls from the log, select Menu > > Clear log lists and from the available options. To view the approximate duration of calls, select Menu >... - Page 33 tones, and other settings for each of the available profiles. The available profiles are: General, Silent, Meeting, Outdoor, Flight, and two customisable ones. To activate or customise a profile or set a time limit for a profile, select Menu > Settings >...
- Page 34 Ringing volume — to set the volume level for the ringing tone and message alert tone Incoming call video — to set a video clip to be played when you receive call Vibrating alert — to set the device to vibrate when you receive a call or a text message Message alert tone —...
- Page 35 Wallpaper — to set a background image that is displayed when the device is in the standby mode Standby mode font colour — to set the font colour for text shown in the standby mode Light indicator — to set how long the light indicator can blink when the device receives a notification Screen saver —...
-
Page 36: Date And Time
Date and time Select Menu > Settings > Date and time and from the following: Date and time settings — to set the date and time, change the time zone, and daylight saving time Date and time format settings — to set the format for the date and time Auto-update of date &... - Page 37 To ask for the purpose of the connection each time when the cable is connected, select Menu > Settings > Connectivity > USB data cable > Ask on connect. To use the PC Suite to transfer files between your device and PC: 1.
- Page 38 Abbreviated dialling — to program a five- or six digits prefix for commonly used phone numbers Preferred carrier — to select the preferred long distance carrier International prefix — to make calls using the + sign as the international prefix. The device replaces the + sign in a saved phone number when making a call Data/fax calls —...
-
Page 39: Voice Commands
Memory status — to view the free memory and used memory of your device Automatic keyguard — to set the keypad to lock automatically after a preset time delay DTMF tones — to set the tone duration when you press the keys on your device keypad Start-up tone Switch off tone... - Page 40 2. Select the device function you want to tag, select > Start and speak the voice tag clearly into the microphone. After recording the voice tags, you may change or delete them. To activate a voice command, press and hold the right selection key in the standby mode.
-
Page 41: Device Information
Network The Network menu allows you to customise how your device chooses which network to operate in while you are within or away from your primary or home system. Your device is set to search for the most effective network. To set which network to use when the device cannot find a preferred network, select Menu... -
Page 42: Gallery
Restore settings You can restore the original factory settings to your device without affecting personal data such as contacts, language selection, or calendar notes. To reset some of the menu setting to their original signal: 1. Select Menu > Settings >... -
Page 43: Video Clips
Images To view and manage images captured with your device camera, select Menu > Gallery > Images > Open. To delete or send an image, select the image, Options, and from the available options. Video clips Video clips recorded with the camera are stored in the Video clips folder. - Page 44 Tones You can personalise your device with ringing tones and alert tones. To display a list of available tones, select Menu > Gallery > Tones. To listen to a tone, select the tone and Open. To select the tone for incoming calls and alert, select the tone, Options tone.
-
Page 45: Media
■ Media Media offers the camera, video, media player, radio, and voice recorder functions. Camera You can take photos and record video clips with the built- in camera. The camera produces images in JPEG format and video clips in 3GP format. The camera lens is on the back of the device. - Page 46 Camera options In the standby mode, select Menu > Media > Camera > Options and from the following: Video — Switch to the video mode. Landscape mode Portrait mode — Switch the capture mode to landscape or portrait. Night mode on Night mode off —...
-
Page 47: Media Player
Record a video clip In the standby mode, select Menu > Media > Video. To record a video clip, press the camera key, or select Record. To adjust the camera zoom level, press the scroll key or volume key up and down. The video clip is saved in the Recordings folder in Gallery. -
Page 48: Voice Recorder
Radio The FM radio depends on an antenna other than the wireless device antenna. A compatible headset or enhancement must be attached to the device for the FM radio to function properly. Warning: Listen to music at an moderate level. Continuous exposure to high volume may damage your hearing. -
Page 49: Organiser
stop button . The recording is saved to the Recordings list in the Recordings folder in Gallery. After you save a recording, select Options > Play last recorded, Send last recorded, or Recordings list. ■ Organiser Your device contains features to help organise your everyday. -
Page 50: Alarm Clock
Alarm clock The alarm clock is based on the device clock. A set alarm will sound even when the device is switched off. To set an alarm, select Menu > Organiser > Alarm clock > Alarm, select On, and enter the time. To set the phone to alert on selected days of week, select Repeat Repeat... - Page 51 To-do list You can keep track of your tasks with the to-do list. To add a to-do note, select Menu > Organiser > To-do list > note. Enter the subject, priority, due date, due time, and alarm type, and select Save. Notes You can save short notes in your device.
-
Page 52: Countdown Timer
Press * repeatedly to add the add (+), subtract (-), multiply (*), or divide (/) operator. Pause briefly to select the displayed character. 3. Enter the second number in your calculation. To display the result, select Equals. To perform a square or square root calculation after, select Options >... -
Page 53: Web
When the time runs out, your device sounds an alarm, displays the timer note, and flashes its lights. Stopwatch Your device has a stopwatch that can be used to track time. The stopwatch displays time in hours, minutes, seconds, and fractions of a second. Using the stopwatch, or allowing it to run in the background when using other features, increases the demand on battery power and reduces the battery life. -
Page 54: Extras
■ Extras Select Menu > Extras. To play a game in your device, select Games. To set or view the time in a different location, select Collection > World clock. To calculate exchange rates, select Collection > Converter. -
Page 55: Enhancements
Warning: Use only batteries, chargers, and enhancements approved by Nokia for use with this particular model. The use of any other types may invalidate any approval or warranty, and... -
Page 56: Battery And Charger Information
When the talk and standby times are noticeably shorter than normal, replace the battery. Use only Nokia approved batteries, and recharge your battery only with Nokia approved chargers designated for this device. Use of an unapproved battery or charger may present a risk of fire, explosion, leakage, or other hazard. - Page 57 reconnect it to begin charging the battery. If the battery is completely discharged, it may take several minutes before the charging indicator appears on the display or before any calls can be made. Always switch the device off and disconnect the charger before removing the battery.
- Page 58 example, when you carry a spare battery in your pocket or purse. Short-circuiting the terminals may damage the battery or the connecting object. Do not dispose of batteries in a fire as they may explode. Batteries may also explode if damaged. Dispose of batteries according to local regulations.
-
Page 59: Nokia Battery Authentication Guidelines
If you have any reason to believe that your battery is not an authentic, original Nokia battery, you should refrain from using it, and take it to the nearest authorised Nokia service point or dealer for assistance. - Page 60 What if you battery is not authentic? If you cannot confirm that your Nokia battery with the hologram on the label is an authentic Nokia battery, please do not use the battery. Take it to the nearest authorised Nokia service point or dealer for assistance.
- Page 61 It may also invalidate any approval or warranty applying to the device. To find out more about original Nokia batteries, visit www.nokia.com/battery.
-
Page 62: Care And Maintenance
Care and maintenance Your device is a product of superior design and craftsmanship and should be treated with care. The following suggestions will help you protect your warranty coverage. • Keep the device dry. Precipitation, humidity, and all types of liquids or moisture can contain minerals that will corrode electronic circuits. - Page 63 • Do not use harsh chemicals, cleaning solvents, or strong detergents to clean the device. • Do not paint the device. Paint can clog the moving parts and prevent proper operation. • Use a soft, clean, dry cloth to clean any lenses, such as camera, proximity sensor, and light sensor lenses.
- Page 64 More detailed information is available from the product retailer, local waste authorities, national producer responsibility organizations, or your local Nokia representative. For the product Eco-Declaration or instructions for returning your obsolete product, go to country-specific information at www.nokia.com.
-
Page 65: Additional Safety Information
Additional safety information ■ Small children Your device and its enhancements may contain small parts. Keep them out of the reach of small children. ■ Operating environment This device meets RF exposure guidelines when used either in the normal use position against the ear or when positioned at least 2.2 centimeters (7/8 inch) away from the body. - Page 66 ■ Medical devices Operation of any radio transmitting equipment, including wireless phones, may interfere with the functionality of inadequately protected medical devices. Consult a physician or the manufacturer of the medical device to determine if they are adequately shielded from external RF energy or if you have any questions.
- Page 67 • Turn the wireless device off immediately if there is any reason to suspect that interference is taking place. • Read and follow the directions from the manufacturer of their implanted medical device. If you have any questions about using your wireless device with an implanted medical device, consult your health care provider.
-
Page 68: Potentially Explosive Environments
carry flammable liquids, gases, or explosive materials in the same compartment as the device, its parts, or enhancements. For vehicles equipped with an air bag, remember that air bags inflate with great force. Do not place objects, including installed or portable wireless equipment in the area over the air bag or in the air bag deployment area. -
Page 69: Emergency Calls
often, but not always, clearly marked. They include below deck on boats, chemical transfer or storage facilities and areas where the air contains chemicals or particles such as grain, dust, or metal powders. You should check with the manufacturers of vehicles using liquefied petroleum gas (such as propane or butane) to determine if this device can be safely used in their vicinity. - Page 70 • Remove certain call restrictions you have activated in your device. • Change your profile from offline or flight profile mode to an active profile. 2. Press the end key as many times as needed to clear the display and ready the device for calls. 3.
- Page 71 SAR values. SAR values may vary depending on national reporting and testing requirements and the network band. Additional SAR information may be provided under product information at www.nokia.com. Your mobile device is also designed to meet the requirements for exposure to radio waves established by the Federal Communications Commission (USA) and Industry Canada.
-
Page 72: Battery Information
■ Technical information Feature Specification Dimensions Width 40 mm Length 110 mm Depth 12 mm Weight 72 g with BL-4C Li-ion battery Wireless networks 800 MHz CDMA Volume 46.4 cc Audio formats MIDI, MP3, AAC, AAC+, QCELP Ringing tones MIDI 64 polyphonics ■... - Page 73 Important: Battery talk and standby times are estimates only and depend on signal strength, network conditions, features used, battery age and condition, temperatures to which battery is exposed, use in digital mode, and many other factors. The amount of time a device is used for calls will affect its standby time.
-
Page 74: Index
Index converter 54 countdown timer 52 access code 10 alarm clock 50 antenna 15 date and time 36 device information 41 device settings 37, 38 battery display 34 installation 11 battery and charger informa- tion 56 battery information 72 enhancements 40, 55 extras 54 calculator 51 calendar 50... - Page 75 language setting 38 radio 48 loudspeaker 21 received calls 31 recordings 44 restoring factory settings 42 media 45 media player 47 message security settings 40 deleting 28 settings 32 minibrowser 29 text message 25 read and reply 27 shortcuts 18 text messages 25 speed dials 31 voice 29...
- Page 76 voice commands 39 voice dialling 21 voice recorder 48 web 53 write text predictive text input 23 traditional text input...
Need help?
Do you have a question about the 2228 and is the answer not in the manual?
Questions and answers