Listen Technologies NOT FLJ LT-800-072 User Manual
Stationary fm transmitter
Hide thumbs
Also See for NOT FLJ LT-800-072:
- Brochure & specs (12 pages) ,
- User manual (25 pages) ,
- User manual (25 pages)
Table of Contents
Advertisement
Quick Links
Advertisement
Table of Contents

Related Manuals for Listen Technologies NOT FLJ LT-800-072


Summary of Contents for Listen Technologies NOT FLJ LT-800-072
- Page 3 Dear Valued Customer, Thank you for choosing Listen! All of us at Listen are dedicated to providing you with the highest quality products available. We take great pride in their outstanding performance because we care that you are completely satisfied. That’s why we independently certify them to the highest quality standards and back them with a limited lifetime guarantee.
-
Page 5: Table Of Contents
LT-800 Table of Contents Package Contents Specifications Architectural Specifications Specifications Block Diagram Quick Reference Setup Instructions Operating Instructions Audio Control Listen SQ™ (Super Quiet) RF Reception Maximization Strategies Coaxial Cable Channel Selection Compatibility Charts 72 MHz Frequency Compatibility Chart 216 MHz Frequency Compatibility Chart Phonak Frequency Compatibility Chart Supplementary Information Troubleshooting... -
Page 7: Package Contents
LT-800 Package Contents LT-800 Contents • LT-800-072 (72 MHz) or • LT-800-216 (216 MHz) or • 12 VDC Power Supply • User Manual Listen Part Number LT-800-072 (72 MHz) LT-800-216 (216 MHz) Optional Accessories See page 22... -
Page 8: Specifications
LT-800 Specifications The stationary FM transmitter shall be capable of broadcasting on 57 channels. The transmitter shall have a SNR of 80dB or greater. The output power shall be adjustable to quarter, half or full. Channel tuning shall be capable of being locked. The device shall broadcast on both wide and narrow band channels. -
Page 9: Block Diagram
LT-800 Block Diagram POWER In-Line Power Supply 115VAC6 LA-201 0 Hz (provided) 15VAC, 1A Top Mounted Antenna Stud Remote Antenna Connection Transmitter RF Board ANTENNA High Functions controlled by the CPU Module RF POWER Input 1 VU Meter 12VDC Mic-Phantom Pwr, Mic, Line Line Phantom Pwr Female XLR-1/4"... -
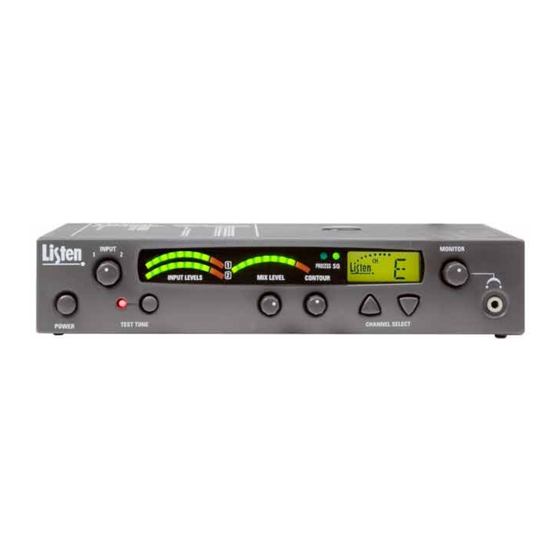
Page 10: Lt-800 Quick Reference
LT-800 Quick Reference LT-800 Front Panel: Controls & Displays Indicates audio input level of Input 1 and Input 2. Adjust audio input levels of Input 1 and Input 2 here. See page 11 for more information. Power Mix Level: Adjust so ON / OFF the Mix Level meter Test Tone: Activates... -
Page 11: Setup Instructions
LT-800 Setup Instructions Unpack the Product Remove outer packaging and plastic cover. Inspect for physical damage. Mount in Rack (if necessary) If rack mounting the unit, install the optional rack mount kit (part LA-326) according to the instructions included with the kit, then install the LT-800 in the rack. NOTE: If rack mounting, you will need to use a rear connection antenna. - Page 12 LT-800 Setup Instructions (cont.) To Select Phonak Mode: Press and hold down the channel select “up” button while powering on the unit. The LCD will display a “P” momentarily upon power up indicating that the transmitter is in the Phonak Channel Mode.
- Page 13 LT-800 Setup Instructions (cont.) Set RF Power Set the RF POWER switch on the back of the unit to Full, 1/2 or 1/4 (Level is indicated on the LCD display). The amount of transmitted RF power that you will need depends on your application. If you are operating multiple transmitters in the same environment, it is best to set the transmitters output power to its lowest level to reduce the...
-
Page 14: Operating Instructions
LT-800 Operating Instructions Power Unit On Turn power on by pressing the power button. Select a Channel Select the transmit channel by pressing the channel select UP and DOWN buttons. See Channel Selection on page 14 for more information. NOTE: The LT-800 is shipped with only limited channels (Basic Mode). To select Lock on Channel Once you determine your transmit channel, you can lock the transmitter on that channel. -
Page 15: Audio Control
LT-800 Audio Control Adjust Audio Input Level Adjust the input knob counterclockwise to add gain to Input 1. This will decrease gain to Input 2. Adjust input knob clockwise to add gain to Input 2. This will decrease gain to Input 1. If you have two audio sources connected to both Input 1 and 2, adjust the level of one input using the VU meter, then adjust the output level of the other audio source. -
Page 16: Listen Sq™ (Super Quiet)
Listen SQ™ (Super Quiet) - People are accustomed to listening to low noise, high fidelity audio (delivered via CD, DVD, etc.). FM radio systems, such as those made by Listen, have more inherent noise compared to most sound systems. To minimize noise, Listen uses a noise reduction technology called ListenSQ™. -
Page 17: Rf Reception Maximization Strategies
RF Reception Maximization Strategies For proper and dependable operation, Listen receivers need to receive a strong and consistent signal from the originating transmitter. Note that on portable receivers the headset wire is the receiving antenna. The following strategies should be used maximize this signal: When designing and installing your system, keep in mind that the location of both the transmitting and receiving antennas is critical to maximize broadcast range. -
Page 18: Channel Selection
Channel Selection It is important to choose channels that are free from interference to achieve proper operation of your Listen equipment. This process is trial and error. Before turning on the transmitter, listen to the wide band channels on the receivers (lettered channels at 72 MHz and channels that start with a “2”... -
Page 19: Compatibility Charts
72 MHz Compatibility Chart Wideband frequencies are indicated in highlighted rows. The highlighted channels also indicated those channels available in the “basic” mode (default). All channels can be accessed when in the “expanded” channel mode (see page 8 for more information). *Parenthesis indicate T35 and T20 narrowband. -
Page 20: 216 Mhz Frequency Compatibility Chart
216 MHz Compatibility Chart 216MHz Compatibility Chart upd 03.16.04 Frequency Phonic Listen Comtek 216.0125 216.0250 216.0375 216.0625 216.0750 216.0875 216.1125 216.1250 216.1375 216.1625 216.1750 216.1875 216.2125 216.2250 216.2375 216.2625 216.2750 216.2875 216.3125 216.3250 216.3375 216.3625 216.3750 216.3875 216.4125 216.4250 216.4375 216.5125 216.5250 216.5375... -
Page 21: Phonak Frequency Compatibility Chart
Phonak Frequency Chart Frequency (MHz) Listen Phonak 216.012 216.025 216.037 216.062 216.075 216.088 216.113 216.125 216.137 216.162 216.175 216.188 216.213 216.225 216.238 216.262 216.275 216.287 216.312 216.325 216.338 216.363 216.375 216.387 216.412 216.425 216.438 216.512 216.525 216.537 216.562 216.575 216.588 216.613 216.625 216.637... -
Page 22: Supplementary Information
LT-800 Troubleshooting The LT-800 has no power Make sure the LA-207 power supply is connected to a power source and is connected to the jack marked “Power Input”. Make sure the POWER button is pressed in. There is no audio or the audio level is too low Make sure that your audio source is properly connected to Input 1 and/or Input 2. - Page 23 LT-800 Troubleshooting (cont.) I’m using another brand of receiver - how do I tell which channel to use Refer to Listen’s Frequency Compatibility Tables (pages 15-17). Adjust Listen’s transmitter to the same frequency as the other major brand. Since Listen products can access 57 channels, they will most likely receive on the same fixed channel or channels of other major brands.
-
Page 24: Compliance Notice
This device must be installed by a trained audio professional or certified dealer of Listen. The user can’t make any modifications to the unit without expressed written consent of Listen Technologies Corporation. Any modifications made will void the FCC compliance, Listen warranty and the users authority to operate Listen’s equipment. -
Page 25: Warranty
Warranty & Contacting Listen Listen Technologies Corporation (Listen) warrants its transmitters and receivers (LT-82, LT-700, LT-800, LR-100, LR-42, LR-44, LR-300, LR-400, LR-500, LR-600) to be free from defects in workmanship and material under normal use and conditions for the useful lifetime of the product from date of purchase. -
Page 26: Optional Accessories
Optional Accessories LA-101 Helical Top Mounted Antenna (72 MHz) LA-107 Ground Plane Remote Antenna (216 MHz) LA-125 (72 MHz) and LA-126 (216 MHz) Antenna Kit for Rack Mount Antenna Accessories LA-102 Telescoping Top Mounted Antenna (216 MHz) LA-122 Universal Antenna Kit The single solution for all of your indoor remote antenna needs. - Page 27 Optional Accessories (cont.) Cable & Connectors Accessories LA-112 RG-58 50 Ohm Coaxial Cable (per ft.) LA-128 RG-8 BNC Connector LA-261 Lavalier Microphone LA-276 LA-277 Collar Conferencing Microphone Microphone NOTE: To use Listen microphones you must use a converter (LA-280) to adapt the 3.5 mm connection to a 1/4” phono connection. LA-113 RG-8 50 Ohm Low-Loss Coaxial Cable (per ft.)
- Page 28 Notes...
- Page 29 Notes...
- Page 30 Notes...
- Page 31 Notes...
- Page 32 Listen Technologies Corporation 14912 Heritagecrest Way Bluffdale, Utah 84065-4818, U.S.A. +1.801.233.8992 +1.800.330.0891 North America +1.801.233.8995 www.listentech.com © 2008 Listen Technologies Corporation ® All Rights Reserved 081308...
Need help?
Do you have a question about the NOT FLJ LT-800-072 and is the answer not in the manual?
Questions and answers