Table of Contents
Advertisement
Advertisement
Table of Contents

Related Manuals for Zycoo C20


Summary of Contents for Zycoo C20
-
Page 2: Table Of Contents
Pin Configuration ......................12 Pin Active ........................13 System Management ....................... 13 Time Setting ........................ 13 Change Login Password of Web ................. 14 Firmware Upgrade ...................... 14 Restore to Factory Default ..................15 Reboot ......................... 15 Copyright © ZYCOO All rights reserved. V1.0... -
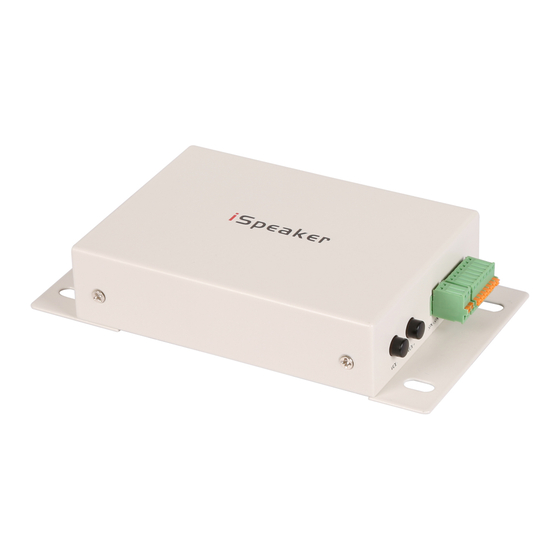
Page 3: Brief Introduction
There are two models of ZYCOO iSpeaker now: B20 and C20. B20 supports 10 Watt amplifier and C20 supports 3.5 Watt amplifier, which will provide sufficient coverage to the assigned rooms or spaces as you required. -
Page 4: Device Installation
Other Input Power 5V/1A DC 12V/2A DC Interface 2x10/100BASE-T Auto-MDIX, RJ45 RS232 Optional 4 programmable output pins Environment Operation 0℃ to 40℃ Temperature Storage -40℃ to 70℃ Temperature Humidity 10% to 95%,No Dew Copyright © ZYCOO All rights reserved. V1.0... -
Page 5: Physical Connection
C20 supports PoE. If the switch server supports PoE, please plug the Ethernet cable to the RJ45 interface “LAN 1 POE” of iSpeaker C20. The two Ethernet interfaces of iSpeaker support bridge mode only; LAN2 is used to connect other devices for network expanding. If your IP PBX server doesn’t support PoE, please use the 5V/1A power supply provided by... -
Page 6: Web Login
5. Configuration Abstract: Here we will take iSpeaker C20 as reference because the B20 has the similar web configuration as C20. If any difference, we will remark it in relatively. Web Login Step1. Plug the Ethernet cable to LAN 1 or LAN 2 of iSpeaker. -
Page 7: Network Configuration
【Continue】to make additional changes, or【Apply Now】to apply changes to device. 6. SIP Registration SIP Basic Configuration Click【SIP Configuration】to go to【SIP Basic Configuration】, including Server Address, SIP Extension, Autoanswer, Audio Output Mode(Defaulted Speaker), etc.. After configuration, please click “Submit”. Copyright © ZYCOO All rights reserved. V1.0... -
Page 8: Sip Advanced Configuration
Click【Advanced】to go to SIP Advanced Configuration. You can change the configuration based on your requirement, such as Local SIP Port(Default is 5060) and RTP/RTCP DSCP (Default is 8000/8001). After modification, please click “Submit”. Copyright © ZYCOO All rights reserved. V1.0... -
Page 9: Sip Voice Codec
Click 【Codecs】 to configure the priority order of SIP codecs. After configuration, click 【Submit】 . SIP Auto Provision (Hidden by default) SIP Auto Provision is very useful function for company to deploy the telephony terminals such as IP Phone and sip speaker quickly. Copyright © ZYCOO All rights reserved. V1.0... - Page 10 224.0.1.75 and default port 5060. If custom URL is required, the IP PBX server IP address will be displayed here automatically once tick this option (E.g. : http://192.168.2.66:9999/phones). Step3. Click【Phone Settings】【New Phone】to configure the iSpeaker information. Copyright © ZYCOO All rights reserved. V1.0...
- Page 11 Step5. Reboot iSpeaker, and visit the device with the previous defined IP in Phone Provisioning, e.g.: http://192.168.2.24, input default username and password “admin/admin”, then you will see the device information which shows the iSpeaker is registered. Copyright © ZYCOO All rights reserved. V1.0...
-
Page 12: Volume Settings
Click【Pin Function】to go to Pin Name Configuration and define the name from Pin 1 to Pin 4. Notice: Space is not allowed in Pin Name; please use “_” to replace space. After configuration, please click【Submit】. Copyright © ZYCOO All rights reserved. V1.0... -
Page 13: Pin Active
NTP mode (NTP is enabled by default). If NTP is not enabled, time should be set manually in “Manual Time Setting”. “Daylight Saving Time” is available to choose (Not enabled by default). Also you can choose the time zone, default is “(UTC+08:00)Beijing”. Copyright © ZYCOO All rights reserved. V1.0... -
Page 14: Change Login Password Of Web
Firmware Upgrade Click【Administration】【Firmware Upgrade】to upgrade the firmware. Download the firmware from Zycoo official website; to make sure successful upgrade please modify the firmware name as“iSpeaker_C20” or “iSpeaker_B20”. Notice: Please DO NOT power off or reboot the device in upgrade; the system will reboot automatically after firmware upgrade succeeded. -
Page 15: Restore To Factory Default
Click 【Administration】【Factory Default】, and click the button “Restore to Factory Default”. The system will be reset after 3~5 seconds, all the settings will be cleared and reset to factory default. Reboot Click【Administration】【Reboot】and click the button “Reboot”, the system will reboot after 3~5 seconds. Copyright © ZYCOO All rights reserved. V1.0...
Need help?
Do you have a question about the C20 and is the answer not in the manual?
Questions and answers