Advertisement
Advertisement
Table of Contents

Related Manuals for Jimi JH08


Summary of Contents for Jimi JH08
-
Page 1: User Manual
JH08 Wireless Home Monitor User Manual Version: J1409-1.0 www.jimilab.com... - Page 2 Please read this manual carefully before usage for fast and correct operation. Product appearance, color and accessories are subject to change without notice. 1 Accessories Check the product and accessories as below to see if they are complete, otherwise please contact your local supplier.
- Page 3 Camera body Wall mount (Optional) Magnetic base Setscrew×3 (Optional) Charger Power cable Screw×3 (Optional)
-
Page 4: Specifications
2 Specifications Type JH08 32bit RISC SoC Processor Image sensor 1/4"Color CMOS Sensor Image resolution HD 720P(1280*720), WVGA(854*480) Camera lens Aperture F2.8, 127° wide angle Video compression format H.264 Video bitrate Dynamic VBR 32Kbps-2Mbps self-adaption Max 30fps Audio working mode... - Page 5 TF Card (Max 32G) local storage and cloud Memory storage server Video format Working status indicator Bi-color LED Indicator Light Photo capture Support Motion detection alarm Support alarm message pushing Mobile terminal Support iOS/Android System Smart phone Max terminal number Working environment -30°C~60°C,Humidity<95% Upgrade way...
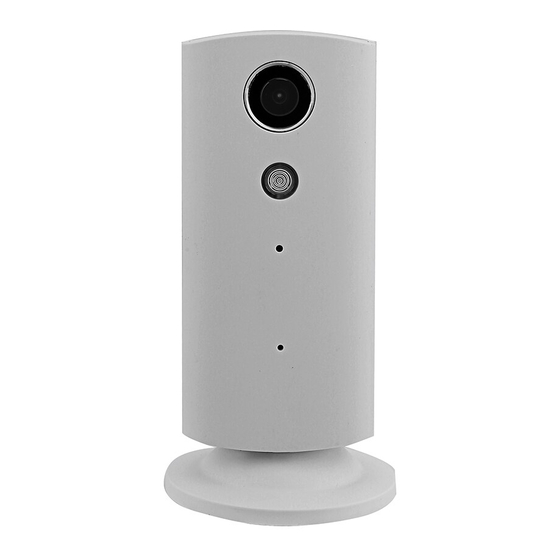
- Page 6 3 Structure Camera Micro SD slot LED indicator Speaker Power input Magnetic base...
-
Page 7: Led Indicator Status
3.1 LED indicator status Status Meaning Blue constant on AP setting mode Blue flashing slow WIFI connection normal Red flashing slow one time in interval Recording Red flashing fast two time in interval User viewing online Red flashing fast constant Upgrading 4 Operation 4.1 Connect with power... - Page 8 4.2.2 WIFI setting 1. When the device is powered and the blue LED is constant on, find the AP hotspot “JH008_”+”first 6 digit of the device UUID” in WLAN settings. Click to connect and the default password is “88888888”. 2. After the connection is made successful, start the APP on your phone, then click “add camera”.
- Page 9 3. Click “Search” button. 4. Click the device “UUID” from search result, or type in the “UUID” manually.
- Page 10 5. Type in the default password “88888888”, name the device, then click “OK”. 6. Click the device and enter the monitoring screen in AP mode.
- Page 11 7. Click the on the right to show the setting menu .
- Page 12 8 . Click “Edit camera”, “Advanced” to show the setting.
- Page 16 9. Click “Modify security code” to change the default password, default password is “ 88888888”.
- Page 17 10. Click “Alarm Time Set” to set motion detect activate time, during which alarm message will be available.
- Page 18 11. Firmware Update: During update, please don’t cut off power, otherwise please contact your supplier. Time Synchronization: Synchronize the time between cellphone time and device time. (after time-zone is set in camera, the camera time will change accordingly). Restart camera: To restart camera and fix malfunction if any.
- Page 19 12. DropBox upload verification: to activate the DropBox upload function for event recordings, you need to link your dropbox account with JimiLive.
- Page 20 13. Click “manage WIFI networks” to connect to a WIFI SSID, type in the password and click “OK”, the device will reboot and connect to this WIFI network. The connection is successful if the LED blue light is flashing slowly and the device is online in APP.
- Page 21 14. After the Wi-Fi is connected successful, the device is ready for remote live-monitor, two-way talk, snapshot, video recording and alarm messages review, etc.
-
Page 22: Installation
5 Installation you can put the device on a flat surface with the magnetic base or install it on the wall or the ceiling. Details please check below: Notice: a. Before installation, please make sure the device is close to the power socket. - Page 23 5.1.2 Drill holes Drills holes on the wall according to the position of the pin holes. 5.1.3 Secure the pin to the wall Place two setscrews into the holes, then secure the pin to the wall with the two screws.
- Page 24 5.1.4 Secure the device on the wall mount.
- Page 25 5.1.5 Secure the wall mount to the pin .
-
Page 26: Ceiling Installation
5.2 Ceiling installation Notice: Please set “Video flip” in the APP’s “Camera setting” if install on the ceiling, otherwise the image will be back side down. 5.2.1 Use a slot type screwdriver to take out the top cover gently and reveal the screw hole. - Page 27 Use one setscrew and one screw to secure the magnetic base to the ceiling. 5.2.4 Press back the circle top cover .
- Page 28 5.2.5 Place the device onto the magnetic base, and then adjust the angle to a proper position.
-
Page 29: Troubleshooting
6 Trouble shooting During operating if encounter any problems, please read the following table, contact your local supplier if the problem remain unsolved. Common errors Possible Causes Solutions Confirm the device is connected Device not in WIFI to WIFI successfully Connection failed WIFI network error Check WIFI status...
Need help?
Do you have a question about the JH08 and is the answer not in the manual?
Questions and answers