
Related Manuals for Pfaff Smarter


Summary of Contents for Pfaff Smarter
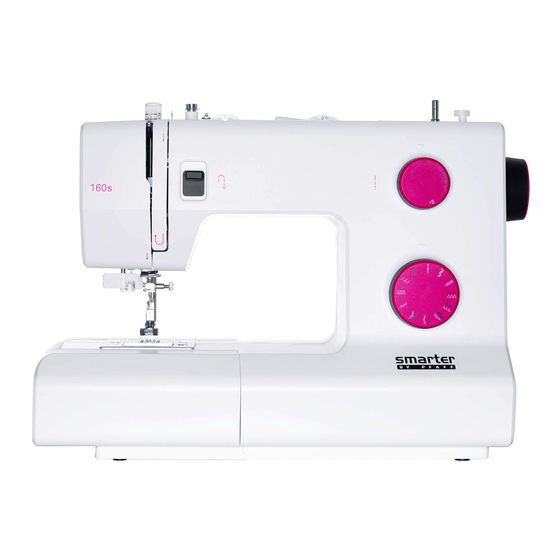
- Page 1 Owner's Manual 160s 150s 140s 130s SMARTER BY PFAFF ™ – inspired and developed by the premier PFAFF sewing machine brand ®...
-
Page 2: Important Safety Instructions
This household sewing machine is designed to comply with IEC/ EN 60335-2-28 and UL1594. IMPORTANT SAFETY INSTRUCTIONS When using an electrical appliance, basic safety precautions should always be followed, including the following: Read all instructions before using this household sewing machine. Keep the instructions at a suitable place close to the machine. - Page 3 • Do not use bent needles. needle causing it to break. • Wear safety glasses. in the needle area, such as threading needle, changing needle, threading bobbin, or changing presser foot, etc. • Never drop or insert any object into any opening. •...
- Page 4 FOR EUROPE ONLY: This appliance can be used by children aged from 8 years and above and persons with reduced physical, sensory or mental capabilities or lack of experience and knowledge if they have been given supervision or instruction concerning use of the appliance in a safe way and understand the hazards involved.
-
Page 5: Table Of Contents
TABLE OF CONTENTS INTRODUCTION ......... 6 ..........21 Machine Overview ..........6 ..........22 ............6 Adjustable Needle Position ......22 Top Parts ............7 ..........22 ............7 Accessories ............7 SEWING ..........23 Included Accessories not in Picture ..7 ....23 Presser Feet ...........8 ......23 ......9 ..........23 ....10 ......24 ......24... -
Page 6: Introduction
INTRODUCTION Machine Overview Front Side 1. Threading slots 12. Needle bar 2. Thread cutter 3. LED light 4. Reverse lever 14. Bobbin cover 5. Free arm 15. Lower thread guide 6. Accessory tray 16. Needle screw 17. Presser foot lift 18. -
Page 7: Top Parts
Top Parts 21. Presser foot pressure dial 22. Thread guides 24. Hole for auxiliary spool pin 25. Bobbin winder spindle 26. Take-up lever 27. Thread tension discs 28. Bobbin winder tension disc 29. Thread tension dial Rear Side 31. Main switch, connectors for power cord and foot control 32. -
Page 8: Presser Feet
Presser Feet Standard Presser Foot 0 This foot is used mainly for straight stitching and zigzag stitching with a stitch length longer than 1.0 mm. Clearview Foot 1 When sewing decorative stitches or short zigzag stitches and other utility stitches with less than 1.0mm stitch length, use this smoothly over the stitches. - Page 9 Stitch Overview – 150s/160s Stitch Name Description 1-step Buttonhole For all straight stitching and topstitching Triple zigzag stitch For stitching on elastic band, darning tears and patches Blindhem stitch For invisible hem attachment Elastic blindhem For invisible hem attachment and simultaneous stitch * serging, also for stretch fabrics Decor stitch...
- Page 10 Stitch Overview – 130s/140s Stitch Name Description 4-step Buttonhole For all straight stitching and topstitching Triple zigzag stitch* For stitching on elastic band, darning tears and patches Elastic blindhem For invisible hem attachment and simultaneous stitch * serging, also for stretch fabrics Blindhem stitch For invisible hem attachment Greek stitch...
-
Page 11: Preparations
2. Remove all outer packing material and the plastic bag. Note: Your SMARTER BY PFAFF™ 130s/140s/ 150s/160s sewing machine is adjusted to provide the best stitch result at normal room temperature. Ex- treme hot and cold temperatures can affect the sewn result. -
Page 12: Free Arm
Pack away after Sewing Note: After switching off, residual power may still remain in the machine. This may cause the light to stay on for a few seconds while the power is consumed. This is normal behavior for an energy 2. -
Page 13: Spool Pins
Spool Pins Your machine has two spool pins, a main spool pin and an auxiliary spool pin. The spool pins are designed for all types of thread. The main spool pin is used in a Narrow thread spool the horizontal position for normal threads and the vertical position for large spools or specialty threads. -
Page 14: Threading The Machine
Threading the Machine Make sure that the presser foot is raised and the needle is in its highest position. 5. Thread the needle. -
Page 15: Needle Threader
Needle Threader The integrated needle threader allows you The needle must be in its highest position to use the built-in needle threader. Turn the handwheel until the notch on the wheel is lowering the presser foot. 1. Use the handle (B) to pull the needle threader all the way down. -
Page 16: Threading For Twin Needle
Threading for Twin Needle Replace the sewing needle with a twin needle. Make sure that the presser foot is raised and the needle is in its highest position. 1. Place the thread spool on the spool pin and fit the appropriately sized spool cap. -
Page 17: Bobbin Winding
Bobbin Winding spool cap tightly against the spool. front to the back. Pull the thread clockwise around the inside to the outside. 4. Place the bobbin on the bobbin spindle. 5. Push the bobbin spindle to the right to activate the bobbin winding. Press the foot control to wind the bobbin. -
Page 18: Presser Foot Pressure
Presser Foot Pressure The presser foot pressure has been pre-set to not need to adjust the presser foot pressure. very light or heavy fabric, adjusting the pres- sure can improve the result. For very light fabrics, loosen the pressure by turning the dial counterclockwise. -
Page 19: Needles
Needles The sewing machine needle plays an important role recommend needles of system 130/705H. The needle package included with your machine contains needles Universal Needle (A) Universal needles have a slightly rounded point and come in a variety of sizes. For general sewing in a vari- ety of fabric types and weights. -
Page 20: Lowering Feed Dogs
Lowering Feed Dogs You can lower the feed dogs by moving the switch at the back of the free arm to the wish to raise the feed dogs. Note: The feed dogs will not raise immediately when the lever is switched. Turn the handwheel one full turn or start sewing to re-engage the feed dogs. -
Page 21: Stitch Selection
Stitch Selection desired stitch. The selected stitch is the one The stitches printed in white on the stitch Use non-stretch stitches when sewing woven fabrics, leather or vinyl and stretch Note: Always raise the needle above the fabric and presser foot before you turn the stitch selc- tion dial. -
Page 22: Adjustable Needle Position
Stitch Width sired stitch width. The higher the number, the wider the stitch width. The stitch width can be varied wheel correspond to the stitch width in Note: Before you turn the stitch width dial, raise the needle to its highest position, other- wise it may bend or break. -
Page 23: Sewing
SEWING stitch scribed, a chart shows the recommended set- chart to the right. Start to Sew – Straight Stitch A. Recommended stitch B. Stitch length in mm Raise the presser foot and position the fab- C. Stitch width in mm ric under it, next to a seam allowance guide line on the needle plate. -
Page 24: Reinforced Straight Stitch
Reinforced Straight Stitch stitch This stitch is stronger than regular straight stitch, due to the fact that it is a triple and elastic stitch. The reinforced straight stitch can be used for heavy stretch fabrics, for Set for reinforced straight stitch crotch seams which are subject to consider- able strain and for topstitching heavy fabrics. - Page 25 Overlock Stitch stitch The open overlock stitch sews the seam and overcast the edge all at one time, perfect for stretch fabrics. This stitch is more elas- tic than normal seams, very durable and Set for overlock stitch Tip: When sewing, guide the fabric edge along the metal pin of the foot.
-
Page 26: Blindhem
Blindhem stitch The blindhem stitch is used to make invisible hems on skirts, trousers and home decorating. 1. Finish the edge of the hem. Set for blindhem stitch 2. Fold and press the hem allowance to the wrong side. 3. Fold the hem back on itself so approxi- extends beyond the fold. -
Page 27: Darning With The
Sewing on Patches or Appliqués stitch To cover large holes it is necessary to sew a new piece of fabric onto the damaged area. Baste the new piece of fabric onto the dam- aged area on the right side of the fabric. Set for three-step zigzag stitch the three-step zigzag stitch. - Page 28 Sewing on Buttons stitch 1. Remove the presser foot and lower the Set for button sewing 2. Mark the fabric where the button is to be located. Place the fabric and button under the ankle with the holes in the button lined up with the swing of the needle.
- Page 29 Standard Buttonhole stitch (model 150s/160s) The fabric should be interfaced and/or stabi- lized where buttonholes are to be sewn. Set for buttonhole 1. Mark the start position and buttonhole Push the button holder open by pushing Push the button holder forward until button will determine the length of the buttonhole.
- Page 30 Standard Buttonhole stitch (model 130s/140s) The fabric should be interfaced and/or stabi- lized where buttonholes are to be sewn. Set for buttonhole Prepare the Buttonhole Measure diameter and thickness of the but- tain correct buttonhole length. Mark the start position and buttonhole length on the fabric Note: Before starting to sew any buttonhole, al- ways push the the buttonhole foot fully back.
-
Page 31: Stretch Fabrics
Use seam ripper and cut the buttonhole open from both ends towards the middle. The density of the buttonhole is adjusted Note: Density varies according to the fabric. Al- Carefully cut your buttonhole ways test sew a buttonhole on the fabric you are open with a seam ripper. -
Page 32: Sewing Zippers
Sewing Zippers stitch the right or the left of the needle, making it 1.5-3 easy to sew both sides of the zipper. To sew the left side of the zipper, attach the Set for zipper To sew the right side of zipper, attach the Center Zipper Right presser foot Left presser foot... -
Page 33: Maintenance
MAINTENANCE Cleaning the Machine To keep your sewing machine operating well, Wipe the exterior surface of your machine with a soft cloth to remove any dust or lint built up. Cleaning the Bobbin Area Note: Raise the needle, lower the feed dogs and turn off the machine. -
Page 34: Troubleshooting
TROUBLESHOOTING ® your machine. For further information please contact your local authorized PFAFF dealer. General Problems The Seam has Uneven Stitches Fabric does not move? Is the thread tension correct? Make sure that the feed dogs are not lowered. Check needle thread tension and the threading. -
Page 35: Intellectual Property
Bobbin Thread Breaks Did you insert the bobbin properly? Check the bobbin thread. Is the stitch plate hole damaged? Change the stitch plate. Is the bobbin area clean? Clean lint from bobbin area. Is the bobbin wound correctly? Wind a new bobbin. design. - Page 36 4710092-26A English © 2014 KSIN Luxembourg II, S.ar.l. All rights reserved. Printed in Germany on environmentally-friendly paper...