Table of Contents

Related Manuals for West Mountain Radio RIGblaster Advantage


Summary of Contents for West Mountain Radio RIGblaster Advantage
- Page 1 RIGblaster Advantage www.westmountainradio.com 1020 Spring City Drive Waukesha, WI 53186 262-522-6503 sales@westmountainradio.com ©2015 West Mountain Radio, All rights reserved. All trademarks are the property of their respective owners.
-
Page 2: Table Of Contents
Introduction About the RIGblaster Advantage ....4 About the RIGblaster DVD ......5 Digital-Mode Operating . - Page 3 Reference RIGblaster Advantage Connection Diagrams ..58 Icom CI-V CAT Cable Schematic ....58 ISC &...
-
Page 4: About The Rigblaster Advantage
It has many outstanding features which will at the same time enhance and simplify your operating. Some of the features of the RIGblaster Advantage which put it ahead of the competition include; • COM port push-to-talk (PTT) keying. -
Page 5: About The Rigblaster Dvd
SSTV enthusiasts.14.236MHz is currently very popular with the digital voice experimenters using FreeDV software. It is worth noting there are some modes in use which cannot be used with the RIGblaster Advantage (nor any sound-card based interface). West Mountain Radio Operating Manual... -
Page 6: Package Contents
These are just suggestions but will help you get started navigating the world of HF digital-modes. Package Contents The following is a list of the contents for the RIGblaster Advantage. Verify that all the following items were included: ITEM RIGblaster Advantage Owner’s Manual... -
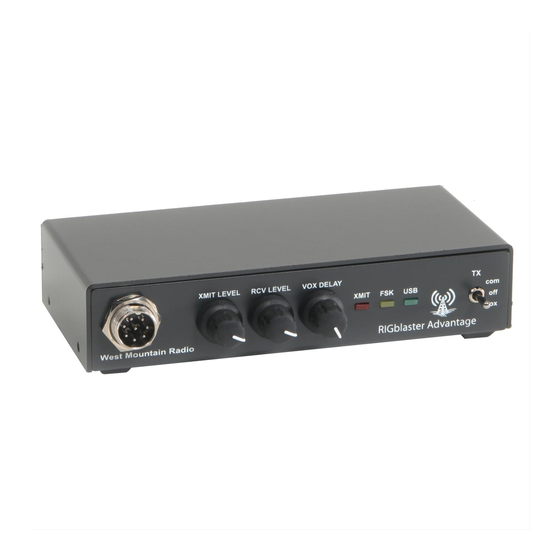
Page 7: Controls, Connections And Features
Controls, Connections And Features West Mountain Radio Operating Manual... -
Page 8: Choosing The Correct Isc
Choosing the Correct ISC Configuring the RIGblaster Advantage with a transceiver is very simple by use of the Instant Setup Connectors (ISC). These take the place of jumper wiring for many common radios. Each ISC is respectively identified: Icom Round Metal, Icom RJ45 Modular, Yaesu Round Metal, Yaesu Round Metel –... - Page 9 Locate the correct ISC for the radio and install it on the ISC header (2 rows of 13 pins) located inside the RIGblaster Advantage ensuring pin 1 on the ISC matches pin 1 on the header. Example: Installation of a Kenwood RJ45 Modular ISC inside the RIGblaster Advantage.
-
Page 10: Software Driver Installation
After the drivers installation has finished, the green led marked “USB” on the front of the RIGblaster Advantage will be illuminated. During installation, the red “XMIT” led may flicker a few times. This is normal and does not indicate a problem. - Page 11 -l | grep ‘RIGblaster’ For older distributions and troubleshooting visit the following support page: http://www.westmountainradio.com/adv/drv/linux Macintosh Installation The RIGblaster Advantage will work with OS X 10.5 and above. Drivers and instructions are available online: http://www.westmountainradio.com/adv/drv/macosx Windows Installation You have two choices of automatic installation on Windows systems.
- Page 12 RIG- blaster Survey/Diagnostic Program. Answer yes to all steps and this will pre-load all West Mountain Radio drivers for you. After it has installed you may attach the RIGblaster Advantage.
- Page 13 COM port later. When expanding the section marked “Sound, video and game control- lers”, notice the new entry labeled RIGblaster Advantage Audio (May be shown as USB Audio Device in Win XP or earlier). Windows may assign any number for the COM port. Windows typically treats COM1 to COM4 as special and does not normally use them for USB serial devices.
-
Page 14: How To Renumber The Rigblaster Advantage Com Port
How To Renumber The RIGblaster Advantage COM port If you find it necessary to renumber the RIGblaster Advantage COM port, e.g., for use with older software which requires a lower COM port number we have created an application to allow you to do this easily. It is part of the West Mountain Radio Diagnostic program “WMRDiagnostics”... -
Page 15: Transceiver Connections
6. The other end of the patch cable should be connected to the jack labeled LINE IN on the rear of the RIGblaster Advantage.If you have our optional FSK cable then you would not perform steps 5 and 6 above. -
Page 16: Rigblaster Settings
Audio Levels Proper audio level setting is crucial to successful digital-mode operation. The RIGblaster Advantage transmit audio level can be set by use of the Windows playback volume slider and the convenient front panel XMIT LEVEL control. Receive level can be set by the Windows recording volume slider and the front-panel RCV LEVEL control. - Page 17 Advantage which will further attenuate transmit volume by 20dB. It is located next to one of the audio transformers and should be shorted for the attenuator to be active. Setting The Playback (TX) Volume Setting The Record (RX) Volume West Mountain Radio Operating Manual...
-
Page 18: Ptt (Keying Your Radio)
PTT (Keying Your Radio) On the front-panel of the RIGblaster Advantage there is a three position switch labeled TX. This controls how PTT is activated (the method by which the transceiver goes into transmit). Position 1 – COM The Advantage is under computer control and switches the transceiver between transmit and receive depending on the state of the serial port RTS control signal. -
Page 19: Rtty (Fsk) Operation
Only transceivers that have an RTTY mode and FSK shift input will work in this method. A special cable is required to interface from the CW/FSK jack on the RIGblaster Advantage to the FSK input on the transceiver. FSK shift input is controlled by the serial DTR line. Note: PTT is also required and provided by serial RTS. -
Page 20: Cat
Most modern radios have a CAT jack and with very few exceptions the RIGblaster Advantage can be connected to this via an optional cable for full computer control. The CAT jack on your radio is a serial interface (using TxD/RxD) which can receive instructions and send information back to your computer to be used with suitable software. -
Page 21: Transceiver Settings
FSK generated RTTY (use RTTY mode) and AFSK RTTY (use LSB mode) Because the RIGblaster Advantage connects to a transceiver microphone jack it is important not to choose a “data” or “dig” mode on the radio. These modes typically expect transmit modulation through an accessory jack and will disable the microphone jack. -
Page 22: Transmit Settings
XMIT LEVEL and/or Windows playback slider control. PSK31 rule-of-thumb: Ensure no ALC indication is shown on your meter while transmitting and aim for no more than 40W output. You should be transmitting a clean signal and being a “good HF neighbor”. West Mountain Radio Operating Manual... -
Page 23: Software Configuration
Note: The CW mode in Fldigi is tone modulated Morse Code (MCW) which is normally operated in SSB mode on HF and FM mode on VHF/ UHF. The RIGblaster Advantage can convert this into real-keyed CW when the switch is in the VOX mode and a stereo patch cable hooked to the CW jack on both the Advantage and radio. - Page 24 3. Choose “Audio” from the first row of tabs. 4. Choose “Devices” from the second row of tabs. 5. Select the “Port Audio” checkbox. 6. Assign “RIGblaster Advantage Audio” to both of the “Capture” and “Playback” drop-down boxes. 7. Click on “Save” to make the changes permanent.
- Page 25 7. Select the “Use RTS” checkbox. 8. Ensure “Use DTR” is not selected. 9. Ensure “RTS=+V” is not selected. 10. Ensure “DTR=+V” is not selected. 11. Click on “Initialize”. 12. Click on “Save” to make the changes permanent. West Mountain Radio Operating Manual...
-
Page 26: Airlink Express (Psk31, Rtty & Mfsk-16)
Airlink Express is designed to be a modern, user-friendly program which previous operators of Digipan will feel immediately at home with. It supports the most popular digital modes, a multi-channel decoder, on- screen display of DSP filtering, CAT control and even FSK RTTY. West Mountain Radio Operating Manual... - Page 27 Configure Airlink Express To Use The RIGblaster Advantage Sound-device. 1. Choose “Setup” from the main menu. 2. Choose “Audio Setup” from the popup menu. 3. Assign “RIGblaster Advantage Audio” to the “Select Input Device” drop-down. 4. Assign “Microphone” to the “Select Input Line” drop-down.
- Page 28 9. Ensure the “PTT by CAT commands” checkbox is not selected. 10. Ensure the “PTT on RTS” checkbox is selected 11. Ensure the “PTT on DTR” checkbox is not selected 12. Click on “Save” to make the changes permanent. West Mountain Radio Operating Manual...
-
Page 29: Mmtty (Rtty Fsk)
Scroll down to the bottom of the page and look for a hyperlink to a zip file named “ExtFSK106.zip”. Download this file, unzip it and copy the contents to the MMTTY working folder, usually C:\Ham\MMTTY Then follow the steps on the next page to configure MMTTY with the RIGblaster Advantage. West Mountain Radio Operating Manual... - Page 30 8. Select EXTFSK from the “Port” drop-down. 9. A new window will appear titled “EXTFSK 1.06”. On this window, assign the RIGblaster Advantage COM port and choose DTR for “FSK output” and RTS for “PTT output”. Notice the “Status: OK” message near the top.
- Page 31 The transmit power level in FSK RTTY is simply determined by the transceiver’s RF POWER control. The RIGblaster Advantage XMIT LEVEL control will have NO EFFECT on transmit power. RTTY is a 100% duty-cycle mode. Check the transceiver manufacturer’s recommendation for a safe power level in RTTY.
-
Page 32: Mrp40 (Morse Code)
1. Choose “Options” on the MRP40 window. 2. Move the mouse cursor to “Show...” and then choose Soundcard...” 3. Assign “RIGBlaster Advantage Audio” in each of the RX and TX drop- down boxes. 4. Enter the preferred sidetone frequency. As we will be using your transceiver’s CW mode this should match the sidetone frequency. - Page 33 7. Move the mouse cursor to “TX Settings” and choose “Send via Com (x) Port” from the menu. 8. Enter the RIGblaster Advantage COM port number in the text box. 9. Ensure that “Send Pin” is set to DTR, and “PTT Pin” is set to RTS.
-
Page 34: Jt65-Hf: (Jt Modes)
JT65-HF is a recent addition developed by Joe Large, W6CQZ. For straightforward HF operation in JT65 this is the easiest software to con- figure and simplest to use. West Mountain Radio Operating Manual... - Page 35 1. Click on “Setup” on the JT65-HF main window. 2. Select the “Station Setup” tab at the top of the configuration window. 3. Assign the RIGblaster Advantage Audio to the sound-card input & output device drop-down boxes. 4. Ensure “Enable Automatic RX/TX Sample Rate Correction” is checked.
- Page 36 Notice the “Adjust Input Levels” box shown on the main screen? The sliders are adjustable, but it is easier to adjust the RIGblaster Advantage RCV LEVEL control until L0 and R0 (on a quiet frequency) are achieved. Time Synchronization The PC’s clock must be synchronized to an accurate time source.
-
Page 37: Winlink 2000 With Rms Express (Winmor)
Using RMS Express requires an understanding of the Winlink 2000 system. This manual only covers getting it working with the RIGblaster Advantage. To learn more, we recommend starting at the Winlink 2000 website: http://www.winlink.org/, especially http://www.winlink.org/GetStarted. West Mountain Radio Operating Manual... - Page 38 4. Choose “Setup” from the menu at the top of this window. 5. Select “WINMOR TNC Setup”. A window titled “WINMOR Setup” should appear. 6. Assign the RIGblaster Advantage Audio device for both of the capture & playback drop-down boxes. 7. Click on “Update”.
- Page 39 11. If using an Icom transceiver, be sure to enter the CI-V address cor- rectly. 12. Select the RIGblaster Advantage COM port for “Serial Port to Use”. Enter the transceiver’s CAT baud rate. Make sure “Enable RTS” and “Enable DTR” are NOT selected.
-
Page 40: Uz7Ho Sound Modem (Packet Radio)
The software itself performs the task of a modem – to actually use it will require another software program which provides you with the tools nec- essary to handle connections and type. This is called a terminal program and Andy was nice enough to provide us this also. West Mountain Radio Operating Manual... - Page 41 3. Select RIGblaster Advantage audio for both the “Output device” and “Input device” drop-downs. 4. Optionally select “Color Waterfall” 5. Select the RIGblaster Advantage COM port in the “Select PTT port” drop-down. 6. Ensure “Dual PTT” is not selected. 7. Click on “OK” to save the new settings.
- Page 42 RX pairs. On very slow computers you might need to set this value to 0. • Ensure “Add.RX shift” is set to 30Hz. • Ensure “Bits recovery” is set to “Single” unless you have good reason not to. • Click on “OK” to save the new settings. West Mountain Radio Operating Manual...
- Page 43 7. EasyTerm will start to decode when packets are heard. 8. If you are new to Packet Radio, before making a connection to another station it is advised you spend some time listening and observing the “netiquette”. West Mountain Radio Operating Manual...
-
Page 44: Mmsstv (Analog Sstv)
Since the advent of the personal computer with color graphics, there has been much improvement in quality and resolution. The RIGblaster Advantage can operate all the common SSTV modes in use today by using the highly regarded (and free) MMSSTV software written by Makoto Mori (JE3HHT). - Page 45 2. Choose “Setup MMSSTV(O)”. 3. Select the “TX” tab from the top of the options window. 4. Assign the RIGblaster Advantage COM port to the “PTT Port” drop- down box. 5. Be sure to enter your callsign in this screen!
-
Page 46: Easy Pal (Digital Sstv)
6. Click the “MISC” tab from the top of the options window. 7. Assign the RIGblaster Advantage Audio for both “In” & “Out” in the Sound-card section. 8. Select “12000” in the “Clock” drop-down. 9. Click on “OK” and an alert will show indicating MMSSTV needs to be restarted. - Page 47 The RIGblaster Advantage is capable of operating digital SSTV in conjunction with the “EasyPal” software created by Erik Sundstrup (VK4AES). The latest version of EasyPal is available to download from: http://www. kc1cs.com/ Configuring EasyPal For The RIGblaster Advantage 1. Open the “Setup” menu from the EasyPal main window.
- Page 48 8. Enter the RIGblaster Advantage COM port. 9. Select the TX option “RTS ON DTR OFF”. 10. Select the RX option “RTS DTR (OFF always)”. 11. Click on “OK”. 12. Be sure to enter your callsign! At this point you should be able to receive digital SSTV images.
-
Page 49: Freedv (Digital Hf Voice)
In order to use the software, two sound cards are necessary. As an owner of the RIGblaster Advantage you're in luck as you can use the sound card in the RIGblaster and your internal computer sound card to operate this remarkable mode. - Page 50 4. The top part of the window says “From Radio”. This is the sound card device used for reception of the digital signal. 5. Assign the RIGblaster Advantage sound card in the “Device” drop- down. 6. Change the “Sample Rate” drop-down to 48000.
- Page 51 12. The lower part of the window says “To Radio”. This is the sound card device used for transmission of the digital signal. 13. Assign the RIGblaster Advantage sound card in the “Device” drop- down. 14. Change the “Sample Rate” drop-down to 48000.
- Page 52 1. Click on “Tools”, then “PTT Config” from the main FreeDV menu. 2. Ensure “Use Serial Port PTT” is selected. 3. Select the RIGblaster Advantage COM port in the selection box. 4. Ensure “Use RTS” is selected. 5. Ensure “Use DTR” is not selected.
-
Page 53: Ham Radio Deluxe & Dm-780
If struggling to change some hard-to-find setting buried in the transceiver’s menu system, then Ham Radio Deluxe is the program to use! Note: You will require one of the RIGblaster Advantage CAT cables to be connected for HRD to operate. (CONTINUES ON NEXT PAGE) - Page 54 Upon the first run, a window similar to the one shown below will appear. This is the new connection dialog and some settings must be specified here to get HRD to communicate with the RIGblaster Advantage and the transceiver. 1. Choose the “New” tab.
- Page 55 “push buttons” displayed in HRD will affect changes to the rig. Setting Up PTT In HRD If using CAT through the RIGblaster Advantage you must configure PTT in the “Program Options” window. 1. Click “Tools” from the main menu and select “Program Options” (last item in menu).
- Page 56 3. Select “PTT” from the list shown on the left. 4. Ensure you select the option “via Ham Radio Deluxe - DM780 must be connected to HRD” 5. Click on “Apply” and “OK” to save the new settings. West Mountain Radio Operating Manual...
- Page 57 Bandscope Captures audio from the RIGblaster Advantage while scanning between defined frequencies. The displays is shown on a constantly updating graph. A great way to visually see the activity on any band.
-
Page 58: Reference
Icom CI-V Rig Control Cable Schematic Icom uses the same CI-V interface for nearly all their transceivers. This optional cable (SKU 58107-971) is available from West Mountain Radio for modest cost but we realize you may want to save a few dollars and make it yourself. -
Page 59: Isc & Jumper Wiring
Pattern #1: Kenwood, Alinco, Elecraft & SGC with 8 pin round-metal mic jack ISC labeled “Kenwood 8 Pin Round Metal” Pattern #2: Icom with 8 pin round-metal mic jack ISC labeled “Icom 8 Pin Round Metal” West Mountain Radio Operating Manual... - Page 60 Pattern #4: Newer Yaesu Radios with 8 pin round-metal mic jack ISC labeled “Yaesu 8 Pin Round – Isolated”. Use this for FT-950, FT-2000, FTDX-3K,5K,9K (This ISC also used for Flex 6000 series, Ten Tec Omni VII & Orion II) West Mountain Radio Operating Manual...
- Page 61 Pattern #5: Icom & Alinco Radios with RJ-45 modular mic jacks ISC labeled “Icom RJ-45 Modular” Pattern #6: Kenwoods with RJ45 mic jacks & most, but not all Kenwood FM rigs ISC labeled “Kenwood RJ-45 Modular” West Mountain Radio Operating Manual...
- Page 62 Pattern #7: Yaesu Radios with RJ45 mic jacks ISC labeled “Yaesu RJ-45 Modular” Use This ISC For FT-817, FT-857, FT-897 & FT-450. West Mountain Radio Operating Manual...
-
Page 63: Using The Rigblaster Advantage As A Microphone Patch Box
Using RIGblaster Advantage As A Microphone Patch Box It's perfectly possible to use the RIGblaster Advantage to interface a different brand microphone with your transceiver even if the pin outs are different. In this case you would not use one of the supplied ISCs – you would use the white and blue jumpers supplied. -
Page 64: Using The West Mountain Radio Com Port Splitter
Using the West Mountain Radio COM Port Spitter Sometimes it is impossible or inconvenient to attempt CAT control, PTT and CW/ FSK keying through a single Windows COM port. For this reason we developed the COM Port Splitter application (part of the Diagnostic/Survey program). -
Page 65: Digital-Modes, Software And Frequencies
A complete list of digital-modes, software and HF frequencies would be difficult to find, however, below is a a brief (non-exhaustive) compilation of suggested frequencies to help get oriented with the RIGblaster Advantage. Most frequencies given here reflect current North American practices. Many of these are shared internationally, but if in doubt, check with a national amateur radio organization for recommendations. -
Page 66: Troubleshooting
4. Check the transceiver’s MIC GAN and RF POWER controls are not set too low. 5. Make sure the digital mode program is using the RIGblaster Advantage Audio device and not the default sound-card. West Mountain Radio... - Page 67 1. Connect the optional CAT cable. Make sure it is connected to the correct jack. 2. Ensure the RIGblaster Advantage COM port is selected and the serial settings (baud rate etc) in the software match the transceiver. Some Yaesu radios have amulti-function port which must be enabled for CAT.
- Page 68 2. Reduce Windows volume sliders until audio in normal range. In general your transceiver ALC meter should indicate minimum or no ALC action. 3. Try re-positioning the RIGblaster Advantage away from your radio and tuner and ensure the equipment is properly grounded. West Mountain Radio...
-
Page 69: Radio Hook-Up Diagrams
Radio Hook-Up Diagrams West Mountain Radio Operating Manual... - Page 70 West Mountain Radio Operating Manual...
- Page 71 West Mountain Radio Operating Manual...
- Page 72 Repaired or replaced items are warranted for the remainder of the original warranty period. You will be charged for repair or replacement of the RIGblaster Advantage or accessory made after the expiration of the warranty period.
Need help?
Do you have a question about the RIGblaster Advantage and is the answer not in the manual?
Questions and answers