Table of Contents
Advertisement
Advertisement
Table of Contents

Subscribe to Our Youtube Channel
Related Manuals for Nitgen NAC-5000


Summary of Contents for Nitgen NAC-5000
- Page 2 © Copyright 2009, NITGEN&COMPANY Co., Ltd. All rights reserved. Unauthorized reproduction of part or all of this manual’s content in any form is prohibited. Product specifications may change without prior notice to improve functionality. NITGEN&COMPANY the NITGEN logo registered trademarks NITGEN.&COMPANY...
-
Page 3: Table Of Contents
Table of Contents CHAPTER ETTING TARTED ..............4 ....................5 RODUCT NTRODUCTION .....................6 RODUCT OMPONENTS ....................7 YSTEM ONFIGURATION ....................9 RODUCT ESCRIPTION ....................12 OUCH CREEN SAGE CHAPTER DMINISTRATOR ............14 ................15 NTERING DMINSTRATOR ....................19 ANAGEMENT UI & S ....................29 OUND ETTING ....................33 ETWORK ETTING ....................37 ERIAL ONNECTION... -
Page 4: Chapter 1 Getting Started
Chapter 1 Getting Started Product Introduction - 5 Product Components - 6 System Configuration - 7 Product Description Touch Screen Usage - 12... -
Page 5: Product Introduction
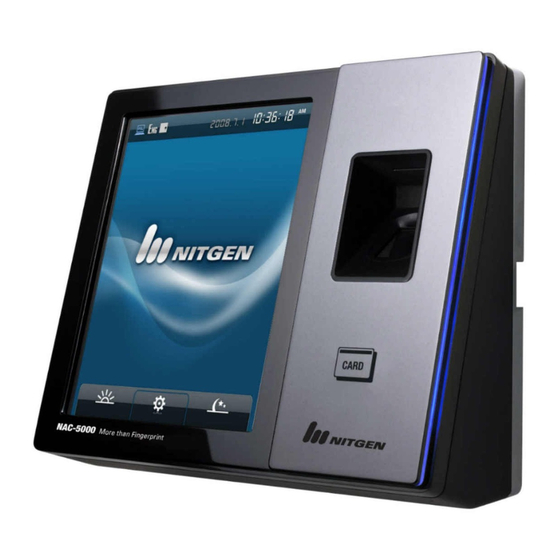
User-friendly software Biometric Ergonomic technology Design For greater user convenience, the NAC-5000 has a 5.7” TFT-LCD touch screen. The NAC-5000 also offers functions such as RF card, password, and fingerprint recognition which can be combined as desired. -
Page 6: Product Components
Product Components The NAC-5000 includes the following components. For detailed information about installation, see the installation guide. If any of the following items is missing, contact the Customer Support Team. NAC-5000 Terminal Installation Bracket Power Cord Adapter Door/AUX Cable Software CD... -
Page 7: System Configuration
In network mode, multiple terminals are connected to the server through TCP/IP links and the terminals can be managed by the administrator. To use NAC-5000 in network mode, a server and a management program (AccessManager Professional) must be installed. Stand-alone Mode... - Page 8 2. User registration and management Client PC 3. Terminal status and event monitoring 1. User registration, modification, deletion and checking 2. Consecutive registration of card-only Terminal users (NAC-5000) 3. Warning/Alarm handling 4. Announcements (To be included in future) 5. Door control...
-
Page 9: Product Description
Product Description ① Touch Screen LCD: The user can handle all inputs by touching. ② LED: If the terminal operates normally, the LED will be blue. ③ Fingerprint Input: The user places his/her finger for authentication. ④ Card Input: The user places his/her card for authentication. -
Page 10: Lcd Screen
LCD Screen ① Network connection status ② Language: Language used on the LCD ③ Door status: Displays whether door is open. ④ Time: Displays the present time. ⑤ Administrator Menu: Entrance Admini- strator menu. ⑥ Authentication button: Authenticates users before opening the door. The following symbols are displayed depending on the network connection status and the mode. - Page 11 Fingerprint Reading Scan fingerprints as described below for fingerprint registration and authentication to prevent authentication errors. ① Maximize the finger area scanned and press evenly (70 ~ 80% of full pressure). ② Place the “core” of the fingerprint at the center of the scanner. The core is usually opposite the whitish half-moon on the bottom of the fingernail.
-
Page 12: Touch Screen Usage
Touch Screen Usage When using the touch screen, use the end of the finger or the nail because the screen may not recognize larger finger surfaces. If the locations of the finger’s contact and removal are different, the touch function may not work properly. If the touch function is slow to respond or does not work, change the touch sensitivity by referring to “Chapter 2 Administrator Menu –... - Page 13 Touch Menu Setting ① To directly enter values in the Adminstrator menu, press the Input ID button, enter the data, and press the “Enter” button. ② If the default setting is already displayed, enter the new value to change it. ③...
-
Page 14: Chapter 2 Administrator Menu
Chapter 2 Administrator Menu Entering Adminstrator Menu User Management - 19 UI & Sound Setting - 29 Network Setting - 33 Serial Connection - 37 Authentication Option Setting - 38 Terminal Information Display - 49 USB Memory Connection - 53 Terminal Reset - 54... -
Page 15: Entering Adminstrator Menu
Entering Administrator Menu Terminal users include general users and administrators. General users are only allowed to open the door while the administrator can use the Administrator menu to control the door as well as the terminal’s functions. 1. To enter the Administrator menu, touch the “Admin”... - Page 16 The Administrator menu has eight submenus as shown below. The following describes each sub menu: Group, privilege, Fingerprint User Register Authentication, Authentication Type ID, Group, privilege, Fingerprint, Modify Authentication, , Authentication Type Delete Enter the user ID User Delete all List Card-Only Terminal...
-
Page 17: Serial
Terminal ID, DHCP, Terminal IP, Server TCP/IP IP, Subnet mask, Gateway, Port Serial Wiegand, 485 Connection Settings Connection 1:1, 1:N Security level, Saving Logs, Default 1:N Authentication, 1:N Authentication Time Door, Function selection, Result signal, Door Time of Opening the door, Door warning time Card Card Type, SOC Type... - Page 18 Using Administrator Menu To select a submenu of the Administrator menu, touch an icon. To exit the Administrator menu, touch the “Back” button at the lower-left of the screen. To close the Administrator submenu, touch any blank area on the screen.
-
Page 19: User Management
User Management The administrator can register, delete, change, or search users with the User menu. User Registration The maximum number of users that can be registered in the is 100,000 templates, and in the case of RF card or if the users use passwords, up to 100,000 people can register. - Page 20 3. In “Authority” touch the “Administrator” button to change the authority. Select General User or Administrator. General User: Door Control Authority Administrator: Door Control + Administrator Menu Authority 4. Fingerprint Authentication – the “Security Level” when the user’s fingerprint rejection rate (FRR) or other users’...
- Page 21 In order to restore the default security level, click the current setting again. Security Level Range: 1 ~ 9 Default Sensor Setting: Brightness: 40 / Contrast: 20 / Gain: 2 The user can be registered using fingerprint, password, or card authentication.
- Page 22 ② Place a finger on the sensor. The fingerprint will be displayed with a quality indicator. The fingerprint must score at least 30 points to be registered and the likelihood of authentication rises with the score. Place the core of the fingerprint on the sensor.
- Page 23 Password Authentication Touch the “Password” button and enter the password (four to eight digits.) Card Authentication Press the “Card” button and place the card on the card reader. Combined Authentication combine authentication methods, press the “AND” button. higher security level convenience, select “OR.”...
- Page 24 User Change User IDs are unique and cannot be changed. However, group, authority, fingerprint, and authentication methods can be changed in the “change user” menu. Users can only be changed in stand-alone mode. In network mode, the server management program must be used to change users.
- Page 25 the default – brightness, contrast, and gain. If the user’s fingerprint is humid, raise the sensor setting above the default. Depending on the fingerprint state, change the options. The new setting is applied upon the registration of the fingerprint and is valid only for 1:1 authentication.
-
Page 26: User Deletion
User Deletion In network mode, the User menu does not support deletion of certain or all users. The administrator can only delete all users registered at a certain terminal by selecting “Manage -> Reset -> User Information.” In order to delete a user from the terminal, select Admin - User-and Delete and enter the user ID to delete. - Page 27 User List/Validation The administrator can check the users registered at the terminal with the “User List” and “User Validation” menus. The user list search function is not currently supported but will be added soon. 1. To check the registered users, select User ->...
- Page 28 Card-only User Registration The NAC-5000 allows door access to be controlled only by card authentication, and not fingerprints or passwords. The card-only feature is provided for the operator in order to conveniently register users. At present, the card-only feature can be used in the network mode only and will be soon available in the stand-alone mode.
-
Page 29: Ui & Sound Setting
To change the display, date, or time, select “UI&Sound” -> “Display” Language Press the “Language” button to sel- ect the language displayed on the screen. The NAC-5000 supports Korean, English, Portuguese, Brazilian, Spanish, French, Indonesian. LCD Brightness (will be available) brightness between 0 and 100. - Page 30 Background The user can select a default image, flash image, or user image as the background screen. By pressing “User”, the user can change this option.
- Page 31 User Image If a user image is set as the background screen, “User Image” menu is activated. Press the “Search” button to edit or configure an image. Date and Time Press “Date and Time” -> “Setting”. Select AM or PM and enter the time or date by scrolling on the screen.
- Page 32 Sound Press “UI & Sound” -> “Sound” to turn sound on or off or control the volume. By touching the volume bars, the user can adjust the volume.
-
Page 33: Network Setting
Network Setting The NAC-5000 terminal can function either in network or stand-alone mode. At present, only wired networks are supported but support for wireless networks will soon be available. Stand-alone Mode In stand-alone mode, the administrator can use all functions of the terminal without connecting to a network. -
Page 34: System
Network Mode In network mode, terminals can be conveniently and efficiently managed through TCP/IP communication with the server. network mode, user authentication and DB management are done by the server while user registration and door control are done by the terminal. - Page 35 TCP/IP Setting 1. After selecting network mode, TCP/IP must be configured to connect to the server. Select “Network” -> “TCP/IP”, and enter the network information. 2. Enter unique terminal between 1 and 2000. The same terminal ID cannot be used in the same server.
- Page 36 Server IP Setting Enter the IP of the server with AccessManager Professional installed. When inputting the server IP, touch “.” to move to the next field. Port Setting Enter the port number to be used for communication between the server and the terminal.
-
Page 37: Serial Connection
Serial Connection Through serial connection, other devices such as RF card readers can be controlled. This function will soon be available. -
Page 38: Authentication Option Setting
1:N authentication can be configured. Settings can be changed by pressing “Authentication” -> “Default”. Setting 1:1/1:N Authentication Method The NAC-5000 supports 1:1 and 1:N authentication methods. authentication, must inputted for authentication. In 1:N authentication, user entered, and authentication is done by searching all users. - Page 39 Authentication Security Level The security level is set according to the authentication method. The security level for 1:1 authentication is between 1 and 9, and the default is 5. The security level for 1:N authentication is between 5 and 9, and the default is 8. If the security level is too high, authentication failure rate may rise, and if it security level is too low, the misreading rate may rise.
- Page 40 Door Using this function, you can control two doors or control devices such as fire alarms or lighting. Select “Auth->Door “ to control the doors and devices such as fire alarms or lighting. Select the “Door1” or “Door2” which you want to configure.
- Page 41 However, in case of connecting the fire alarm, messeage and beep will occured on the terminal when fire alarm system detects the event of a fire or other emergency. 6. Enter the time between 5 and 20 in “Warning Duration”. The alert messeage will displayed on the screen when light alarm or openig the door status are not...
- Page 42 Card To use card authentication to authenticate users, do the following. The card authentication type has normal and SOC modes. 1. To use card authentication, select “Authentication” -> “Card”. Press “Card Type” and change “Disable” into “Normal.” 3. Select the card type – MIFARE, HID35Bit, HID/EM26Bit, HID37Bit or SOC.
- Page 43 Time and Attendance mode Time and attendance mode, the user must press a function key and perform the user authentication process when opening the door. The entry logs will be sent with the function key data to the server management program. Depending on the function key, user attendance records can be classified into “Coming to work”, “Leaving work”, “Going out”, and “Returning”...
- Page 44 4. To allow entry only through Time and attendance authentication, select “Allow only Time and Attendance Authentication” -> “Yes.” When “Allow only Time and Attendance Authentication” mode is activated, users must press the function key to open the door. 5. After finishing configuration, press “Save”.
- Page 45 Sensor Settings related to fingerprint sensor options such as sensor type, fingerprint capture time, LFD precision, and sensor brightness can be configured. If the options are set to the terminal’s default values, the settings will apply to all users who didn’t make individual sensor configurations when registering.
- Page 46 Authentication Limit Time The fingerprint input waiting time is between 3 and 9 seconds, and the default is 5 seconds. LFD (Live Finger Detection) Precision Sets whether to distinguish fake fingerprints, what degree precision. Select “Low”, “Middle”, “High”, or “Do not use”. Sensor Option If the fingerprint is too bright or dark, the brightness, contrast, and gain...
- Page 47 Camera The terminal camera can take photos of users and add the photos to user profiles. This function is not currently available but will soon be supported.
- Page 48 Fixed Option In the “Fixed Option” menu, the number of fingerprint scans to be inputted during fingerprint registration and the ID length can be configured. These settings cannot be changed of registered users already exist. To change these settings, the administrator must delete all users registered at the terminal.
-
Page 49: Terminal Information Display
Terminal Information Display The administrator can check the terminal ID, mode status, firmware version, number of users, time zone, logs, and other Normal terminal information. Self-diagnosis can also be performed to check whether the terminal is working properly. Normal view terminal information, select Information ->... -
Page 50: Time Zone
Time Zone The “Time Zone” menu is used to restrict or allow entry during certain time periods. Using this function, you can check individual user timezone or terminal settings. 1. Select the “Info->TimeZone” to view timezone information. 2. Select the “Terminal” or “User” that you want check in the “Type”. - Page 51 Terminal user authentication logs can be checked. This feature is not currently available, but will soon be supported.
- Page 52 Self Test Using the self test function, the terminal can test itself for problems with sensor, time, network and DB. perform self-test, select “Information” -> “Self Test.” The terminal will check for problems in sensor and time configuration.
-
Page 53: Usb Memory Connection
USB Memory Connection User and log data can be uploaded or downloaded by connecting a USB memory device to the terminal. When uploading data from the USB device to the terminal, the data will be added to the existing DB. This feature is not currently available, but will soon be supported. -
Page 54: Terminal Initialization
Terminal Reset Using the “Reset” menu, the terminal’s user, log, and serial data can be returned to factory settings, and touch sensitivity can be adjusted. Reset will delete all the data in the terminal DB. Reset To reset the terminal data, select “Reset”. - Page 55 Touch Calibration If response to the touch function is slow or does not work properly, touch sensitivity can be adjusted with the “Touch Calibration” menu. 1. Select “Reset” and “Touch Calibration”. The screen shown on the right will appear. Carefully press the “+”...
-
Page 56: Chapter 3 General User
Chapter 3 General User Door Opening - 57 Authentication in Attendance Mode - 59 Changing User Information -61... -
Page 57: Door Opening
Door Opening A user registered at the terminal can open the door in two ways depending on whether 1:N authentication is used. 1:1 Authentication The user enters his ID and scans his fingerprint, and the scanned fingerprint is compared 1:1 to the registered fingerprint that matches the ID. -
Page 58: Fingerprint Authentication
1:N Authentication In 1:N authentication, the user does not need to input his ID. Instead, the scanned fingerprint is authenticated by searching all fingerprints in the DB. The process is simpler than 1:1 authentication, but if there are a lot of users, it may take more time. ①... -
Page 59: Authentication In Attendance Mode
Authentication in Attendance Mode In attendance mode, all users shall press the functions keys in order to be authenticated. All logs are transmitted to the server. If the users do not press function keys, the attendance types –coming to office,leaving office ,leave,and return –may not be recorded so that the user shall press the fuction keys in order to be authenticated . - Page 60 Using Extended Attendance Mode In Extended Attendance Mode, the initial main screen will be displayed as shown on the left. 1. Select a function key, and press “Enter.” 2. Enter the user ID and press “Enter”to perform authentication. To use 1:N authentication in attendance mode, enter the attendance key and perform authentication without inputting an ID.
-
Page 61: Changing User Information
Changing User Information The administrator can change passwords, fingerprints, and card information of registered users using the terminal’s Adminstrator menu or the server program. To change user information, contact the administrator. -
Page 62: Appendix
Appendix Troubleshooting - 63 Firmware Update - 67 Product Specifications -68... -
Page 63: Ppendix
Appendix Troubleshooting <If the Touch function does not work properly> 1. Check if there is any dust on the touch sensor, and clean the sensor with soft towel or paper. 2. If the area of the finger touching the screen is large, sensitivity may drop. - Page 64 <If fingerprint authentication takes too long> 1. If the terminal uses 1:N authentication in network mode, server overload may occur, resulting in slow authentication and recognition. In this case, a dedicated server should be used. 2. Check if the finger and the sensor are clean. Clean the finger and the sensor.
- Page 65 <If fingerprint is not registered> If the finger is too dry or humid, fingerprint image quality may be poor and may not register. Dry or moisturize the finger before registering the fingerprint. <If RF card authentication fails> 1. Select “Admin”, “Authentication -> Card Setting” and check if the card setting matches the actual card.
- Page 66 <If the door does not open after authentication> 1. Check the time period during which access is allowed. 2. Select Admin – Authentication -> Door and check if the door is set to Open. <If users cannot be registered> In default configuration, this product operates in network mode which requires a proper network connection for user registration.
-
Page 67: Firmware Update
Firmware Update NAC-5000 firmware can be updated through the USB port. Do the following to update firmware. Store firmware cab file under the root folder of the USB memory. Connect a USB memory to the terminal USB port. Restart the system by using the power switch of the terminal or by selecting Admin –... -
Page 68: Product Specifications
Product Specifications Item Description 14.52cm(5.7”) Touch Screen TFT-LCD High Color(16Bit), 640(H) x 480(W) 624MHz 32Bit RISC Memory 256MB RAM Sensor OPP06 Optical, 500DPI(LFD, Auto-On) Authentication Rate 1:1 – Less than 1 second / 1:N - FAR/FRR 0.001% /0.1% Number of users 100,000 fingerprint templates (Two templates per user) Communication... - Page 69 WARNING This is a class A product. In a domestic environment this product may cause radio interference in Which case the user may be required to take adequate measures. INFORMATION TO THE USER (15.105(a)) For Class A digital device INFORMATION TO THE USER This equipment has been tested and found to comply with the limits for a Class A digital device, pursuant to part 15 of the FCC Rules.
Need help?
Do you have a question about the NAC-5000 and is the answer not in the manual?
Questions and answers