Table of Contents
Advertisement
Advertisement
Table of Contents

Related Manuals for Esoteric C-02


Summary of Contents for Esoteric C-02
- Page 1 C - 02/C-03X Linestage Preamplifier OWNER’S MANUAL D01188020B...
-
Page 3: Important Safety Precautions
IMPORTANT SAFETY PRECAUTIONS For U.S.A. TO THE USER This equipment has been tested and found to comply with the limits for a Class B digital device, pursuant to Part 15 of the FCC Rules. These limits are designed to provide reasonable protection CAUTION: TO REDUCE THE RISK OF ELECTRIC SHOCK, DO NOT against harmful interference in a residential installation. -
Page 4: Important Safety Instructions
Replace only with the same or equivalent type. ESOTERIC is a trademark of TEAC CORPORATION, registered in the U.S. and other countries. WARNING MEXCEL is a registered trademark of Mitsubishi Cable Industries, Ltd. in Japan and other countries. - Page 5 For European Customers Disposal of electrical and electronic equipment (a) All electrical and electronic equipment should be disposed of separately from the municipal waste stream via collection facili- ties designated by the government or local authorities. (b) By disposing of electrical and electronic equipment correctly, you will help save valuable resources and prevent any potential negative effects on human health and the environment.
-
Page 6: Table Of Contents
Contents Before use Thank you for choosing Esoteric. Read this manual carefully Check to be sure the box includes all the supplied accessories to get the best performance from this unit. shown below. Please contact the store where you purchased this unit if any of these accessories are missing or have been damaged during Before use . - Page 7 CAUTION Maintenance 0 Avoid placing the unit in direct sunlight or close to any source of If the surface of the unit gets dirty, wipe with a dry soft cloth. If it heat, such as a radiator, heater, open fireplace or amplifier. Also becomes very dirty, dampen a soft cloth slightly with a diluted neu- avoid locations that are subject to vibrations or exposed to exces- tral cleanser and remove any excess fluid from the cloth thoroughly...
-
Page 8: Connections
0 Read the owner’s manuals of all devices that will be connected, and follow their instructions. 0 Do not bundle connecting cables with power cords. Doing so could cause noise. This illustration is of the C-02. Super Audio CD player, Super Audio CD player, etc. - Page 9 Super Audio CD player, power ampli- fier or other equipment, the audio quality might be improved. 0 This is NOT an electrical safety ground. At Esoteric, we use Esoteric MEXCEL stressfree cables for reference. For detailed information, access the following website. http://www.esoteric.jp/products/esoteric/accessory/indexe.html...
-
Page 10: Names And Functions Of Parts (Main Unit)
Names and functions of parts (main unit) This illustration is of the C-02. INPUT knob VOLUME knob Turn this knob to select the active input. Select the input that is Turn this knob clockwise to increase the volume and counter- connected to the device you want to use. -
Page 11: Remote Control
Remote control The included remote control allows you to operate this unit from a Battery installation distance. Point the remote control at the main unit’s remote sensor from a dis- tance of 7 meters (23 feet) or less. Remote sensor 7 m/23 ft Remove the cover from the back of the remote control and insert two AA batteries with their ¥/^ ends oriented as shown in the case. -
Page 12: Names And Functions Of Parts (Remote Control)
Names and functions of parts (remote control) 0 The buttons not explained here do not function with this unit. 0 This remote control can also be used for other Esoteric Super Audio CD/CD players and D/A converters. ON/LIGHT button Use to confirm selection of some of the settings explained in “Additional settings”... -
Page 13: Basic Operation
Basic operation (1) These illustrations are of the C-02. Play the source, and then adjust the volume by turn- ing the VOLUME knob. Turning the unit on Turn on the connected input source devices. Press the POWER button to turn the unit on. -
Page 14: Muting The Output
Basic operation (2) Turning the unit off Using the dimmer There might be noise from the speakers if the unit is turned off sud- denly. When you turn the unit off, follow the steps below. If a connected device is playing back, stop playback. 0 Turn off the power amplifier first. -
Page 15: Balance And Input Level Settings
Balance and input level settings (1) You can set the left and right balance, output level and phase inversion. Press the INPUT buttons (l/;) to change the setting. You can set these independently for each of the inputs. Turn the INPUT knob to select the input source you want to set. -
Page 16: Phase Inversion
Balance and input level settings (2) Left and right balance setting Phase inversion (Bal>***) (Invert>***) Adjust the balance between the left and right output channels. This can be used to reverse the phase of the audio signal output. You can set this to values between L 6.0 dB and R 6.0 dB in 0.5 dB For example, if the XLR output of a device that sends a signal to this increments. -
Page 17: Additional Settings
Additional settings (1) You can also make the following settings and restore factory defaults. Press the INPUT buttons (l/;) to change the setting. Volume display Volume curve Output Through (RCA2) Illumination Input source name Automatic display (FL) off Press and hold the SETUP button for about 2 seconds. Press the SETUP button repeatedly until the display resumes showing its usual contents. - Page 18 Additional settings (2) Volume display setting Output setting (Out>***) (Disp>***) You can set which connectors output audio. You can set how the volume level is shown. The default setting is “BOTH”. The default setting is “Step”. Step The volume is shown in steps (0 to 99). Sound is output from the XLR 1/XLR 2 connectors.
- Page 19 Through (RCA2) Illumination (RCA2>***) (Light>***) You can select whether to use the RCA 2 jacks as normal input con- You can set whether or not the tops of the knobs light. The default nectors or as signal through connectors. setting is ON. The default setting is “NML”.
-
Page 20: Restoring Factory Settings
Additional settings (3) Input source name setting Automatic display backlight (FL) off setting XLR1= FLaOFF>*** XLR2= You can set the display backlight to automatically turn off if no oper- ation is conducted for a certain amount of time. The default setting is RCA1= “30m”. -
Page 21: Troubleshooting
Troubleshooting If you experience a problem with this unit, please take a moment to VOLUME knob does not work. review the following information before requesting service. Moreover, e When you set the RCA 2 input jacks to “THRU”, the VOLUME knob be aware that the problem might be caused by something other will not work if the RCA 2 input is the active input (page 19). -
Page 22: Specifications
External dimensions (W × H × D) (including protrusions) C-02 ..... 445 × 162 × 457 mm (17 5/8” × 6 1/2” × 18”) C-03X . -
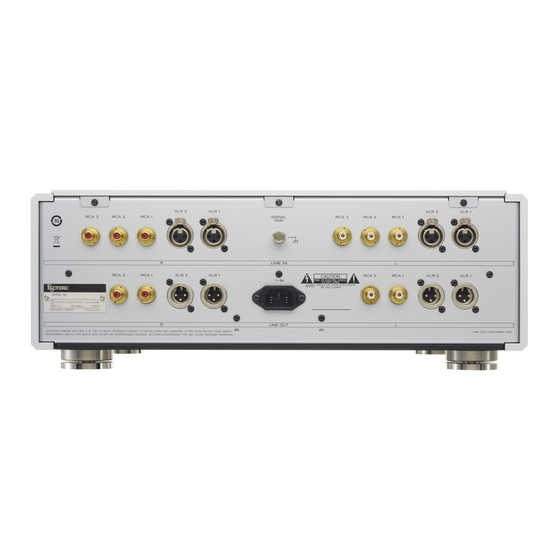
Page 23: Rear Panel
Rear panel (1) C-02... - Page 24 Rear panel (2) C-03X...
- Page 28 Liegnitzer Straße 6, 82194 Gröbenzell, Germany Phone: +49-8142-4208-141 This appliance has a serial number located on the rear panel. Please record the serial number and retain it for your records. 0313 . M A-1 914B Model name: C-02/C-03X Serial number...
Need help?
Do you have a question about the C-02 and is the answer not in the manual?
Questions and answers