Table of Contents
Advertisement
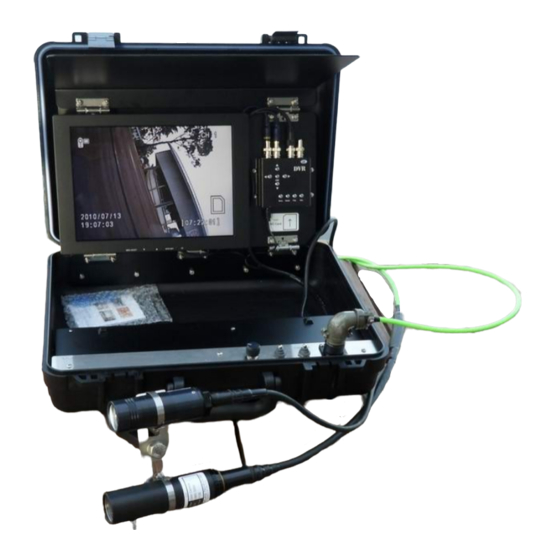
1. To operate Camera System, all interconnections from the Control
Unit, DVR & Monitor, should already be connected but in the
event there is a problem drawing # 0010550 shows how those
items connect.
CAUTION:
Insure voltage does not exceed 250 volts AC to
the Console. Also power source must be properly
grounded. Typically 110 VAC to 250 VAC.
2. Plug Camera Umbilical into Camera and light (Be sure to use a
good quality silicon grease for lubrication). Plug topside
end of umbilical into Control Unit connector on front panel.
3. After verifying supply power is correct, insure camera, light
switches are in off position. Plug into power source.
4. Turn Monitor, Recorder and Camera switches on. A picture should
appear within a few secs.
5. Insure "Light Intensity" is at "Min" position. Turn light
switch on. Turn control up to test light. Turn back to Min.
and Turn switch off.
CAUTION:
" Light can be operated out of water but will shut
down automatically if the temperature exceeds 50c.
6. The CON-3300 console only outputs 24 VDC maximum.
OUTLAND TECHNOLOGY INC.
38190 Commercial Court
Slidell, Louisiana U.S.A. 70458
Ph.(985)847-1104, Fax 1106
Email:
sales@outlandtech.com
Website: www.outlandtech.com
UWS-3310/3320
OPERATING INSTRUCTIONS
Advertisement
Table of Contents

Related Manuals for Outland Technology UWS-3310

Summary of Contents for Outland Technology UWS-3310
-
Page 1: Operating Instructions
OUTLAND TECHNOLOGY INC. 38190 Commercial Court Slidell, Louisiana U.S.A. 70458 Ph.(985)847-1104, Fax 1106 Email: sales@outlandtech.com Website: www.outlandtech.com UWS-3310/3320 OPERATING INSTRUCTIONS 1. To operate Camera System, all interconnections from the Control Unit, DVR & Monitor, should already be connected but in the event there is a problem drawing # 0010550 shows how those items connect. - Page 2 8.) To Use the recorder please refer to the DVR manual. Note: Read the recorder manual for more details concerning the operation of these recorders. Any problems Please Contact: Outland Technology Inc. 38190 Commercial Ct. Slidell, La. U.S.A. 70458 (985)847-1104, Fax (985)847-1106 EMAIL: sales@outlandtech.com...
- Page 3 Outland HD Mini DVR Instructions Initial Setup Turn “Power On” by sliding switch on bottom of DVR towards the right. It is OK to leave the DVR power on all of the time. Install the SD card carefully. Make sure that the orientation of the card is inserted so that the notch on the SD card is on the top left.
- Page 9 OUTLAND TECHNOLOGY INC. UWL-401 UNDERWATER LIGHT Operating and Maintenance Procedures Reference: DRAWING UWL-401 Installation and Operation: A. The UWL-401, can be mounted to your Camera, ROV, Helmet or Hand bracket by using DHM-60 OR HM-300 helmet bracket. B. With Power Off, lubricate the light mating connector with a light coating of silicon lubricant.
-
Page 10: Limited Warranty
Advertising claims made by us represent our honest opinion of the qualities and features offered by the products described. We disclaim any warranties expressed or implied, including warranties of merchantability and fitness for a particular purpose, except as provided herein. In no event shall Outland Technology be liable for consequential damages of any kind. - Page 11 12” TFT-LCD MONITOR WITH VIDEO INPUTS 288 Video Series USER’S MANUAL...
- Page 12 CONTENTS 1. Introduction Page 2 Product Description ............Page 2 Package Contents ............Page 2 Product Features …............Page 2 Screen Cleaning Techniques ......... Page 3 Additional ..............Page 3 2. Control Functions Page 5 Function Selection ............Page 5 Function Adjustments.............
- Page 13 1. Introduction Product Description Congratulations on your purchase of the 288 video series LCD monitor. It incorporates high quality display into a small light-weighted module. It has power-saving capabilities and emits no radiation. You will certainly benefit from this monitor in lots of ways; to name some of them: comfort, safety, space-saving and environmental protection.
- Page 14 Screen Cleaning Techniques 1. Gently clean the screen with a clean camel hair lens brush, or a soft, clean, lint-free cloth, to remove dust and other particles that can scratch the screen. 2. Do not apply pressure to the screen surface when wiping it clean. 3.
- Page 15 If the product does not operate normally when the operating instructions are followed. Adjust only those controls that are covered by the operating instructions. Improper adjustment of other controls may result in damage and will often require extensive work by a qualified technician. If the product exhibits a distinct change in performance, service may be required.
- Page 16 2. Control Functions The monitor digital control functions are located on the front panel. They are shown in the figure below and described in the following paragraphs. 1. Power indicator LED 2. Power switch 3. Function keys Function Selection 1. Press the knob “MENU/SELECT” to show the OSD menu. Then use the “▲”...
- Page 17 2. Video Contrast - Adjust the difference in luminance between light and dark areas of the image. Brightness - Adjust the luminance level of the image. Colour - Adjust the Color level of the image...
- Page 18 Tint - Adjust the Tint level of the image Sharpness - Adjust the Sharpness level of the image Video Mode - Adjust the Video Mode for Normal/Nature/Cinema/Sport/Vivid...
- Page 19 Reset - Recall the factory setting of the Vide menu. VGA not used ontrast - Adjust the difference in luminance between light and dark areas of the image. Brightness - Adjust the luminance level of the image.
- Page 20 harpness - Adjust the Sharpness level of the image olor Temperature - Adjust Color Temperature Cool(9300k)/User/Warm(6500k)/Nature(7500k) User RGB not used - Adjusting R/G/B level of the image...
- Page 21 Image uto Tune - Adjust geometry of the image automatically. osition - Adjust the vertical & horizontal position of the image. hase - Adjust the horizontal sync phase of signal. Clocks - Adjust the horizontal sync size of signal. Reset - Recall the factory setting of the VGA menu.
- Page 22 4. Feature Controls (Video & VGA) Sleep T - Select 10/20/30/40/50/60 /70/80/90/Off Language -Sel ect Language English/Fran/Deu/Esp/...
- Page 23 SD Controls -Select OSD Position /Rotation/Timer Factory Recall - Recall Factory setting...
-
Page 24: Display Modes
Insta ng the Monitor This m tor is equipped with an auto sensing DC power adapter for voltage ranges of 100-240VAC, 60/50Hz. Follow these steps to install the monitor: Before you connect the cables, made sure that the monitor and the system unit power switches are off. - Page 25 MODE Resolution Horizontal Vertical Remark (Dots*lines) Freq.(KHz) Freq.(Hz) 640×350 31.5 Non-interlaced 720×400 31.5 Non-interlaced 640×480 31.5 Non-interlaced VESA/75 640×480 37.5 Non-interlaced VESA/60 800×600 37.9 Non-interlaced VESA/75 800×600 46.9 Non-interlaced Power Saving Features hen the power saving is active, the power indicator LED will be from Green ght to Amber.
- Page 26 Power Mode H. Sync. V. Sync. Consumption Normal Green < 30 Watts Stand-by Amber < 5 Watts Suspend < 5 Wa < 1 Wa mon or uses the H. S ync and V . Sync signa ls to det ermin e th e operation e to...
-
Page 27: Product Specifications
7. Product Specifications 7.1 288V series product specifications Model 288V Series Features Panel Type: tive TFT- Screen Size: 12” diagonal Pixel Pitch: 3075 (W) x 3075 (H ) mm ㎡ Brightness: pical: 400 cd/ Contrast Ratio: pical: 500:1 Response Time: Typical: 35 ms ewing Angle(H / V) Typical: 140°... - Page 28 8. Win setup For the best display quality, please set the monitor type in ndows. Control Pane l > Display > Se ttings > Advance d > List All Modes For 800 ×600, please set to “SVGA 800 × 600 @ 6 0Hz”...
- Page 29 9. Trouble Shootin 1) Power on but no picture → Make sure the VGA cable is tightly connected from the video o utput connector on the video card to the video input connector on the monitor. → Make sure you are using the standard power adapter co ming with the monitor.
- Page 30 ) Residue image → If an image remains o n the screen for an extended period of time, it may be imprinted in the screen and leave a residue image. It is characteristic of liquid crystal and is not malfunction or deterioration of the liquid crystal. The res idue image will disappear after a period of time.
- Page 31 The “Out of Range” m ay happen if you switch monitor A to monitor B for your PC. Whenever you change the monitor for your PC, your PC may detect it as a new hardware and automatically install a proper driver for the monitor. o, you will have both monitor A and monitor B drivers on your PC.
Need help?
Do you have a question about the UWS-3310 and is the answer not in the manual?
Questions and answers