Table of Contents
Advertisement
Quick Links
Future One touch Cappuccino
Fully Automatic Coffee Centre
Operating Instructions and Useful Tips
Welcome to the Sprada One Touch Cappuccino
Dear Customer,
Congratulations on purchasing a high-quality SPRADA coffee machine.
To get the most out of your SPRADA machine, please read this manual
carefully before use.
Please start by reading the safety notes. Keep this manual in a safe place as
a reference guide or to give to any other users of your machine.
The SPRADA team is here to support you as we are dedicated to your
enjoyment of great coffee from this high-quality SPRADA product.
Retailer:
Date & Place of Purchase:
i
Advertisement
Table of Contents

Related Manuals for Sprada FUTURE One Touch Cappuccino


Summary of Contents for Sprada FUTURE One Touch Cappuccino
- Page 1 Fully Automatic Coffee Centre The SPRADA team is here to support you as we are dedicated to your Operating Instructions and Useful Tips enjoyment of great coffee from this high-quality SPRADA product.
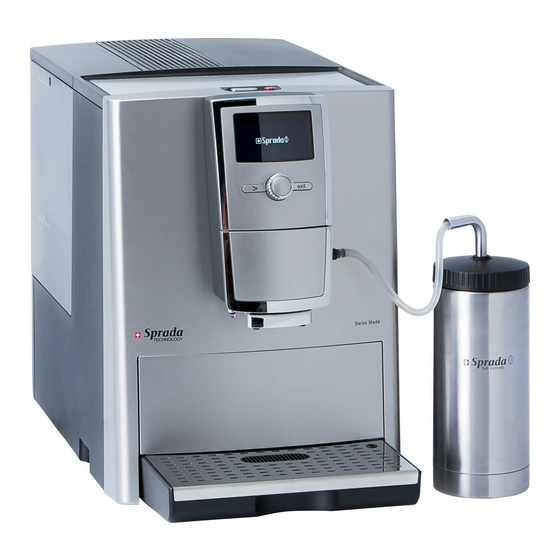
- Page 2 Familiarising yourself with your Future OTC A. Display K. Removable Water Reservoir B. Rotary Control Knob L. Bean Container (inside) C. Button “>” M. Pre-Ground Coffee Chamber (inside) D. Button “Exit” N. Cup Holding Plate E. Height Adjustable Spout O. Cup Warming On/Off Button F.
- Page 3 Important areas on your Future OTC Bean Container (L) Water Reservoir (K) Water Filter Up/Down Position Height Adjustable Spout (E) Drip Tray & Cover Panel (I & J) Milk Cooler Thermos (S) Connector on Drip Tray Brewing two cups Grinder Setting Control Cappuccinotori access Brewing Unit Release...
-
Page 5: Table Of Contents
Contents SAFETY INSTRUCTIONS SETUP 2.1 Preparing the Machine 2.2 The most important Controls 2.3 Adding Water and Beans 2.4 The Cappuccinotori (Milk Frother) 2.5 Pre-Warming your Cups SWITCHING ON AND GETTING STARTED 3.1 Mains Switch 3.2 On/Off Switch 3.3 Brewing with Factory Settings 3.4 Brewing two Cups of Coffee 3.5 Emptying the Drip Tray and the Coffee Grounds Container 3.6 Hints for First Time Users... -
Page 6: Safety Instructions
• Make sure to switch off and unplug the machine before maintenance or cleaning. • The SPRADA Future OTC is for indoor use only and should be located on a firm and level surface. • Do not place the machine on a hot surface or near an open flame. - Page 7 1. Safety Instructions Caution: Electrical appliances should be repaired only by qualified personnel as non-professional repairs can expose the user to significant risk. Liability for damages cannot be accepted if the machine is used for anything other than the intended purpose or is incorrectly maintained or serviced.
-
Page 8: Setup
2.2 The most important controls Your SPRADA One Touch brews a range of Speciality Coffees according to your own personal taste. For easy use, the most important controls are common to the various Speciality Coffees and machine setup functions. -
Page 9: Adding Water And Beans
The display will indicate “Fill up beans”. 2.4 The Cappuccinotori (Milk Frother) The SPRADA One Touch is supplied with an insulated Milk Cooler Thermos which attaches directly to the machine to make delicious milky coffee and hot milk drinks. -
Page 10: Pre-Warming Your Cups
2. Set up Always empty and clean the Milk Cooler Thermos a minimum of once a day. Rancid milk can cause blockages that will cause malfunction of the machine. Caution: Do not wash the Milk Cooler Thermos in a Dishwasher as this will damage it. -
Page 11: Switching On And Getting Started
3.3 Brewing with Factory Settings The Main Menu on the Display Screen is a visual representation of the different Speciality Coffees that your SPRADA One Touch can make. You can start making coffee immediately as each icon represents a coffee brewed according to Factory Settings. -
Page 12: Brewing Two Cups Of Coffee
3. Switching on and getting started While the brewing cycle is in process, the icons below the bar on the display will flash. Turning the Rotary Control Knob will change the setting of the flashing icon. At any stage the process can be aborted by pressing “BAR”... -
Page 13: Emptying The Drip Tray And The Coffee Grounds Container
If the message “Fill Up Pipe System” appears on the display when the SPRADA Future OTC is used for the very first time: (Refer to section 2.3) Place a receptacle or large cup with its centre under the Spout. -
Page 14: Advanced Settings For Brewing Speciality Coffees
4.1 The Main Menu The Main Menu is the key to making the SPRADA One Touch your own. Each speciality coffee is represented by an icon: Espresso, Café Crème, Caffe Lungo, Cappuccino, Latte Macchiato. - Page 15 4. Adjusting the Basic Settings Pressing the “>” Button again allows setting of the cup volume from 20ml to 240ml according to the cup size. Pressing the “>” Button again highlights 1x/2x and either one cup or two cups can be made automatically. If a milky coffee setting is being modified: Pressing the “>”...
-
Page 16: The Settings Menu
5. The Settings Menu 5. The Settings Menu The Settings menu allows access to many other functions that are integral to the operation of the SPRADA One Touch. Scroll through the options using the Rotary Control Knob and select by pressing: • Coffee recipes... -
Page 17: Operating The Machine With Or Without The Water Filter
5. The Settings Menu • Amount Frothy milk: The amount of milk in millilitres. Changing this will not affect the Amount Total but will change the Prop coffee. • Temperature: Normal, High, Maximum. Hot Water: Used for making tea for instance. Has no settable items. Warm Milk: Two items can be changed. - Page 18 5. The Settings Menu Wait until water stops coming out of the spout. The message “Please Rinse” appears on the Display Screen. Press the Rotary Control Knob. The machine rinses and is ready for use. Note: ALWAYS TAKE THE FILTER OUT before descaling! The Filter loses its efficiency after precossing about 50 litres of water.
-
Page 19: Setting The Water Hardness Level
5. The Settings Menu 5.3 Water Hardness Using the Test Strip: A Water Hardness Detection Strip is supplied with the machine as an accessory. It is used to determine Water Hardness. Dip the Test Strip in the water and shake off excess water. ... -
Page 20: Setting Time And Timer Functions
To disable, scroll down to the option with the Rotary Control Knob and press to select. Select “Exit” to return to “Times” menu. “Set Clock”: When this is set, the time will be displayed when the SPRADA One Touch is in Standby mode. Select by pressing the Rotary Control Knob. -
Page 21: Setting The Language
5. The Settings Menu Cup Heater Auto ON: Select Disabled/Enabled with the Rotary Control Knob. Press the Rotary Control Knob to confirm selection. Time format: Select either “24 hours” or “am/pm” with the Rotary Control Knob. Press the Rotary Control Knob to confirm selection. Select ”Exit”... -
Page 22: Setting The Eco Mode
5. The Settings Menu 5.8 ECO Mode A unique feature of the SPRADA Future OTC is the power saving ECO Mode where the machine uses minimal power but is ready for use at the touch of a button. This can either be “Disabled” or the delay set from 3 minutes to 15 minutes before going into ECO Mode. -
Page 23: Manual Adjustments
6. Manual Adjustments 6. Manual Adjustments 6.1 Setting the Grinder Caution: The Grinder setting can only be changed while the Grinder is operating. The Grinder can be adjusted to suit the roast of your coffee beans. It is advised that you always keep the Grinder on a medium setting. To change the grinding level: ... - Page 24 6. Manual Adjustments Please note: If you start preparing your coffee inadvertently or too early, you can actually change the “amount” while the coffee is being brewed. If you wish to abort a brewing process, press the Exit button. Please note: if you inadvertently open the pre-ground coffee chamber –...
-
Page 25: Care: Cleaning And Maintenance
7. Care 7. Care: Cleaning and Maintenance 7.1 Rinsing the Cappuccinotori (Milk Frother) Caution: Do not interrupt the rinsing program whilst it is running! Rinse the Cappuccinotori (Milk Frother) after every milky drink or when a message appears on the display alternating with the selected drink message. -
Page 26: Rinsing The Spout
7. Care Connect one end of the hose to the Height Adjustable Spout and submerge the other end of the hose in the cleaning solution. Place a receptacle with at least 0.5ℓ capacity under the Height Adjustable Spout. ... -
Page 27: Descaling The System
7. Care Raise the Height Adjustable Spout to its top position. Remove the Drip Tray and the Coffee Grounds Container and empty them both. If necessary, fill the Water Reservoir with fresh water and put the Water Reservoir, Drip Tray and Coffee Grounds Container back in the machine. The machine will now start rinsing twice. - Page 28 7. Care Caution: You must remove the Filter from the Water Reservoir before starting the descaling program. Turn the Rotary Control Knob to the maintenance symbol. Press the Rotary Control Knob. Turn the Rotary Control Knob to “Descale system”. Press the Rotary Control Knob.
-
Page 29: Regular Manual Cleaning Of The Machine
7. Care Press the Rotary Control Knob to start the rinsing process. The Display Screen will now show the message, “Rinsing”. The rinsing cycle will start and run automatically for approximately two minutes. As soon as the rinsing cycle has finished, the Display Screen will show the message, “Empty Tays”. -
Page 30: Cleaning The Brewing Unit
7. Care 7.7 Cleaning the Brewing Unit Caution: Only remove the Brewing Unit when the machine is in Standby mode. Open and remove the service door on the right of the machine. To unlock the Brewing Unit, press the red button and turn the handle all the way to the left until it unlocks. -
Page 31: System Messages
8. System messages 8. System Messages Message Meaning What to do FILL-UP PIPE-SYSTEM Fill or rinse out water hoses (inside) Press the Rotary Control Knob Fresh water Filter in use may be Remove or change the Filter cartridge faulty FILL UP WATER Water Reservoir is empty Add fresh water Water Reservoir is absent or incor-... -
Page 32: Troubleshooting
If you are unable to correct a fault / system message yourself, call a SPRADA Service Centre and please consult the Guaratee details in Section 13. Caution: If the display reads “Error / Service-Tel”, note the code. Switch... -
Page 33: Accessories
SPRADA Descaling Tablets: Your fully automatic coffee centre provides an integrated descaling programme. The descaler will reliably remove lime scale without damaging the machine. SPRADA Milk Cleaning Powder: SPRADA Milk Cleaning Powder easily cleans all Milk Frothers of milk residues. -
Page 34: Further Instructions
Should you wish to claim under this guarantee, please return the SPRADA Future OTC in its original packaging together with a detailed description of the fault to one of our service centres that can be found on www.sprada.ch. A downloadable repair form is available from the website to facilitate this process.
Need help?
Do you have a question about the FUTURE One Touch Cappuccino and is the answer not in the manual?
Questions and answers