Table of Contents
Advertisement
Advertisement
Table of Contents

Related Manuals for Sprada Future TS4


Summary of Contents for Sprada Future TS4
- Page 1 SPRADA 572 MANUAL (FRONT COVER)
- Page 3 Please start by reading the safety notes. Keep this manual in a safe place as a reference guide or to give to any other users of your machine. The SPRADA team is here to support you as we are dedicated to your enjoyment of great coffee from this high-quality SPRADA product.
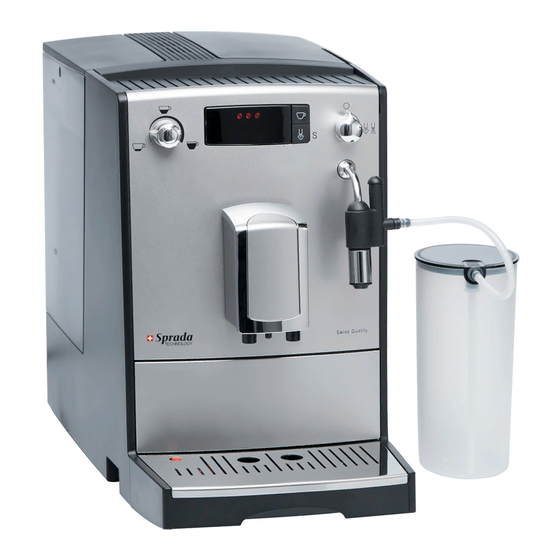
- Page 4 FAMILIARISING YOURSELF WITH YOUR TS4 FIGURE 1 A. Display L. Service door (side panel) B. Strength/volume selector M. Pre-ground coff ee chute C. Steam/hot water control N. Drip tray D. One cup/two cup coff ee button O. Identifi cation plate (inside, remove E.
- Page 5 FAMILIARISING YOURSELF WITH YOUR TS4 Frothing device components Bean container Water tank Inserting the filter Frothing device Two cup dispensing One cup dispensing Milk container Grinder setting control Brewing unit release...
- Page 6 DISPLAY SYMBOLS Descaling required Water tank Automatic switch-off Drip tray Temperature Coffee strength Coffee powder chute (open) Rinsing Two cups Cleaning required Steam valve Filter Indicator bar...
-
Page 7: Table Of Contents
INDEX SAFETY INSTRUCTIONS GETTING STARTED 2.1 Preparation 2.2 Controls 2.3 Filling the water container and bean container 2.4 Switching the machine on and filling the system 2.5 Using the machine with a filter 2.6 Using the machine without a filter, adjusting water hardness 2.7 Setting automatic switch off time 2.8 Adjusting the temperature 2.9 Setting the automatic-off rinsing process... -
Page 9: Safety Instructions
1. SAFETY INSTRUCTIONS 1. SAFETY INSTRUCTIONS • This machine is only intended for domestic use. It is not designed for commercial use (see warranty conditions). Warranty will be compromised when the machine has been used in any way other than intended. •... - Page 10 Where repair work is necessary (including power cord replacement), please contact the retailer from whom you purchased the machine for repair or send the machine to a SPRADA customer service centre. • The power cord of this machine must be replaced if damaged.
-
Page 11: Getting Started
2. GETTING STARTED 2. GETTING STARTED (Please read carefully before using the machine to prepare coffee for the first time.) 2.1 Preparation Carefully remove the machine and all accompanying parts from à à the packaging. Your package should contain the following: •... -
Page 12: Filling The Water Container And Bean Container
2. GETTING STARTED than three seconds, enters the menu for the basic settings. Press the button again for more than 3 seconds to leave the menu. • Height-adjustable spout (Fig. 1/F): Pushing up or down accomodates the height of different cups or glasses. 2.3 Filling the water container and bean container Open the cover on the left (Fig. -
Page 13: Using The Machine With A Filter
2. GETTING STARTED Press steam/rinsing button (Fig. 1/E). à à Your machine is now ready for use. 2.5 Using the machine with a filter The machine can operate with or without a filter. By using a filter, the machine needs to be descaled less often because the filter softens the water. -
Page 14: Using The Machine Without A Filter, Adjusting Water Hardness
2. GETTING STARTED 2.6 Using the machine without a filter, adjusting water hardness Depending on the water hardness in the area, the machine needs to be descaled every now and again. For the system to be able to indicate that this is necessary, set the correct water hardness prior to first use. -
Page 15: Adjusting The Temperature
2. GETTING STARTED Increase the number of bars at the bottom of the display, one bar at a time according to personal preference: 1 bar = automatic switch-off time after 5 minutes 2 bars = automatic switch-off time after 30 minutes 3 bars = automatic switch-off time after 70 minutes After three bars the display starts again with one bar. -
Page 16: Adjusting The Coarseness Of The Grinding
2. GETTING STARTED Press the steam/rinsing button (Fig. 1/E) repeatedly until symbol à à appears. To change the setting, press the coffee cup button (Fig.1/D) à à repeatedly to increase the number of bars at the bottom of the display one bar at a time. Set the rinsing according to the number of red bars: à... -
Page 17: Making Coffee
3. MAKING COFFEE 3. MAkING COFFEE Tip: The machine is set so that you can brew your first coffee immediately. However, we recommend you make the necessary adjustments according to your personal preferences - check point 2 “Getting started” first and follow the instructions. Tip: When you use the machine for the first time or if it hasn’t been used for a prolonged period of time, the first cup will not have the full strength/aroma and should therefore be discarded. -
Page 18: Making A Cup Of Coffee
3. MAKING COFFEE 3.4 Making a cup of coffee Select the coffee strength (see point 3.2) and the water volume (see point 3.3): Place a cup centrally beneath the spout (Fig. 8). à à The spout is adjustable to match the size of the cup. Press the coffee cup button briefly (Fig. -
Page 19: Using Pre-Ground Coffee
3. MAKING COFFEE 3.6 Using pre-ground coffee Turn the strength/volume selector (Fig. 1/B) to the water volume required for one cup. Open the hinged lid of the coffee powder chute located at the à à top of the right hand side panel (Fig. 1/M). Symbol S4 shown. - Page 20 3. MAKING COFFEE 3.8 Frothing milk and making cappuccino The special frothing device (Fig. 1/K) can froth milk directly into the cup from a container. Immerse the suction hose (Fig. 9) into the milk (in the container à à or directly into the milk carton). Place a cup under the frothing device.
-
Page 21: Cleaning And Maintenance
3. MAKING COFFEE/ 4. CLEANING AND MAINTENANCE Turn the steam/hot water control (Fig. 1/C) anti-clockwise back à à to position 0. Press the steam/rinsing button (Fig. 1/E) once again. à à The machine is now back to coffee mode. Attention: From time to time (ideally each time the machine will not be used for a while, or at regular intervals), the frothing device needs to be completely dismantled (Fig. -
Page 22: System Cleaning
4. CLEANING AND MAINTENANCE Press the strength/volume selector (Fig. 1/B). à à Symbol S6 flashes and symbol S12 is displayed. Turn the steam/hot water control (Fig. 1/C) clockwise all the way. à à The system is now being flushed. Wait until no more water is dispensed from the jet and turn the à... -
Page 23: Descaling
4. CLEANING AND MAINTENANCE Place a cleaning tablet in the coffee powder chute and close à à the lid. The cleaning process re-starts. Symbol S11 flashes. The cleaning process is automatic and will run for about 10 minutes. Once the process has finished, symbol S2 is displayed and symbol S11 flashes. - Page 24 4. CLEANING AND MAINTENANCE Symbol S7 flashes, symbol S2 is displayed. Remove the drip tray with the used coffee grounds container à à (figures 1/N and Q) and empty both. Re-insert the drip tray and the used coffee grounds container. à...
-
Page 25: Regular Cleaning By Hand
Attention: From time to time (ideally each time the machine will not be used for a while, or at regular intervals), the steam/hot water spout needs to be completely dismantled and thoroughly cleaned under running water (Fig.2). We recommend the SPRADA milk cleaning powder. -
Page 26: Cleaning The Brew Unit
4. CLEANING AND MAINTENANCE 4.5 Cleaning the brew unit Attention: Remove the brew unit only when the machine is switched off. The brew unit can be removed and cleaned under cold, running water. Never use any cleaning agent, but clear, cold water. For hygienic reasons, we recommend the removal and cleaning of the unit thoroughly after each run of the cleaning programme (see point 4.2). -
Page 27: System Messages
5. SYSTEM MESSAGES 5. SYSTEM MESSAGES MESSAGE MEANING ACTION No beans Add beans, restart coffee making à à flashes Refill water pipe system Turn steam/hot water control à à clockwise Possible water system blockage Clean or service à à Filter possibly defective Remove or replace filter à... -
Page 28: Troubleshooting
In the event of not being able to correct a fault or malfunction, or not being able to clear a fault message, call a SPRADA customer service centre. If the system detects any errors, the display will show an error report: •... -
Page 29: Coffee And Accessories
The descaler will reliably remove lime scale without damaging the machine. SPRADA Milk Cleaning Powder: SPRADA Milk Cleaning Powder easily cleans all milk frothers of milk residue. Milk Thermos: This double-walled stainless steel cooler is designed to help keep... -
Page 30: Customer Service
Should you wish to claim under warranty, please return the machine in its original packaging and power plug together with a detailed description of the fault to a SPRADA service centre. Upon receipt, technicians will inspect the machine and deliver a full report on the probable cause of the defect.
Need help?
Do you have a question about the Future TS4 and is the answer not in the manual?
Questions and answers