Table of Contents
Advertisement
Advertisement
Table of Contents

Related Manuals for Tiny Audio M7


Summary of Contents for Tiny Audio M7
- Page 1 Internet, DAB/DAB+ and FM Receiver I n s t r u c t i o n M a n u a l...
-
Page 2: Safety Precautions
Safety Precautions To achieve the utmost in enjoyment and performance, and in order to become familiar with its features, please read this manual carefully before attempting to operate the unit, this will assure you years of faithful, trouble free performance and listening pleasure. Important Notes This safety and operating instruction should be retained for future reference. -
Page 3: Safety Information
Safety Information Some Do’s and Don’ts on the safe use of equipment This equipment has been designed and manufactured to meet international safety standards but, like any electrical equipment, care must be taken if you are to obtain the best results and safety is to be assured. -
Page 4: Table Of Contents
Table of Contents Safety Precautions ........................ 2 Safety Information ......................... 3 Table of Contents ........................4 Package Content ........................6 Unit Overview ........................6 Remote Control Overview ....................7 Getting Started ........................8 Internet Radio Quick Start Guide ..................9 Internet Radio Mode ...................... - Page 5 View Station Information ....................18 FM Mode ..........................19 Select FM Mode ......................19 Scan setting ........................19 Audio Setting ........................19 Presets Setting........................20 Store Preset Stations ...................... 20 Recall a Preset Station ....................20 Remote Control via iPhone/iPod Touch ................21 App store operation ......................
-
Page 6: Package Content
Package Content What you can find inside of your package: Main unit Instruction Manual Remote control and AAA alkaline batteries Power adapter Antenna RCA cable Unit Overview 1. LCD display 6. Antenna socket 2. Remote control sensor button 3. Optical out socket - Press to switch on radio. -
Page 7: Remote Control Overview
Remote Control Overview You can alternatively select remote control or iPhone/iPod Touch to navigate your radio. Generally, we use below remote control to operate. button Press to switch on radio, press again to switch radio to standby mode. 2. OK button Press to confirm your selection. -
Page 8: Getting Started
Getting Started Carefully remove your radio from the box. You may wish to store the packaging for future use. Positioning your Radio Receiver Place your radio receiver on a flat / stable surface that is not subject to vibrations. Avoid the following locations: Where the receiver will be exposed to direct sunlight. -
Page 9: Internet Radio Quick Start Guide
Internet Radio Quick Start Guide Before use your radio receiver, you need to know followings: Wireless LAN Setting: A broadband Internet connection. A wireless access point (Wi-Fi) connected to your broadband Internet, preferably via a router. If your wireless network is configured to use Wired Equivalent Privacy (WEP) or Wi-Fi Protected Access (WPA) data encryption then you need to know the WEP or WPA code so you can get the Internet Radio to communicate with the network. -
Page 10: Internet Radio Mode
Internet Radio Mode 1. For initial use, the LCD display will show ‘Setup wizard’ screen. Press OK button to confirm ‘YES' to start setup. Options in the setup wizard include the following: Date/Time Set 12 or 24 hour format Auto update Update from DAB Update from Network Select your time zone and daylight savings is needed. -
Page 11: Access Internet Radio Mode
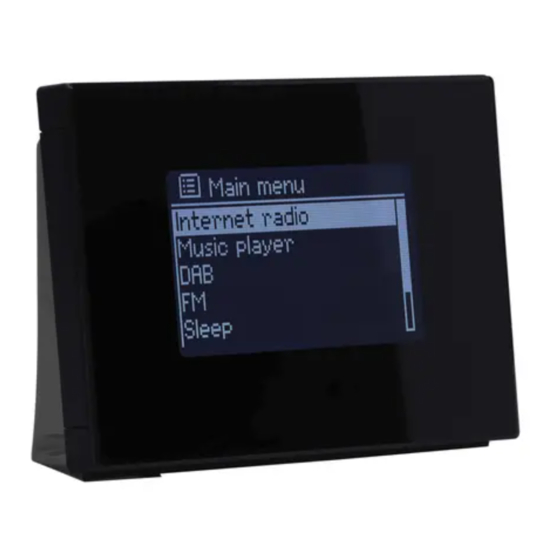
Access Internet Radio Mode Display will show 'Main menu' after 'Setup wizard' completed. Press OK button to select Internet radio mode. While 'Station list' is highlighted, press OK button to confirm. Then refer the following section to choose stations. If failed to connect to network, please follow: a . -
Page 12: Select A Station Through Podcasts
b. Press button to select the region you wanted, and then press OK button to confirm. c. Using the same method to choose country, station in turn, radio receiver will perform loading. ‘Genre’ enables you to choose radio stations according to their content, for example Classic Rock, Sport, News, etc. -
Page 13: Add Station To 'My Added Stations
Add Station to ‘My Added Stations’ Even though the Internet radio portal contains thousands of stations, you may want to listen to stations not listed. You can add your own stations via the portal (www.wifiradio-frontier.com). After you added the stations, in order to have your radio access your new settings, get your radio power off for several minutes is necessary. -
Page 14: Music Player Mode
Music Player Mode Setting up a Music Server In order for your radio play music files from a computer, the computer must be set up to share files or media. UPnP media sharing allows devices like this radio to play music from a shared media library, navigating through tag menus such as Artist, Album or Genre. -
Page 15: Play Shared Media
Play Shared Media Press MODE button repeatedly to select Music player mode. While 'Shared media' is highlighted, press OK button to confirm, and then step by step to your selecting music. When a track is playing, you can use remote control to: a. -
Page 16: Clear My Playlist
Clear My Playlist You can use this feature to clear the contents of your playlist. Press MENU button, press button to select 'Clear My playlist' and then press OK button to confirm. Select 'YES' to clear my playlist. Prune Servers The Prune Servers feature enables you to remove music servers that are no longer available to you to browse for music. -
Page 17: Dab Mode
DAB Mode Select DAB mode Press MODE button repeatedly to select DAB mode. For initial use, your receiver will carry out a full scan and store stations list in memory. Once the scanning is completed, the DAB/DAB+ stations will be displayed in alphanumeric order. The first station in the list will be selected, press OK button to broadcast. -
Page 18: Change Station Order
1. Press MENU button, press button to select 'DRC', and then press OK button to confirm. 2. Press button to select option, press OK button to confirm. Change Station Order You may want to display the stations in different order. Press MENU button, press button to select 'Station order', and then press OK button to confirm. -
Page 19: Fm Mode
FM Mode Select FM Mode 1. Press MODE button repeatedly to select FM mode. 2. For initial use, it will start at the beginning of the FM frequency range (87.50MHz). Otherwise, the last listened FM station will be selected. 3. To manually change the FM frequency, make sure no other order/system setting is going on, press button to change the frequency by 0.05MHz. -
Page 20: Presets Setting
Presets Setting Note: This is the same for Internet, DAB/DAB+ and FM Radio stations. Store Preset Stations Your receiver can store up to 10 of your favourite Internet, DAB/DAB+ and FM stations. While playing your favourite station, press and hold one of 1- 10 button to store current station, then display will show “Preset stored”. -
Page 21: Remote Control Via Iphone/Ipod Touch
Remote Control via iPhone/iPod Touch This feature enables you to navigate the receiver via iPhone/iPod Touch. Any iPhone/iPod running iOS 3.1.3 or later allows users to control your receiver as long as you install it properly. First and foremost, we need to make sure App Store has already installed on your device properly, if it isn’t, please follow: App store operation Getting apps onto your iPhone/iPod Touch couldn’t be simpler. -
Page 22: Setting Up The Connection
1. In the iPhone/iPod’s main menu, open the App Store by tapping the App store icon 2. In the App store, search for ‘Pinell Remote App'. 3. Tap ‘Pinell’ icon, and then tap 'Free' and then 'install'. The wireless Device Remote control application now is downloaded and installed on your iPhone/iPod. -
Page 23: General Operation
General Operation Set Sleep To set sleep, press SLEEP button directly, or press MENU button > Main menu > Sleep, and then press OK button to confirm. Press button to view options Sleep OFF, 15, 30, 45 or 60 minutes, press the OK button to confirm. -
Page 24: Set Time/Date
Want to set DHCP enable or disable? --------- Manual settings Want to set a Net Remote Pin code? --------- NetRemote PIN Setup Want to see the list of registered networks or delete some of unwanted networks? --------- Network profile Want to keep network connected when radio in standby mode? --------- Keep network connected 3. -
Page 25: Setup Wizard
C A U T I O N Before starting a software upgrade, ensure that your radio is plugged into a stable mains power connection. Disconnecting power during a software update may permanently damage the unit. 1. Press MENU button > Main menu > System settings > Software update, press OK button to confirm. -
Page 26: Specification
Specification ITEMS SPECIFICATIONS Description: Internet, DAB/DAB+ and FM receiver Input: 100-240VAC, 50-60Hz Power Supply: Output: 6VDC, 500mA FM: 87.5-108MHz Frequency Ranges: DAB/DAB+: 174.928 – 239.200 MHz LCD Display: High resolution display Power Consumption: 3W (Max) Dimension (L x W x H): 130mm x 42mm x 95mm This symbol on the product or in the instructions means that your electrical and electronic equipment should be disposed at the end of its life separately from your household waste.
Need help?
Do you have a question about the M7 and is the answer not in the manual?
Questions and answers