HIKVISION DS-7204HVI-SH series Quick Operation Manual
Hide thumbs
Also See for DS-7204HVI-SH series:
- User manual (198 pages) ,
- Quick operation manual (39 pages) ,
- User manual (171 pages)
Table of Contents
Advertisement
Advertisement
Table of Contents

Related Manuals for HIKVISION DS-7204HVI-SH series


Summary of Contents for HIKVISION DS-7204HVI-SH series
- Page 1 DS-7200-SH/SV&DS-7300-SH Series DVR Quick Operation Guide UD.6L0202B0057A02...
-
Page 2: Dvr Pre-Installation
Quick Operation Guide of DS-7200-SH/SV&DS-7300-SH Series DVR Thank you for purchasing our product. If there is any question or request, please do not hesitate to contact dealer. This manual is applicable to DS-7204HVI-SH, DS-7208HVI-SH, DS-7216HVI-SH; DS-7204HFI-SH, DS-7208HFI-SH, DS-7216HFI-SH; DS-7204HWI-SH, DS-7208HWI-SH, DS-7216HWI-SH; DS-7204HVI-SV, DS-7208HVI-SV, DS-7216HVI-SV;... - Page 3 Quick Operation Guide of DS-7200-SH/SV&DS-7300-SH Series DVR 3. Connect the HDD to the motherboard of the DVR with the included data cable. 4. Connect the power cable to the HDD. 5. Re-install the cover of the DVR and fasten screws.
-
Page 4: Front Panel
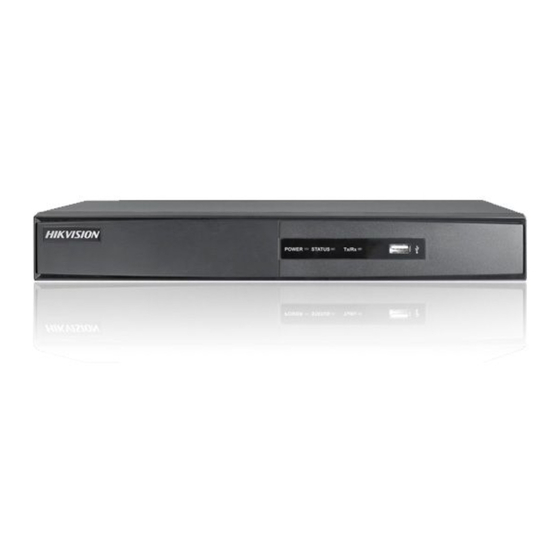
Quick Operation Guide of DS-7200-SH/SV&DS-7300-SH Series DVR Front Panel The front panel of DS-7200-SH/SV is shown below: Table 1 Description of Control Panel Buttons Name Function Description POWER indicator turns green when DVR is powered up. POWER STATUS indicator lights in red when data is being read from or written to HDD. STATUS Tx/Rx indictor blinks green when network connection is functioning properly. -
Page 5: Jog Shuttle
Quick Operation Guide of DS-7200-SH/SV&DS-7300-SH Series DVR Enter letters “ABC”; The F1 button can be used to select all items on the list; In PTZ Control mode, the F1 button can be used to zoom out (zoom-) the PTZ camera; In live view or playback mode, the F1 button can be used to switch between main and spot video output. -
Page 6: Rear Panel
Quick Operation Guide of DS-7200-SH/SV&DS-7300-SH Series DVR Rear Panel DS-7204HVI/HFI/HWI-SH and DS-7204HVI-SV: DS-7216HVI-SH and DS-7216HVI-SV: Note: The rear panels of DS-7208HVI-SH and DS-7208HVI-SV provide 8 video input interfaces. DS-7216HFI-SH and DS-7216HWI-SH: Note: The rear panels of DS-7208HFI-SH and DS-7208HWI-SH provide 8 video input interfaces. Table 3 Description of Rear Panel Item Description... - Page 7 Quick Operation Guide of DS-7200-SH/SV&DS-7300-SH Series DVR DS-7304HFI-SH and DS-7304HWI-SH: DS-7308HFI-SH and DS-7308HWI-SH: DS-7316HFI-SH and DS-7316HWI-SH: Table 4 Description of Rear Panel Item Description VIDEO IN BNC connector for analog video input. MAIN VIDEO OUT BNC connector for video output. SPOT VIDEO OUT BNC connector for spot video output.
-
Page 8: Peripheral Connections
Quick Operation Guide of DS-7200-SH/SV&DS-7300-SH Series DVR Peripheral Connections Note: Alarm input/output connections are valid for the DS-7300HWI-SH and DS-7300HFI-SH models only. Connecting to Alarm Input / Output Device The alarm input is an open/closed relay. If the input is not an open/closed relay, follow the connection diagram below: To connect to an AC/DC load, use the following diagram: For DC load, JP4 can be used within the limit of 12V/1A safely. -
Page 9: Specifications
Quick Operation Guide of DS-7200-SH/SV&DS-7300-SH Series DVR Specifications Table 5 Specifications for DS-7200HFI-SH Model DS-7204HFI-SH DS-7208HFI-SH DS-7216HFI-SH Video compression H.264 Video input 4-ch 8-ch 16-ch BNC (1.0 Vp-p, 75 Ω), PAL /NTSC self-adaptive Video input interface Video/Audio input Audio compression G.711 1-ch, RCA (2.0 Vp-p, 1 kΩ) Audio input... - Page 10 Quick Operation Guide of DS-7200-SH/SV&DS-7300-SH Series DVR Table 6 Specifications for DS-7200HVI-SH Model DS-7204HVI-SH DS-7208HVI-SH DS-7216HVI-SH Video H.264 compression Video input 4-ch 8-ch 16-ch Video input BNC (1.0 Vp-p, 75 Ω), PAL /NTSC self-adaptive Video/Audio interface input Audio G.711 compression 1-ch, RCA (2.0 Vp-p, 1 kΩ) Audio input Two-way audio...
- Page 11 Quick Operation Guide of DS-7200-SH/SV&DS-7300-SH Series DVR Table 7 Specifications for DS-7200HVI-SV Model DS-7204HVI-SV DS-7208HVI-SV DS-7216HVI-SV Video H.264 compression Video input 4-ch 8-ch 16-ch Video input BNC (1.0 Vp-p, 75 Ω), PAL /NTSC self-adaptive interface Video/Audio Audio input G.711 compression 1-ch, RCA (2.0 Vp-p, 1 kΩ) Audio input Two-way audio...
- Page 12 Quick Operation Guide of DS-7200-SH/SV&DS-7300-SH Series DVR Table 8 Specifications for DS-7200HWI-SH Model DS-7204HWI-SH DS-7208HWI-SH DS-7216HWI-SH Video H.264 compression Video input 4-ch 8-ch 16-ch Video input BNC (1.0 Vp-p, 75 Ω), PAL /NTSC self-adaptive interface Video/Audio Audio input G.711 compression 1-ch, RCA (2.0 Vp-p, 1 kΩ) Audio input Two-way audio...
- Page 13 Quick Operation Guide of DS-7200-SH/SV&DS-7300-SH Series DVR Table 9 Specifications for DS-7300HFI-SH Model DS-7304HFI-SH DS-7308HFI-SH DS-7316HFI-SH Video compression H.264 Video input 4-ch 8-ch 16-ch BNC (1.0 Vp-p, 75 Ω), PAL /NTSC self-adaptive Video input interface Video/Audio input Audio compression G.711u 4-ch, RCA (2.0 Vp-p, 1 kΩ) Audio input 1-ch, RCA (2.0 Vp-p, 1 kΩ) (using the audio input)
- Page 14 Quick Operation Guide of DS-7200-SH/SV&DS-7300-SH Series DVR Table 10 Specifications for DS-7300HWI-SH Model DS-7304HWI-SH DS-7308HWI-SH DS-7316HWI-SH Video compression H.264 Video input 4-ch 8-ch 16-ch BNC (1.0 Vp-p, 75 Ω), PAL /NTSC self-adaptive Video input interface Video/Audio input Audio compression G.711u 4-ch, RCA (2.0 Vp-p, 1 kΩ) Audio input 1-ch, RCA (2.0 Vp-p, 1 kΩ) (using the audio input)
-
Page 15: Hdd Storage Calculation Chart
Quick Operation Guide of DS-7200-SH/SV&DS-7300-SH Series DVR HDD Storage Calculation Chart The following chart shows an estimation of storage space used based on recording at one channel for an hour at a fixed bit rate. Bit Rate Storage Used 128K 160K 192K 224K... -
Page 16: Menu Operation
Quick Operation Guide of DS-7200-SH/SV&DS-7300-SH Series DVR Menu Operation Menu Structure The menu structure of the DS-7200-SH/SV series DVR is shown as below: Menu Playback Export Manual Record Camera Shutdown Configuration Maintenance Normal Normal Record General Schedule General Logout Lock System Info Event Event... -
Page 17: Using The Setup Wizard
Quick Operation Guide of DS-7200-SH/SV&DS-7300-SH Series DVR Shutting down the device: Steps: 1. Enter the Shutdown menu. Menu > Shutdown 2. Click the Shutdown button to enter the following dialog box: 3. Click the Yes button. The following message box pops up: 4. - Page 18 Quick Operation Guide of DS-7200-SH/SV&DS-7300-SH Series DVR 2. Check the checkbox to enable Setup Wizard when device starts. Click Next to continue the setup wizard. You can also click Cancel to exit the Setup Wizard, or use the Setup Wizard next time by leaving the “Start wizard when device starts?”...
- Page 19 Quick Operation Guide of DS-7200-SH/SV&DS-7300-SH Series DVR 5. Click Next button which takes you back to the Network Setup Wizard window. Set the network parameters, including the NIC type, IPv4 address, IPv4 subnet mask, default gateway, etc. You can enable the DHCP to automatically obtain an IP address and other network settings from that server. Note: The DS-7200HWI/HFI/HVI-SH and DS-7200HVI-SV models provide one 100M/100Mbps self-adaptive network interface, and the DS-7300HWI/HFI-SH models provide one 100M/100M/1000Mbps...
- Page 20 Quick Operation Guide of DS-7200-SH/SV&DS-7300-SH Series DVR 7. Click Next button to enter the Record Settings window. Select the camera to configure. Check the checkbox to enable Start Recording. Select the recording mode to Normal or Motion Detection. Click Copy to copy the record settings of the current camera to other camera (s) if needed.
-
Page 21: Using The Mouse In Live View
Quick Operation Guide of DS-7200-SH/SV&DS-7300-SH Series DVR Click OK to return to the Record Settings window. Click OK to complete the startup Setup Wizard. Live View Some icons are provided on screen in Live View mode to indicate different camera status. These icons include: Live View Icons In the live view mode, there are icons at the right top of the screen for each channel, showing the status of the record and alarm in the channel, so that you can find problems as soon as possible. -
Page 22: Main/Aux Output Switching
Quick Operation Guide of DS-7200-SH/SV&DS-7300-SH Series DVR Table 11 Mouse Operation in Live View Name Description Menu Enter the main menu of the system by right-clicking the mouse. Single Screen Switch to the single full screen by choosing channel number from the dropdown list. Multi-screen Adjust the screen layout by choosing from the dropdown list. - Page 23 Quick Operation Guide of DS-7200-SH/SV&DS-7300-SH Series DVR Control icon to enter the PTZ toolbar. Table 12 Description of the PTZ toolbar icons Description Description Icon Icon Icon Description Direction button and Zoom+, Focus+, Zoom-, Focus-, Iris- the auto-cycle button Iris+ The speed of the PTZ Wiper on/off Light on/off...
-
Page 24: Instant Playback By Channel
Quick Operation Guide of DS-7200-SH/SV&DS-7300-SH Series DVR 2. Click the Start Recording submenu and select the recording mode to Normal Record or Motion Detection Record. 3. In the pop-up message box, click Yes to finish the quick recording settings for all channels. Note: The full-screen motion detection triggered recording is configured by default in this mode. - Page 25 Quick Operation Guide of DS-7200-SH/SV&DS-7300-SH Series DVR Press PLAY button on the front panel or IR remote control to play back record files of the channel under single-screen live view. Under multi-screen live view, record files of the top left channel (not masked) will be played back. 2.
- Page 26 Quick Operation Guide of DS-7200-SH/SV&DS-7300-SH Series DVR Backup Recorded files can be backed up to various devices, such as USB flash drives, USB HDDs or a DVD writer. To export recorded files: 1. Click Menu>Export to enter Video Export interface. Choose the channel (s) you want to back up and click the Quick Export button.
- Page 27 Quick Operation Guide of DS-7200-SH/SV&DS-7300-SH Series DVR 3. Check backup result. Choose the record file in Export interface and click the button to check it. 0202021030106...
Need help?
Do you have a question about the DS-7204HVI-SH series and is the answer not in the manual?
Questions and answers