Table of Contents
Advertisement
Quick Links
Advertisement
Table of Contents

Related Manuals for Jay-tech DS100


Summary of Contents for Jay-tech DS100
-
Page 2: Table Of Contents
Instruction Contents Safety Precautions ..............Unpacking Your Product ............Installation ................The Film Scanner ..............Loading Slides ..............Loading Negatives ..............Capturing Images ..............Saving Images ..............Cleaning & Maintenance ............. Trouble Shooting ..............Technical Specifications ............. -
Page 3: Safety Precautions
Do not disassemble the device and do not open the housing, there is danger of electric shock. The retailer is not liable for any damage incurred during use of this device, or for the complaints of third parties. DS100 may become slightly warm during use. This does not indicate malfunction. -
Page 4: Ambient Conditions
Ambient Conditions: Set the scanner up so that the ventilation openings are not obstructed. For example do not place it on a bed, sofa, carpet, or similar surfaces. Do not place the device close to heat sources such as radiators or ovens. And do not subject the device to high temperatures or severe temperature fluctuations. -
Page 5: Unpacking Your Product
Start of Operation: To ensure proper operation please read all the operating instructions and the notes on safety carefully! USB Connection: Use the USB cable to connect the device to your PC. This symbol on the product or in the instructions means that your electrical and electronic equipment should be disposed at the end of its life separately from your household waste. -
Page 6: Installation
3. Installation Before connecting to the computer for the first time insert the CD- ROM and choose the following options on the CD: Please follow this order: 1: Install Driver 2: Install BlazePhoto Software 3: Install Directx 9.0 Note : if you are running Windows XP Service Pack 2 or higher or Windows Vista and XP professional this is not needed. -
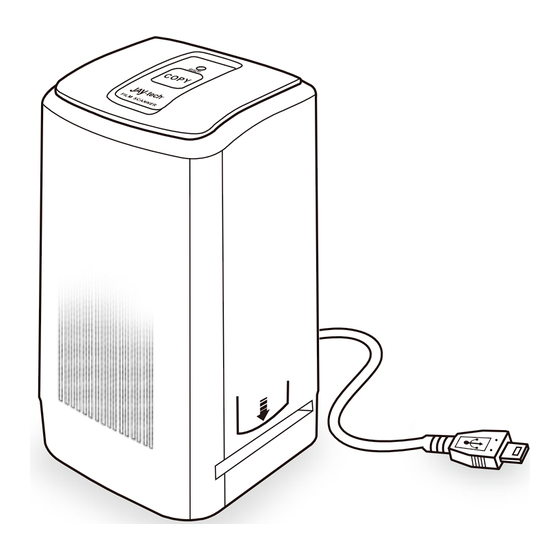
Page 7: The Film Scanner
4. The film scanner Slot USB Cable Positive Slide Holder Power LED Copy Button: Press this button to capture and save the image loaded in the holder NOTE:This button will light up when connected to a USB Power source Negative Film Holder Ready Light: Will turn green when the slide or negative... -
Page 8: Loading Slides
5. Loading Slides Slide: The light, shade and color of the slide is exactly the same as original image. With the slide holder laid open place the slide onto the holder with the glossy side facing up and the image should be upright, Note : Handle slides with care. -
Page 9: Loading Negatives
6. Loading Negatives Negative film properties: The light and shade, color of the Negative is exactly inverted from the original image. Place the film onto the holder with the glossy side facing up and the image should be upright. Use the tabs in the holder to align the negatives film. - Page 10 Film Holder: The design of the film holder follows ISO standard. In some cases the holes on the film will not match exactly to alignment of the holder, as this is caused by using non-standardized film. In this case there will be a small black line on the edge of the frame that can easily be cropped out using the BlazePhoto software.
-
Page 11: Capturing Images
7. Capturing images After installation and connection of the film scanner to the computer: ◆ Click on the START menu of your windows PC and launch BlazePhoto from the programs menu, wait for the application to launch. “BlazePhoto” Window ◆Choose “Get Photo” from the menu bar ◆... - Page 12 ◆Select the “OVT Scanner” choice ◆ Choose the location on your computer to save the captured images into ◆Choose the color depth ◆Choose the resolution as 1800 or 3600 DPI ◆Choose the format ◆Choose the type of film you are scanning (the default film type is negative) ◆After all settings have been made click the OK button Note: When choose the Slide, the following window will be appeared:...
- Page 13 If you want to adjust brightness manually, please choose ”Yes” in “Open Brightness Manual Control Box”, then click the OK button, “Brightness Manual Control Box” window will be appeared, you can adjust brightness automatically or manually. “OVT Scanner” Window This window will show you the preview of the image loaded from the film scanner.
- Page 14 ◆If you find the preview happen incomplete image, please check the display setting and change it to 32 bit. Windows XP...
- Page 15 Windows Vista “Color/Brightness Adjustment” Window User can click “Color/Brightness Adjustment” on the application window, the following window will be appeared. Then click”+”/“-“ to increase/decrease brightness/color balance level.
-
Page 16: Saving Images
8. Saving images Capture/Save the image Note: To get the best quality capture please wait a few seconds after the image has been put into place, you will see the image darken and adjust the best settings. ◆Insert the film/slide holder from the right side of scanner (Arrow sign on the right side) and push it. - Page 17 To save/delete images ◆ Click the “Save” button to save the captured images to the designated directory on your computer. ◆ You can also click the “Delete” button to delete the selected image.
- Page 18 ◆After saving is completed click “Exit”. The images will appear in BlazePhoto main window and can be edited. Using BlazePhoto From the main window of BlazePhoto you may double click on an image to see it in more detail and edit the image as desired(as below) There are many editing features that can be applied by using the software.
-
Page 19: Cleaning & Maintenance
9. Cleaning & Maintenance Periodically and after consistent use the film scanner should be cleaned using compressed air canister to clean the dust out of the inside chamber. ◆Place the film scanner on the side and insert the end of straw from the compressed air into door on the right side so that it opens. -
Page 20: Trouble Shooting
10. Trouble Shooting Problem: Your film scanner will not connect to the computer Solution: Check your operating system: At the time of release the film scanner is only compatible with Windows XP and Windows Vista. To check your Windows operating system version go to the START menu under windows. - Page 21 II. Please unplug the USB, and then reconnect the scanner to computer to see if driver updates with successful connection. III. Please try to connect to the computer's other USB port, because the electrical characteristics of the different USB ports may be different. IV.
-
Page 22: Technical Specifications
11. Technical Specifications ◆Lens : F/6.0 f=11.87mm 5.1 Megapixel CMOS sensor ◆Sensor : ◆Focus Range: Fixed focus ◆Exposure : Auto ◆Color Balance : Auto ◆Scan High Resolution : 3,600 DPI interpolation resolution 10 bits per color channel ◆Data Conversion : ... -
Page 23: Declaration Of Conformity
The EU conformity declaration for this product is available under www.jay-tech.de Intended Use: Dia-/Film-Scanner DS100 is suitable for private indoor use. The device is used for the digitization of slides and negatives to a PC via USB connection. The dimensions of the film holders supplied conform to ISO standard (ISO = International Organization for Standardization). -
Page 24: Service Procedures
Service Procedures: If you have reason for complaint, or your device is defective, please contact your dealer or the service division of JAY-tech GmbH to make arrangements for service procedures. Service Hours: Monday – Thursday from 8:00 am to 5:00 pm Friday from 8:00 am to 2:00 pm.
Need help?
Do you have a question about the DS100 and is the answer not in the manual?
Questions and answers