
Related Manuals for Adventure Pilot iFly 700

Summary of Contents for Adventure Pilot iFly 700
- Page 1 700 ™ O wner ’s M a n u a l Copyright 2011 by Adventure Pilot, LLC. iFly 700 is a trademark used by Adventure Pilot, LLC. Version 5, Rev G 05/11...
-
Page 2: Table Of Contents
Using the Remote Control ......... 28 Panning ............9 System Menu ............29 Activating Buttons .......... 9 Transferring Media Files to Your iFly 700 ..30 Button Fading ..........9 Video Player Optimal Settings ....30 Switching Sectionals ........9 Transferring Audio and Video Files to Markers ............ -
Page 3: Overview
Overview Package Contents iFly 700 AC Adapter Carrying Case Cigarette Lighter Adapter Window Mount SD Card Remote Control Quick Start Guide Features Interface Flight Planning “Direct-to” flight planning Extensive zoom levels from 2 to 100 NM per inch Touch-n-drag scrolling, works even in turbulence... -
Page 4: Warnings
The flight indicators shown on the iFly 700 are based on GPS-derived data and may differ from the aircraft’s instruments. The altitude shown on the iFly 700 is geometric height above Mean Sea Level and may differ from the altitude displayed by pressure altimeters. Always use the pressure altitude displayed by your aircraft’s altimeter for determining aircraft altitude. -
Page 5: Unit Overview
AV In – Connect external video or audio device Headphone Jack USB Port SD/MMC Memory Card Slot Connect USB memory storage device • Included 4G SD card contains iFly 700 applications and data Power Jack • Card must be inserted for unit to operate Connect Cigarette Lighter Adapter or AC Adapter •... -
Page 6: Mounting On A Windscreen
Loosen the two arm adjustment knobs, position the unit as desired, and re-tighten the arm adjustment knobs. Notes: • Do not install the iFly 700 where it obstructs your field of view or interferes with operating controls. • After installation, make sure the unit is firmly secured. -
Page 7: Updating Your Ifly 700
If you do not have a login, create one by clicking the “Register” button at the top of the screen. Be sure to keep your login and password in a safe location. Once registered, it will be necessary to link your new iFly 700 with your account. -
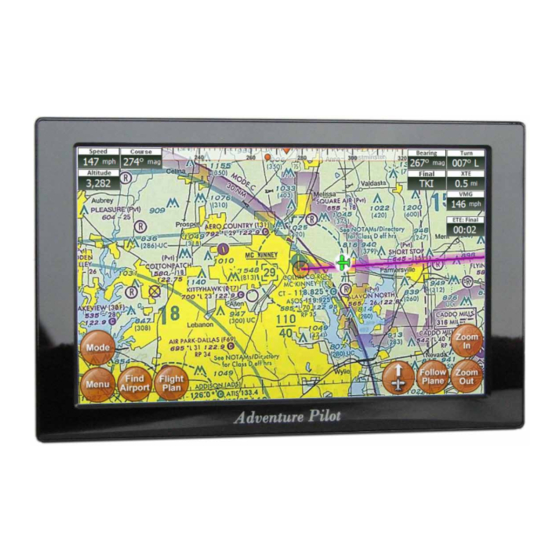
Page 8: Main Display
Overview Main Display Speed Track Navigation Instruments The direction your aircraft Available when a flight plan is active Use Menu Setup to toggle is moving relative to true between Miles, Kilometers, (see page 19) North and Nautical Miles Altitude Your altitude in feet above sea level calculated by GPS Warning: Always... -
Page 9: Using The Touch-Screen
Overview Using the Touch-Screen Panning the view Panning Swipe your finger across the map to move (or “pan”) the view to another area. Panning temporarily hides all the instruments and buttons on the map. This can be useful if you need to see text or an image that is behind something else on the map. -
Page 10: Menus And Screens
Menus and Screens Main Menu Access by touching Menu on the bottom left-hand corner of the map display. Quickly set a route by entering the airport code or name in the Fly Direct To Fly Direct To Screen (see page 21). Find Nearest... Find the airport or NAVAID closest to your current location (see below). -
Page 11: Setup Menu
Flight Trails current flight plan. The iFly 700 remembers all past flights and lists them with the date and time stamp of departure. Select one and touch Load to draw the flight trail on the map. - Page 12 Menus and Screens Setup Menu Continued Alerts and Warnings Customize how specific airspaces are displayed: Hidden, Shaded, Outlined, Shaded and Outlined Special Use Airspace Options Note: Some airspaces will not be shown at higher zoom levels. See page 25 for a table of airspace display levels. Provides a warning before flying into an airspace (see “Airspace Alerts”...
-
Page 13: Instrument Setup Form
Menus and Screens Instrument Setup Form Use this form to customize the appearance of your instruments. Access by touching Menu Setup Customize Instruments. Note: You can also select instrument modes from the Mode Menu. Touch and drag an instrument Touch an instrument to flag to a new location it for change or removal Touch the Change... -
Page 14: About Menu
Note: The FAA publishes updated sectionals one day prior to the sectional’s expiration date. Adventure Pilot makes every effort to get new sectionals ready for download within 24 hours. This shows the current software version of your iFly 700, as well as Version and Contact Adventure Pilot copyright and contact information. -
Page 15: Mode Menu
Menus and Screens Mode Menu Touch the Mode button on the Main Screen and select one of the following options to change the map mode. Sectional Charts Map based on the sectional charts. Low-Enroute Charts Map based on the IFR Low-Enroute charts. Terminal Area Charts Map based on Terminal Area Charts. -
Page 16: Possible Actions Menu
Menus and Screens Possible Actions Menu Activate the Possible Actions menu by either:1) Holding your finger down over the same spot on the map (without swiping it to another spot), or 2) Touching a spot on the map and then touching the Options button. Fly Direct to Here... -
Page 17: Airport Information Screen
Menus and Screens Airport Information Screen Access by touching the Find Airport button and selecting an airport from the list. This screen provides important information about an airport, including: Airport code and name Latitude/Longitude Public/private status If a control tower is present, and what hours that tower is open All utilized communication frequencies A list of runways with detailed information about each runway’s orientation, condition, lighting, traffic pattern, IFR equipment, markings, and obstructions... -
Page 18: Plate Viewer Screen
Menus and Screens Plate Viewer Screen Access by touching the View Plates button on the Airport Information Screen. The Plate Viewer Screen displays additional graphical information published by the FAA for a specific airport. The following types of plates can be viewed: Airport Diagrams Published Minimums Instrument Approaches Departures STARs (Standard Terminal Arrival) plates... -
Page 19: Flight Planning
Warning: The iFly 700 does not support terrain warnings. It will not offer visual or verbal warnings about terrain, low altitude, or obstructions. If using the iFly 700 in a low AGL situation, always remain visually aware of surrounding terrain and obstructions. -
Page 20: Option #1: Create A Point-To-Point Plan By Touching The Screen
Flight Planning Option #1: Create a point-to-point plan by touching the screen Pan the map until you find your desired airport Touch the destination and hold for 2 seconds to or other flying destination. display the Possible Actions menu. Select the “Fly Direct to Here” option. If there are any airports or NAVAIDS near your selected destination, you will be given a list to select from. -
Page 21: Option #2: Find An Airport By Code Or Keyword
Continue touching “Perform full text to see previous search” below Begin searching Limits search entire Adventure Pilot to airport and Airport database NAVIAD codes Searches airport and city Check to include indicated Return to map display names for the entered text... -
Page 22: Option #3: Use The Flight Planner
Flight Planning Option #3: Use the Flight Planner The Flight Planner can be used to create a flight plan from scratch, tweak a current flight plan, change the order of waypoints, cancel a flight plan, save plans, or load previously saved plans. It can also be used to review flight time and fuel consumption estimates. - Page 23 Flight Planning After a departure point is set, begin adding additional points to your plan. Touch Add Waypoint and complete the Fly Direct To Screen as described in “Option #2: Find an airport by code or keyword” on page 21. Next to each point in the flight plan is an Opts button. Touching this opens a menu that provides information on the airport (if the waypoint is an airport).
-
Page 24: Option #4: Rubber-Band Route Modification
Flight Planning Option #4: Rubber-band route modification After creating your initial flight plan, it may be tweaked by touching and dragging a route line or waypoint. You may need to tweak a flight plan if you find that it travels through areas or airspaces that should be avoided (such as a TFR, restricted airspaces, undesired controlled airspaces, etc.). -
Page 25: Airspace Info Form
Flight Planning Airspace Info Form Access by touching the Airspaces? button in the Flight Planner. Use this form to walk through all the airspaces that your flight plan crosses, one by one, in order to get detailed information on the airspaces and to adjust your flight plan if necessary. -
Page 26: Altitude Planning
Flight Planning Altitude Planning Use altitude planning to show the ascent / descent rate in fpm (feet per minute) required to reach the target altitude of the waypoints in your flight plan. the Vert. Speed (Vertical Speed to Target) instruments to your display using the Instrument Setup form. -
Page 27: Airspace Alerts
Flight Planning Airspace Alerts Set up Airspace Alerts to recieve a warning before you fly into an airspace. To control how Airspace Alerts “pop” for each airspace type, touch Menu Setup Alerts and Warnings Airspace Alerts. The following options are available: 1) Types – Select the airspace types that will pop an alert box (Class B, TFR, etc.) No Warnings –... -
Page 28: Extra Features
Extra Features Using the Remote Control Install batteries: Open the battery compartment cover and install two AAA batteries (included), matching the polarity symbols (+ and – ) marked inside. POWER PLANE POWER PLANE Turns the display on and off Centers the display to your current location (same as the “Follow Plane”... -
Page 29: System Menu
/ video devices. Access by touching Menu then System Menu. Navigation Return to iFly 700 Moving Map Software. Multimedia Listen to music and watch videos (see page 32). Image Viewer View images in JPG, TIF or PNG formats (see page 33). -
Page 30: Transferring Media Files To Your Ifly 700
Operating System documentation for information on how to eject or stop your USB Flash Drive. If this step is not accomplished the files may not be completely copied, and the transfer process may fail. Connect the USB flash drive to your iFly 700. See page 32 to play multimedia files. -
Page 31: Transferring Audio And Video Files To The Play List
Extra Features Transferring Audio and Video Files to the Play List Make sure the USB flash drive containing your files is plugged into the iFly 700 (see pagepage 30). From the System Menu, touch the icon. Multimedia From the Multimedia screen, touch the Play List icon at the bottom of the screen. -
Page 32: Using The Multimedia Player
Extra Features Using the Multimedia Player Access the Multimedia Player by touching Menu System Menu Multimedia. Note: First copy files to the Play List (see above). Operate the Multimedia Player using controls shown below. Touch a file name shown in the Play List. Play will begin automatically. Touch to view additional Play List pages. -
Page 33: Using The Video Player
Return to default screen size Lower volume Using the Image Viewer Access the Image Viewer by touching Menu System Menu Image Viewer. Make sure the USB flash drive containing your files is plugged into the iFly 700 (see pagepage 30). Play / pause Previous Next 2x play Rotate... -
Page 34: Changing Configuration Settings
Note: When calibrating the touch- screen, use a stylus, toothpick, or plastic pointed object • Enable button sound • Choose to start the iFly 700 in System Menu or Navigation • Reset the GPS (see page 39) • Enable daylight savings time •... -
Page 35: Using The Clock
Using the Text Viewer Access the Text Viewer by touching Menu System Menu Additional Text Viewer. Make sure the USB flash drive containing your files is plugged into the iFly 700 (see pagepage 30). Touch the “Search for text” button. A file window appears. Choose a .TXT file from the file window and touch “OK. ”... -
Page 36: Using The Memo Screen
Extra Features Using the Memo Screen Access the Memo Screen by touching Menu System Menu Additional Memo. Use your finger or a stylus to write on the screen. Open a Save the currently Delete the currently new memo opened memo opened memo Previous Number of Next memo stored memos... -
Page 37: Playing The Card Game
Using an External Audio/Video (AV) Device Connect an AV cable between your AV device and AV-In jack on the side of the iFly 700. Note: Make sure your AV cable jack matches the configuration shown below (except video portion not required if only playing audio). -
Page 38: Using An External Camera
Extra Features Using an External Camera Connect your external camera to the R-CAM jack on the side of the iFly 700. Note: Make sure the camera cable jack matches the configuration shown below. Video Ground Camera sensor Access the external camera by touching Menu System Menu Additional R-CAM. -
Page 39: Additional Information
Why does it look like my plane is flying on the legend area of a sectional? When you approach the edge of a sectional, the iFly 700 will attempt to automatically switch to the appropriate map. If this does not happen correctly, touch the “Switch Maps” button to change to a more appropriate map. -
Page 40: Specifications
Connect the equipment into an outlet on a circuit different from that to which the receiver is connected. Consult the dealer or an experienced radio/TV technician for help. Changes or modifications not expressly approved by Adventure Pilot, LLC may cause interference and void the user’s authority to operate the equipment. -
Page 41: Limited Warranty
It is likely that such data, software, or other materials will be lost or reformatted during service and Adventure Pilot, LLC will not be responsible for any such damage or loss.
Need help?
Do you have a question about the iFly 700 and is the answer not in the manual?
Questions and answers