Table of Contents
Advertisement
Quick Links
Advertisement
Table of Contents

Related Manuals for Digifly AIR Pro BT


Summary of Contents for Digifly AIR Pro BT
- Page 1 AIR Pro Firmware 142 IT Rev. 53 a UK...
- Page 2 - Damage is caused by accidents including but not limited to lightning, water or fire, misuse or neglect, or every malfunction not related to manufacturing defects of your instruments. If your Digifly product is not working correctly or is defective, please contact your Digifly dealer. In order to avoid unnecessary inconvenience.
-
Page 3: Table Of Contents
INDEX INDEX .................................. 3 GETTING STARTED ............................6 CONNECTIONS ................................... 6 BATTERY ..................................... 6 2.2.1 BATTERY RECHARGE ............................... 6 2.2.2 EXTERNAL POWER SUPPLY ............................ 6 KEYBOARD - NORMAL OR LONG KEY PRESS ....................... 6 TURNING ON & OFF ................................7 DISPLAY CONTRAST ADJUSTMENT .......................... - Page 4 AIR EFFICIENCY (GLIDE RATIO) ............................ 18 TRACKING & BEARING ..............................18 BAROMETER ................................... 18 5.10 TIME/CHRONOGRAPH SETUP ............................. 18 5.11 PILOT’S NAME & GLIDER’S DATA ..........................19 ADVANCED FUNCTIONS ..........................19 TOTAL ENERGY COMPENSATION ..........................19 POLAR (WITH OPTIONAL PITOT TUBE) ......................... 19 SPEED TO FLY (WITH OPTIONAL PITOT TUBE) ......................
- Page 5 15.6.1 TELEMETRY DATA SELECTION ........................... 40 15.7 LK8000 .................................... 42 15.8 XCSOAR ................................... 42 APPENDIX ................................ 43 16.1 DIGIFLY AIR STANDARD ACCESSORIES ........................43 16.2 OPTIONAL ACCESSORIES ............................. 43 16.3 TECHNICAL FEATURES ..............................43 16.3.1 STANDARD FUNCTIONS ............................43 16.3.2 ADVANCED FUNCTIONS ............................
-
Page 6: Getting Started
There are no problem if you leave the vario charging for more than 8 hours, as the vario automatically switches to a “maintain mode” to prevent the battery’s overcharge. The Digifly AIR’s lithium battery has no “memory effect”, so it can be also partially charged. ... -
Page 7: Turning On & Off
4 seconds. After switching off your Digifly instrument, you must wait at least 5 seconds before to be able to turn it on again. This prevents unwanted operation e.g. during the transit in your glider bag. -
Page 8: Alphanumerical Fields Editing
IMPORTANT: after every firmware update, it is necessary to update also the help file containing the messages. The help file update can be done from your PC using the Digifly AirTools, function: “upload HELP”. 2.8 RESTORE FACTORY SETTINGS To restore the factory settings (default values for all parameters), turn on the instrument pressing at the same ... -
Page 9: Quick Reference Guide
QUICK REFERENCE GUIDE 3.1 SYMBOLS MENU Battery level Bluetooth activated GPS connected Flight recorder on Volume level Direction toward the center of the current Waypoint Direction toward the current WP accordingly to the optimized route Direction to the current WP for optimized route, HIS representation Closest START line direction Last thermal direction Wind direction... -
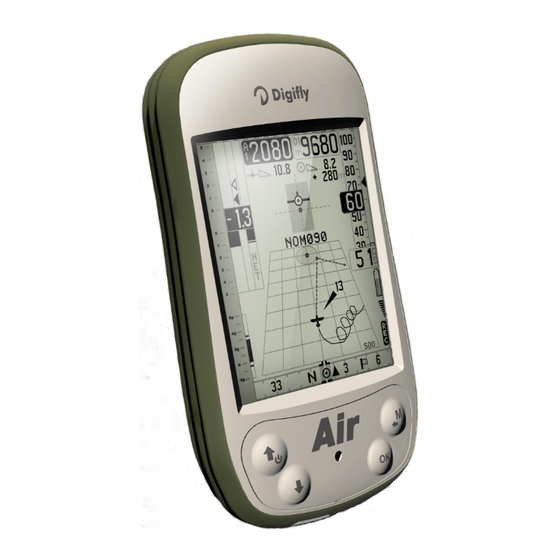
Page 10: Plotter Screen
3.2 PLOTTER SCREEN Distance to WP Altimeter A1 Required glide ratio to the Current glide ratio next WP Analogical Analogical vario scale Anemometer Optimal spd to fly STF McCready equivalent Digital anemometer McCready Height to WP Analogical vario Ground speed GPS Digital vario Optimized route to WP Analogical avg. -
Page 11: Compass Screen
3.3 COMPASS SCREEN Clock Analogical altimeter A1 digital altimeter Time to START Analogical vario scale Current glide ratio McCready Analogical Anemometer McCready equivalent Optimal spd to fly STF Analogical Vario Digital anemometer Digital Vario START line distance Analogical avg. vario START direction Compass main points GPS ground speed... -
Page 12: Display
DISPLAY 4.1 MAIN SCREENS The Digifly Air features a lot of different main screens (page), to manually change the pages press the key. PLOTTER PAGE COMPASS PAGE INFO GPS PAGE LatLon ddmmss.ss 05 43’46.5N 005 43’46.5E Tracking Ground Speed... -
Page 13: Plotter And Compass Screens – Instruments Fields
4.2 PLOTTER AND COMPASS SCREENS – INSTRUMENTS FIELDS 4.2.1 VARIOMETER In the variometer’s informations area can be seen: o Digital variometer; o Average vario / Netto vario; o Mc Ready value; o Mc Ready equivalent value 4.2.2 ANEMOMETER In the shown anemometer’s informations area can be seen: o Analogical gauge - roll type- of Indicated Air Speed (IAS);... -
Page 14: Navigation Plotter Screen
4.2.6 NAVIGATION PLOTTER SCREEN In the PLOTTER page the navigation is based on a graphic perspective plotter that features: o Graphic representation of the flight track toward the current WP; o Graphic representation of the current WP cylinder; o Optimized course line to the current WP cylinder; o Optimized course line to the next WP;... -
Page 15: Basic Functions
All the vario data are subject to this filter. The Digifly AIR utilizes an extremely sensible pressure sensor and an excellent data acquisition sys providing a very quick and extremely precise vario (updated 24 times each second). -
Page 16: Vario Reactivity
from 48 to 96, reducing this value makes the vario very sensible to variations. Filter 3, adjustable in the menu (VARIOMETER SETUP \ n. 12 FLT3), default value 0%, suggested use range from 0% to 10%, reducing this value makes the vario very sensible to variations. 5.2.3 VARIO REACTIVITY ... -
Page 17: Acoustic Vario Pre-Thermal Advidse
Pitot tube should have done at the sea level in standard atmosphere conditions. 5.5 TIME & CHRONOGRAPH The Digifly AIR can visualize the expected hour and time referred to a route’s waypoint, or a goal arrival. Relative time (hour/min or min/sec with blinking points) ero: relative time –... -
Page 18: Distances
Absolute time (hour/min) ts: absolute time to start pylon gate t1: Expected absolute time to the current Waypoint. tA: Expected absolute time to goal. rt: Absolute time UTC (hours/min). 5.6 DISTANCES It is possible to set the distance’s unit of measure using the parameter (MAIN SETUP \ n. 16 U-SP) the same ... -
Page 19: Advanced Functions
The vario time and date are automatically synchronized with the GPS data at the instrument’s power on. To set the time zone for your country go to (MAIN SETUP \ n. 7 UTCO). To manually adjust the time and date, go to (MAIN SETUP \ n. 8 HOUR), (MAIN SETUP \ n. 9 MIN), (MAIN SETUP \ n. -
Page 20: Speed To Fly (With Optional Pitot Tube)
VB and the glide ratio is VB/SinkB. On your Digifly AIR you can insert three different polars using the function (ADVANCED SETUP \ n. 10 - 18 Px- A/B/C). To choose which polar to use, go to (ADVANCED SETUP \ n. 9 POLA). -
Page 21: M C Cready (With Optional Pitot Tube)
McCREADY (WITH OPTIONAL PITOT TUBE) Equivalent If this parameter (ADVANCED SETUP \ n. 9 POLA) is set to “OFF”, all McCready information related to McCready, McCready Equivalent, and Netto Vario are not displayed on the instrument. The McCready value is the average lift value of the last “nn” minutes ... -
Page 22: Gps Functions
GPS FUNCTIONS 7.1 INTEGRATED 99 CHANNELS GPS RECEIVER Digifly AIR features an extremely sensible, and state-of-the-art, 99 channels integrated GPS receiver. 7.2 GPS STATUS INFORMATION The GPS status icon is located in the status bar, on the right lower part of the display (plotter screen) or on the... -
Page 23: Gps Direction (Trk)
7.7 GPS DIRECTION (TRK) The GPS direction (“TRK”) is the glider’s direction related to the ground. 7.8 GROUND EFFICIENCY (GLIDE RATIO) It shows the efficiency (glide ratio) related to the ground. To set the time over which the average efficiency (glide ratio) is calculated, go to (ADVANCED SETUP \ n. 7 EFF). -
Page 24: Creating A New Waypoint Manually
The Waypoints can be manually created or can be downloaded from PC using the AirTools or GpsDump software or also from MAC using GpsDump ‘MAC’ version . It is also possible to transfer the Waypoints from one instrument to the other via BT. 8.1.1 CREATING A NEW WAYPOINT MANUALLY To create a new Waypoint, in the menu, put the cursor on the first database’s dotted line, and then press the ... -
Page 25: Navigate To A Waypoint (Goto)
the delete request of ALL THE WP with the key , or cancel the procedure using the key NAVIGATE TO A WAYPOINT (GOTO) 9.1 ACTIVATING NAVIGATION TO A WAYPOINT (GOTO) 9.1.1 NAVIGATION TO WAYPOINT HOME (GOTO HOME) This function allows to create a waypoint having position “HOMxxx” (xxx = altitude in tens of meters) and at the ... -
Page 26: Route Management
or cancel the procedure using the key 9.1.5 DEACTIVATING NAVIGATION TO A WAYPOINT (GOTO) To deactivate the current navigation, from the page GPS INFO, press the key (long press) then confirm the choice to deactivate the navigation pressing again the key , or cancel the procedure using the key 9.2 NAVIGATION’S FUNCTIONS TO A WAYPOINT (GOTO) The following navigation’s functions are available only if a navigation toward a single waypoiny (GOTO) is active:... -
Page 27: Visualizing Waypont Data Of A Route
For every route it is possible to insert both Waypoint Competition and Waypoint User in any combination. The routes can be created manually or can be downloaded from PC using the software Digifly AirTools. It is possible also to transfer the routes from one instrument to another. - Page 28 confirm with the key It appears a page with all the Waypoint data, use the arrow keys to navigate the field you want to modify and confirm with the key The function “EDIT” is described in the chapters 2.6.1 and 2.6.2. ...
-
Page 29: Delete A Waypoint In A Route
LEAVING START PYLON (OUT) Start radius WP start Waiting side Start OK 10.1.5 DELETE A WAYPOINT IN A ROUTE Using the arrows keys set the cursor on the waypoint to be deleted. Press the key to open the drop down menu containing the possible action, then select “DELETE”, confirm with the key , or cancel the procedure using the key Confirm to accept the cancellation of the WP pressing the key... -
Page 30: Operation Checklist Before A Task
Download the waypoints from the competition organization web site Upload them on the Digifly Air with the software AirTools (PC) or GpsDump (PC e MAC), or copy them transferring the file from one instrument to the other using the direct connection cable. ... -
Page 31: Optimized Navigation
12.3 OPTIMIZED NAVIGATION The optimized navigation shows to the pilot the shortest way of the task’s route: 12.4 NAVIGATION TO START PYLON WAYPOINT If the current waypoint is a Start Pylon, on the info bar appears the message “START PILON” and 3 minutes before the start time it appears the message "... - Page 32 ___________________________________________________________________ ENTERING START PYLON ( IN ) Start OK Start Waiting radius side WP start ___________________________________________________________________ LEAVING START PYLON ( OUT ) Start radius WP start Waiting side Start OK The start-pylon function (with countdown) is activated only if it is set one of the two parameters: IN or OUT. Page 32...
-
Page 33: Navigation To Standard Waypoint
Cylinder validation: entering in a cylinder the Digifly air will alert you with a sound and will appear the messageo “WPOK”, then flight recorder rate returns to the setup value (MAIN SETUP \ n. 5 RECR). . 12.6 NAVIGATION TO CONCENTRIC WAYPOINT To properly manage a task’s route with concentric waypoints it is necessary to insert in the desired route the... -
Page 34: Flight Recorder
13 FLIGHT RECORDER When the Digifly Air starts the flight recorder, it compares the message “REC ON” and the icon “rec” on the bottom of the display starts blinking. The following parameters are continuously recorded: Date and time, Latitude, longitude, number of satellite, tracking GPS, ground speed GPS, altimeter GPS, barometric altimeter A1, variometer and anemometer. -
Page 35: Log Book Management (Log Book )
It is not possible to delete a single flight. 14 CONNECTIONS, INTERFACES & MEMORY CARD It is possible to connect your Digifly Air to a PC, MAC, Smartphone, Tablet , PDA, via Bluetooth or using the provided USB cable. -
Page 36: Bluetooth Connection
For the AIR Pro BT, enter in the menu “Bluetooth Pairing” and wait. In your device, (PC, MAC etc…) start a research for new Bluetooth devices, the AIR Pro Bt will be recognized as "Digifly AIR BT" . In your device, when requested, enter the code for the pairing of the AIR Pro BT, it is “0000”. -
Page 37: Bluetooth Data Transfer Activation
14.2.2 BLUETOOTH DATA TRANSFER ACTIVATION Set on AIR Pro Bt the parameter (ADVANCED SETUP \ n. 24 TELE) to choose the desired telemetry, see paragraph 15.6.1. To be able to exchange data with the software installed on your device (PC , MAC , SmartPhone , Tablet , or ... -
Page 38: Software
It is an official Digifly software, it integrates the protocol Digifly v66 The Digifly “AirTools” is an application available for free, to be used on PC Windows; it allows the full management of: flights, routes, waypoint, the help language of the “SETUP parameters” and the complete personalization of the vario’s acoustic profile... -
Page 39: Firmware Updating Procedure
To restore the normal functions it is enough to do the update once again (in a case, try to do it from a different PC). Using the Digifly AitTools software it is also possible to upload the help info. This is suggested if the new ... -
Page 40: Telemetry Data Output
The models AIR Plus, AIR Pro and AIR Pro BT have the possibility to send data at high speed rate to external devices (up to 8 updates per second). This function is very important, as the instrument can send in “real time”... - Page 41 Age of Diff. Corr. second Null fields when DGPS is not used Diff. Ref. Station ID 0000 Checksum Nmea checksum <CR><LF> End of message termination Note 3 : 0 Fix not available or invalid 1 GPS SPS Mode, fix valid 2 Differential GPS, SPS Mode, fix valid 3-5 Not Supported GPS PPS Mode, fix valid 6 Dead Reckoning Mode, fix valid...
-
Page 42: Lk8000
Wind Speed km/h 28 km/h Wind Direction degree 65 degree Main Lithium Battery Voltage 0.01 volts 3,82 volts Backup AA Battery Voltage 0.01 volts 1,53 volts Checksum Nmea checksum <CR><LF> End of message termination 15.7 LK8000 The AIR models can interface directly the free software LK8000 For every info visit: www.lk8000.it 15.8 XCSOAR The AIR models can interface directly the free software... -
Page 43: Appendix
16 APPENDIX 16.1 DIGIFLY AIR STANDARD ACCESSORIES The model Digifly Air is shipped with the following standard accessories: Protective case. Internal rechargeable lithium battery. Battery charger (110-220Vca 50-60Hz). USB PC cable to download flights, manage other functions and update the firmware directly from Internet ... -
Page 44: General Specifications
Dimensions (H x L x D) 156mm x 93mm x 19mm Weight (with battery) 180g The Digifly instruments are supplied with protective case, rechargeable internal lithium battery, wall adapter charger (110-220V ca 50-60Hz) and USB cable ... -
Page 45: Main Set Up Menu Parameters
16.4 MAIN SET UP MENU PARAMETERS Name Description Range Default Units CTRS display contrast 1 - 99 LANG language selection USR/UK/ITA/ESP/DEU/FRA/CZE/HUN/PLN/GRK/TRK RECM recorder mode selection OFF/ALW/AUT ---- R.DS meters variation start autorecorder 0.1 – 5 R.TI seconds variation start autorecorder 1 - 30 RECR recorder rate... -
Page 46: Adv-Setup Parameters Menu (Advanced Setup)
16.6 ADV-SETUP PARAMETERS MENU (ADVANCED SETUP) The following is a list of parameters that can be adjusted. For each parameter you can see the range of values, the factory setting (default) and the unit of measure. Name Description Range Default Unit PITO pitot tube habilitation...
Need help?
Do you have a question about the AIR Pro BT and is the answer not in the manual?
Questions and answers