
Related Manuals for Restmoment RX-3500 SERIES

Summary of Contents for Restmoment RX-3500 SERIES
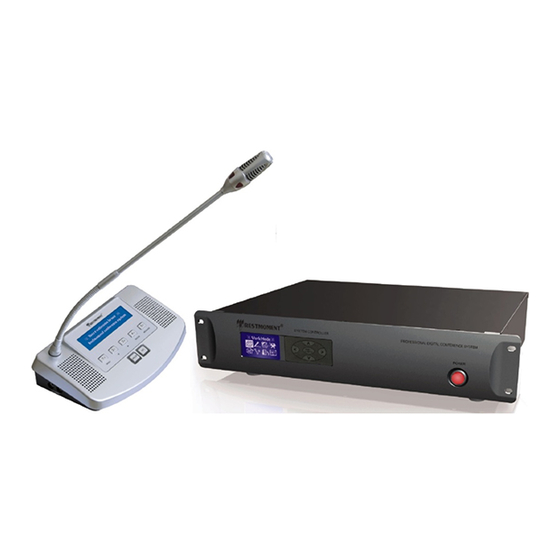
- Page 1 —— —— Restmoment digital conference system RX-3500 SERIES Installation operation RESTMOMENT ELECTRONIC CO.,LTD...
-
Page 2: Table Of Contents
CONTENTS RESTMOMENT DIGITAL CONFERENCE SYSTEM ....................0 RX-3500 SERIES ................................0 ........................2 PART 1 SAFETY OPERATION 1.1 SAFETY OPERATION ............................. 2 PART 2 SYSTEM CONNECTIO2.1 ..........................3 SYSTEM CONNECTION DIAGRAM........................... 3 PART 3 SYSTEM PORTS AND KEYS .......................... 4 ... -
Page 3: Part 1 Safety Operation
PART 5 FAQ..................................27 Part 1 SAFETY OPERATION 1.1 SAFETY OPERATION RESTMOMENT Thanks to the use of conference system. Please read this operation carefully before you use the equipment, and operate it as request. 1、 Please confirm the power supply system is under the requirement of the equipment normal level. -
Page 4: Part 2 System Connectio2.1
PART 2 SYSTEM CONNECTIO system connection diagram... -
Page 5: Part 3 System Ports And Keys
PART 3 system ports and keys 3.1 ports and keys 3.1.1 RX-3500 series controller 3.1.1.1 RX-3500 front panel ports 1、Mounting hole for 19 inch stand 2、Front panel 3、LCD screen, adjust brightness and contrast. 4、5-dimensional direction operate、control key 5、Switch, with electrifying indicator 6、Mounting hole for 19 inch stand... -
Page 6: Rx-3500 Serial Unit
3、RS232 interface(CCU): Central control system interface. 4、USB interface ( CONTRUL IN): Function extension interface. Reserve for function extension 5~8、4 PCS 6P DIN digital interfaces ( DRAGOMAN ): 4 channels conference unit output. Can connect all digital all conference unit equipment in same series, and single function equipment. - Page 7 * Left key. Select function menu of the unit. Cursor move key *Used as digital key 2/7 when input unit location Utilizada para decrementar volumen. 4.PRIOR Chairman function control key, essage rapid key * Conference Chairman operate chairman ontrol right *Set MIC management mode.
-
Page 8: Rx-3500
4.Wire chase 5.OUT 6 pin socket setup and function RX-MBVS RX-MBVS is RESTMOMENT digital conference system RX-3500 serial software. When it work with conference system, could manage MIC, and have sign-in、vote、 video function. It can’t work without hardwork. 4.1 RX-3500 hardware connection 4.1.1 system controller and unit connection. -
Page 9: Unit And Unit Connection
Please don’t change the connection between unit and system controller. It could lead Anomalies. 4.1.2 unit and unit connection. Hand-in-Hand connection. Unit with 6P-2M cable. The first unit Out port to the second unit In port. The second unit Out port to the third unit In port. Followed by analogy. -
Page 10: System Controller Adjustment
4.2 system controller adjustment Insure system controller and unit connection, then turn on system controller power, it will check automatically. 4.2.1 System controller interface and key: ADCS System controller interface ADCS System controller display interface ADCS System controller operate interface Four-dimensional key“up”... -
Page 11: Main Menu Instruction
Press MENU/CONFIRM, enter system main menu. See photo 4.2.2 main menu instruction: Conference event: edit conference event and check agenda result. Work mode: setup unit work mode. Speaker set: setup output and input volume. Video-tracing: setup panorama/unit video tracing. - Page 12 Notice: in this list, the chairman unit is executive chairman. 2) setup unit quantity and ID No. Press , enter system main unit, select system setup, then select to edit ID No, press again. Move cursor to “start” key, press at previous.
- Page 13 At this moment, we could edit ID No for this unit. Enter “Edit ID No” , select right key, edit one ID No, as below photo: Setup ID No, move cursor to “start”, press . At previous, press unit’s “MIC” key.
- Page 14 New vote: setup vote conference event, enter vote interface, press “start”. More than 10 vote modes could be selected. see below photo. Al pulsar start se activará una cuenta atrás de 30s para que todas las unidades puedan votar. Para finalizar el proceso sin acabar la cuenta atrás debe pulsarse la tecla menú, que la dejará...
-
Page 15: Setup Work Mode In Controller
Meeting Setting: setup count-down time and count rule, see below photo Pre-> Si, Agt->-No, Abs-> Abstensión Back: back to previous menu 4.2.3.3 setup work mode in controller Press enter system main menu and Mode setting interface, see below photo: this menu include: Limit mote: set the number of delegates permitted to speak at the same time. -
Page 16: Setup Video Trace In Controller
Apply mode: microphone key with request –to-speak registration (AUTO). see below photo Voice mode: voice-activated microphones with selectable threshold. see below photo 4.2.3.4 setup volume in controller Press enter system main menu and volume setup interface, see below photo: This menu include Input volume: could adjust volume as meeting room request. - Page 17 Press enter system main menu and volume setup interface, see below photo: This menu include: Camera parameter: setup baud rate、protocol、save No. See below photo Could setup 8 cameras with difference protocol and baud rate. Operation option: setup scene、save No. See below photo Setup scene 1.Unit:001 option, select scene 0001, press...
- Page 18 Notice: Camera address No will change automatically when adjust panorama position. 5.Move cursor to save NO:001, select one to save camera position. 6.Move cursor to save “ panorama 001” as preset point Notice: Save No can’t repeat. back to previous menu, RST meat clear all save No.
-
Page 19: Setup System Function In Controller
As above photo: preset camera 1 to trace unit No1-5, setup 4 panorama. “camera 1 corresponding MIC” setup unit 1-5. 3 options “previous unit” “ No action” “ID 0001” “ turn off all to panorama” camera switch to panorama when all units are off. -
Page 20: Rx-Mbvs Software Setup And Adjustment
This menu include: Edit No: setup total human quantity and unit No. Status setup: setup executive chairman unit. One system only have one executive chairman unit. ID item display all common chairman unit. Screen setup: setup LED brightness and contrast. See below photo: Menu language setup: setup controller language. - Page 21 1、About RX-MBVS RX-MBVS is RESTMOMENT digital conference system RX-3500 increment software. Work with conference system, have microphone manage、sign-in、vote、video tracing function. It can’t work without hardware 1) 、System need hardware and software circumstance. ☆ Hardware circumstance. RX-MBVS need hardware equipment as below: (1)Pentium III 800 MHz CPU or above, 128M EMS memory or above.
-
Page 22: Rx-Mbvs Rx-Mbvs Function
4.3.1 RX-MBVS RX-MBVS function 、 User confirm. Start main procedure, enter software language、communication protocol、ID validate interface. As below photo. Please ask Restmoment distributor for password. Password: restmoment Select PC serial port. See below photo -21-... - Page 23 Setup new event, this system could have many conference events. See below photo: Total of units-> Numero de unidades instaladas, Attendance-> numero de unidades participantes en la conferencia (menor o igual a les unidades instaladas. Toastmaster-> Es el nombre del director (un nombre cualquiera) Una vez configurada la conferencia pulsar Save.
-
Page 24: System Setting
This software main menu include: 1. System setup 2. Attendance file 3. Agenda management 4. Video tracing 5. Screen info 6. Conference abstract 7. Conference design-> Para definer tipo de unidades y ubicación en la sala 8. Seat manage -> Para asignar las id a las unidades. -
Page 25: Attendance File
4.3.1.2 Attendance file 4.3.1.3 Agenda Management En este menú se configuran las votaciones y las funciones Sign. Debe realizarse una programación Sign que se deberá ejecutar antes de las votaciones para identificar las unidades que participaran en ellas. Siempre que se haga una modificación en algún parámetro de las unidades del software deberá ejecutarse la función Sign de nuevo. -
Page 26: Screen Info
4.3.1.4 s creen info 4.3.1.5 Video tracing -25-... -
Page 27: Onference Video
4.3.1.6 Conference video 4.3.1.7 Help 4.3.1.8 Back -26-... - Page 28 5 FAQ failure Reason Solution No respond when turn on system Power upply clear controller( Power light is trouble dark) plug clear stable fuse replacing broken (F3A250V) System controller is light, DC24V fuse is replacing but units are no response broken system controller can’t edit...
- Page 29 Above info only for reference. If have other problem, please contact distributor, request technique support. -28-...
Need help?
Do you have a question about the RX-3500 SERIES and is the answer not in the manual?
Questions and answers