Table of Contents
Advertisement
Quick Links
Advertisement
Table of Contents

Subscribe to Our Youtube Channel
Related Manuals for Geemarc PHOTOPHONE 155


Summary of Contents for Geemarc PHOTOPHONE 155
- Page 1 PHOTOPHONE 155 Amplified Big Button Telephone And Answering Machine...
-
Page 3: Table Of Contents
CONTENTS CONTENTS INTRODUCTION Unpacking the Telephone DESCRIPTION General Description Key Description LCD Description Menu Navigation INSTALLATION Setting Up Wall Mounting SETTINGS Set Language Set Contrast Set Font Size Hour Format Setting Date Format Setting Ringer Setting Incoming Call Notification Setting VIP Ringer Setting Keypad Tones Setting Call Waiting... - Page 4 CONTENTS Voice Prompt Receiving Volume and Tone Settings USING THE TELEPHONE Making a Call Last Number Redial Dialling a Number from the Redial List Clear the Redial List Mute Function Hold Function Receiving a Call Hearing Aid Use Flash Signal OPTIONAL ACCESSORIES Shaker Headset and Audio Neck Loop Use...
- Page 5 CONTENTS Modify a Phone Book Entry Delete a Phone Book Entry Voice Announce a Phonebook Entry Record Voice Announce for a Phonebook Entry Delete Voice Announce for a Phonebook Entry QUICK DIAL Create a Quick Dial Number View/Dial a Quick Dial Number Clear a Quick Dial Number ANSWERING MACHINE Switching the Answering Machine On/Off...
-
Page 6: Introduction
It is important that you read the instructions below in order to use your Geemarc telephone to its full potential. Keep this user guide in a safe place for future reference. This guide explains how to use the following telephone: PHOTOPHONE 155 *To use the caller display facility, you must subscribe to your network provider’s caller display... -
Page 7: Unpacking The Telephone
Unpacking the Telephone When unpacking the telephone, you should find the following in the box: • 1 PHOTOPHONE 155 unit • 1 PHOTOPHONE 155 handset with curly cord • 1 Telephone line cord • 1 Mains power adaptor • 1 User Guide For product support and help visit our website at www.geemarc.com... -
Page 8: Description
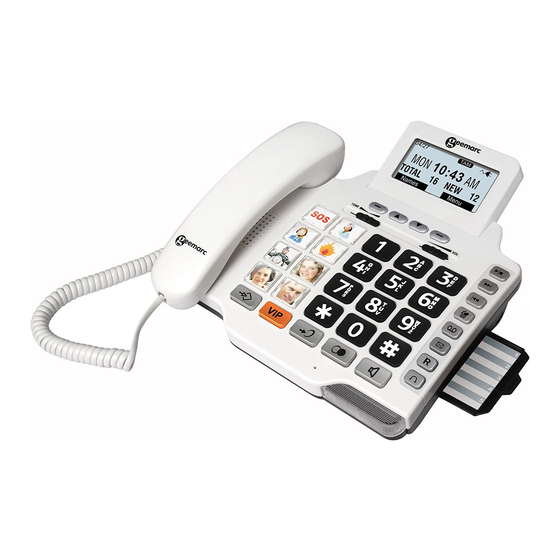
DESCRIPTION General Description 1. Hook Switch 13. MEMO 2. Handset Knob 14. Message Waiting Speed Dial Key 3. Large LCD Screen 15. Call Waiting 4. Left Soft Key 16. Headset Key 5. Right Soft Key 17. Message waiting/new call 6. Up/Down Scroll 18. - Page 9 DESCRIPTION 1. Optional Bed Shaker jack 2.Shaker/Strobe/Shaker and Strobe select mode 3. Volume reset override switch (ON/OFF) 4. Power jack 5. Phone line cord jack 6. Audio neckloop jack 7. Headset jack 8. Handset cord jack 9. New call indicator switch 10.
-
Page 10: Key Description
DESCRIPTION Key Description Make/Answer/End a call. Activates the speakerphone if pressed during a call Last number redial Insert a pause when pre-dialing a number Scroll through the menu options. Enter the Caller ID list Soft keys. They perform the functions indicated by the text immediately over it (on the bottom line of the display) which changes depending on context... - Page 11 DESCRIPTION Press and hold this key to record a memo Use them to adjust the volume of ringer, dialing talking and Caller ID announcing and speakerphone...
-
Page 12: Lcd Description
DESCRIPTION LCD Description In standby mode, the large LCD display will show as below If you forget to connect the phone line cord, No line will show on the screen Menu When you press the soft key, the main menu will be displayed. - Page 13 DESCRIPTION On receiving an incoming call, the caller’s phone number and/or name will be displayed (providing you have subscribed to the Caller ID service with your network provider). The screen below shows the total calls and new calls needing reviewing. In this example you have 16 calls in total, which includes 12 new calls.
-
Page 14: Menu Navigation
DESCRIPTION Menu Navigation To access any menu function you must take the following steps: 1) Press the Menu soft key, the main menu will be displayed. 2) Use ▲ or ▼ to scroll through the menu until you find the desired option. -
Page 15: Installation
Connect one end of the curly cord to the handset. The other end of the curly cord plugs into the jack on the left hand side of the PHOTOPHONE 155 unit. Place the handset on the cradle. Connect the line cord to the socket located at rear of telephone then connect the plug into the wall socket **. -
Page 16: Wall Mounting
INSTALLATION Wall Mounting Slide the handset hanger tab out and reverse its position (rotate it 180 degrees). Slide it back into place so that the hook points up (see diagram 1). This will keep the handset from falling out of the cradle when it is mounted on the wall. -
Page 17: Settings
SETTINGS Set Language ‘MENU’ Press soft key Press ‘SELECT’ soft key to access ‘SET DISPLAY’ Press ‘SELECT’ soft key to access ‘LANGUAGE’ to select one of the 4 languages available (English, Francais, Espanol, Deutsch) Press ‘SELECT’ soft key to confirm Set Contrast Your screen has a backlight which automatically switches off after 15 seconds of inactivity. -
Page 18: Set Font Size
SETTINGS Set Font size The text can be displayed on the LCD screen in either a large font or a small font. ‘MENU’ Press soft key ‘SELECT’ ‘SET Press soft key to access DISPLAY’ to select ‘DIM:X- x’ Press ‘SELECT’ soft key to select either ‘ON’... -
Page 19: Hour Format Setting
SETTINGS Hour Format Setting ‘MENU’ Press soft key Press ‘SELECT’ soft key to access ‘SET DISPLAY’ ‘HOUR FORMAT’ to select Press ‘SELECT’ soft key to select either ‘12 HOUR CLOCK’ ‘24 HOUR CLOCK’ Press ‘SELECT’ soft key to confirm Note: If 12 hour clock is selected, AM or PM will be displayed on the right hand side of the time in standby mode. -
Page 20: Ringer Setting
SETTINGS Ringer Setting You can select your own ring tone and adjust both the day volume and night volume. You can also adjust the volume to off in order to turn the ringer off. ‘MENU’ Press soft key to select ‘SET PHONE’... -
Page 21: Incoming Call Notification Setting
SETTINGS You can also adjust the ringer volume whilst in standby. Simply use the volume controls V+ and V- found on the right hand side of the telephone. The display will show the current level. For example: ‘RINGER LOW’ Incoming Call Notification Setting There is a Shaker/Strobe/Shaker and Strobe select switch at the rear of the telephone. -
Page 22: Keypad Tones Setting
SETTINGS Keypad Tones Setting ‘MENU’ Press soft key to select ‘SET PHONE’ Press ‘SELECT’ soft key ‘SELECT’ ‘SET RING’ Press soft key to access ’KEYPAD TONES’ to select Press ‘CHANGE’ soft key to set the keypad tones. You can choose either ‘ON’... -
Page 23: Call Waiting
SETTINGS Call Waiting If you subscribe to Call Waiting service from your service provider, you should activate the Call Waiting function on the telephone. The telephone will display the name (provided the name and number are stored in the phonebook) and number of a second caller while you are having a conversation. -
Page 24: Flash Time Setting
SETTINGS Flash Time Setting You can adjust the flash time setting. There are four options available. Your telephone works with a flash time for United Kingdom (R=100ms). ‘MENU’ Press soft key to select ‘SET PHONE’ ‘SELECT’ Press soft key to select ‘SET FLASH’... -
Page 25: Dialling Mode Setting
SETTINGS Dialling Mode Setting In the UK, all telephone exchanges now use Tone dialing. If your telephone does not dial out, it is probably being used from an older private switch- board (PBX). In this case, the Tone/Pulse setting must be changed to Pulse. ‘MENU’... -
Page 26: Setting Date And Time
SETTINGS Setting Date and Time In standby mode, the telephone displays the current date and time. You need to set the date and time so that when you receive calls they will appear in the call list with the correct date and time. If you subscribe to a Caller ID service, the time and date will be set automatically when you receive your first call. -
Page 27: Dialling Talking Setting
SETTINGS Dialling Talking Setting This feature allows you to check the number you have entered in standby mode without looking at the display i.e. the number is announced when pressed. Press ‘MENU’ soft key to select ‘SET TALK’ Press ‘SELECT’ soft key Press ‘SELECT’... -
Page 28: Caller Id Talking Setting
SETTINGS Caller ID Talking Setting This feature allows you to check the Caller ID number on receiving a new call without looking at the display i.e. the telephone number is announced (provided the number has not been blocked by the caller). If you have stored the incoming telephone number in the phone book and recorded the corresponding name, the name will be announced. -
Page 29: Review The Phonebook And Caller Id List
SETTINGS Review the Phonebook and Caller ID List The telephone can announce numbers stored in the phonebook and the Caller ID list (except Private and Out of Area calls). If a name is stored with a telephone number, the name will be announced. -
Page 30: Voice Prompt
SETTINGS Voice Prompt You can select the language in which to play the voice prompt. ‘MENU’ Press soft key ‘SET TALK’ to select Press ‘SELECT’ soft key ‘VOICE PROMPT’ to select to select the required language (English, Deutsch or Francais) Press ‘SELECT’... -
Page 31: Receiving Volume And Tone Settings
SETTINGS Receiving Volume and Tone Settings You can alter the receiving volume and tone during a conversation according to your hearing requirements. Use the Volume slide control found at the top of the telephone base to adjust the level. The volume adjustment available is 0- 15dB. - Page 32 SETTINGS AMPLIFY ON/OFF Switch at OFF Position The additional amplification and tone controls are turned off each time you use the telephone. The Amplify LED will be off whenever you use the telephone. Pressing the Amplify button once during a call will enable tone control and additional amplification.
-
Page 33: Using The Telephone
USING THE TELEPHONE Making a Call Pick up the handset. When you hear the dialling tone, dial the number on the keypad. To end the call simply replace the handset in the cradle Making a Call – Hands Free Press the SPEAKER button to get a dialling tone then dial the telephone number on the keypad. -
Page 34: Last Number Redial
USING THE TELEPHONE Pre-Dialling a Telephone Number You can enter the desired phone number in standby mode, which allows you to make corrections before dialling. Follow these steps: Enter a telephone number (up to 32 digits). Check it. If you make a mistake while entering a number, press the ‘CLEAR’... -
Page 35: Mute Function
USING THE TELEPHONE Mute Function If you wish, you can speak privately to someone else in the room without your caller overhearing. You will still be able to hear the caller but they cannot hear you during the mute operation. ‘MUTE’... -
Page 36: Receiving A Call
USING THE TELEPHONE Receiving a Call When an incoming call is received, the telephone rings and the incoming call LED lights up. If you have a voice message, NEW VOICE MAIL will be shown on the LCD. To delete the voice message, press in standby then press and hold Lift the handset and speak... -
Page 37: Optional Accessories
OPTIONAL ACCESSORIES Shaker At the back of the phone, there is a 3.5mm shaker jack You can connect an optional shaker device. When you are receiving an incoming call, the shaker will vibrate. (See Incoming Call Notification Settings) Headset and Audio Neck Loop Use Your phone is equipped with both an Audio and Headset jack. -
Page 38: Caller Id
CALLER ID The features described in this section are only available if you subscribe to a Caller ID service from your network provider. Caller ID means you can see who is calling on your handset display (provided the number is not withheld, unavailable or is an international call). -
Page 39: Dial A Number From The Caller Id List
CALLER ID Dial a Number from the Caller ID List to scroll through the Caller ID list until you find the desired number Pick up the handset or press the SPEAKER key, the number is automatically dialled Add a Number from the Caller ID List to the Phone Book to scroll through the Caller ID list until you find the number you wish to add to the phone book... -
Page 40: Delete A Number From The Caller Id List
CALLER ID confirm, you can record the name of the phonebook entry ‘End’ (up to 6 seconds). You can also press to confirm and end the recording. Your recording will play back for you immediately Delete a Number from the Caller ID List to scroll through the Caller ID list until you find the number you wish to delete from the Caller ID list Press... -
Page 41: Caller Id On Call Waiting
CALLER ID Caller ID on Call Waiting When you are using the telephone, if you have subscribed to Call Waiting with your service provider, the name and number of a second caller will be displayed. Press the CALL WAITING key and ‘2’ to answer the second caller. -
Page 42: Phone Book
PHONE BOOK Telephone numbers can be stored in the phone book. It allows you to store frequently used numbers so that you can easily make a call without having to remember or enter the telephone number The phone book can contain 39 entries. Each phone number can contain up to 24 digits. -
Page 43: Create A Phone Book Entry In Standby Mode
PHONE BOOK Create a Phone Book Entry in Standby Mode Enter a telephone number whilst in standby Press ‘STORE’ soft key ‘NAME:’ will be displayed Enter the name you wish using the numeric keypad ‘SAVE’ Press soft key to confirm if you want change the number Modify the phone number if it is not correct with the ‘CLEAR’... - Page 44 PHONE BOOK Insert Pause Inserting a pause provides a delay of 3 seconds. This is necessary with some telephone systems. To insert a dialling pause between numbers when storing a ‘P’ number, press ‘REDIAL’ button until appears in the LCD display.
-
Page 45: View Phone Book Entries
PHONE BOOK View Phone Book Entries ‘PHONEBK’ Press soft key to enter the phone book to scroll through the phone book until you find the contact you wish to view. If the Review Talking feature is activated, the number (or name-if recorded) of the highlighted entry will be announced Press ‘VIEW’... -
Page 46: Delete A Phone Book Entry
PHONE BOOK to select ‘EDIT’ The curser will start to flash on the right hand side of the name. Modify name using ‘CLEAR’ soft key to clear the previous characters and then enter the correct character(s) Press to edit the telephone number The curser will start to flash on the right hand side of the ‘CLEAR’... -
Page 47: Voice Announce A Phonebook Entry
PHONE BOOK Voice Announce a Phonebook Entry ‘PhoneBk’ Press soft key to enter the phone book to scroll through the phone book until you find the contact you wish to edit Press ‘VIEW’ soft key to view details of that phone book entry Press ‘OPTIONS’... -
Page 48: Delete Voice Announce For A Phonebook Entry
PHONE BOOK ‘RECORD VOICE’ to select Press ‘SELECT’ soft key Select ‘YES’ to confirm or ‘NO’ to cancel. If you confirm, you can record the name of the phonebook entry (up to 6 seconds). You can also press ‘End’ to confirm and end the recording. -
Page 49: Quick Dial
QUICK DIAL This telephone has 10 quick dial memory buttons. Eight of these buttons are photo dial buttons where you can store your contact’s photograph under the perspex of the button. This is very useful if you tend to forget telephone numbers or names. are the other two quick dial buttons. -
Page 50: Clear A Quick Dial Number
QUICK DIAL Clear a Quick Dial Number ‘ ’ Press . The LCD display will show Select the quick dial location to be cleared ‘SAVED’ will be displayed. The location will be cleared of the number. Alternatively, store a new number – this will automatically erase the previous telephone number... -
Page 51: Answering Machine
ANSWERING MACHINE Switching the Answering Machine On/Off The answering machine can be switched on and off as follows: ‘MENU’ Press soft key to select ‘TAM SETUP’ ‘SELECT’ Press soft key ‘SELECT’ ‘TAM ON/OFF’ Press soft key to select to select either ‘ON’... -
Page 52: The Outgoing Message
ANSWERING MACHINE Outgoing Message Before you use the answering machine you should record an outgoing message. The outgoing message is your message to an incoming caller and may be up to 2 minutes in length. The default OGM is “Please leave your message after the tone”. If you prefer, you can record your own OGM. -
Page 53: Checking The Outgoing Message
ANSWERING MACHINE Checking the Outgoing Message ‘MENU’ Press soft key to select ‘TAM SETUP’ ‘SELECT’ Press soft key ‘OUTGOING MSG’ to select Press ‘SELECT’ soft key ‘SELECT’ ‘PLAY OGM’ Press soft key to select The current OGM will be played. During the process the display will show ‘PLAYING OGM’... -
Page 54: Restore The Outgoing Message
ANSWERING MACHINE Restore the Outgoing Message You can delete your personal recorded OGM and restore the factory default OGM. Press ‘MENU’ soft key to select ‘TAM SETUP’ Press ‘SELECT’ soft key to select ‘OUTGOING MSG’ ‘SELECT’ Press soft key STAGE A to select ‘ERASE MSG’... -
Page 55: Answering Machine Settings
ANSWERING MACHINE Answering Machine Settings You can select the number of rings before the answering machine is activated and responds to an incoming call. You can choose from the following: 3 = calls are answered after three rings 4 = calls are answered after four rings 5 = calls are answered after five rings 6 = calls are answered after six rings •... -
Page 56: Listening To Messages
ANSWERING MACHINE Listening to Messages If you have a new message the display will show how many new messages have been received and new message LED will be lit. To play the messages, press the key. To play the messages through the speaker, press whilst on hook. -
Page 57: Incoming Message Voice Slow
ANSWERING MACHINE Incoming Message Voice Slow If you are struggling to hear or understand the message left by a caller, you can play it back in a slow mode. ‘MENU’ Press soft key ‘TAM SETUP’ to select ‘SELECT’ Press soft key ‘ICM VOICE SLOW’... -
Page 58: Remote Code
ANSWERING MACHINE Remote Code A confidential three digit code is required to listen to your messages from a remote external telephone. The default remote code is 123. For security reasons it is advisable to change this code. Press ‘MENU’ soft key to select ‘TAM SETUP’... -
Page 59: Remote Control
ANSWERING MACHINE Remote Control Call the answering machine (using your telephone number) While the outgoing message is playing, enter the remote code If the remote code is accepted, the system will play the menu of commands. You can then follow the voice prompt to operate When you have finished accessing the machine replace the handset. -
Page 60: Recording A Memo
ANSWERING MACHINE Recording a Memo You can leave a memo for other answering machine users (up to 3 minutes). To record the memo, press and hold the key in standby mode. The display will show ‘RECORDING MEMO’ and start the recording. The key should be pressed and held down whilst recording. -
Page 61: Troubleshootiing
Make sure that the power adaptor is plugged in correctly and is not damaged • Check for a power cut in the area PHOTOPHONE 155 does not ring • Make sure that the telephone line cord is plugged in correctly and is not damaged •... -
Page 62: Safety Information
SAFETY INFORMATION General Only use the power supply included with the product. Do not open the unit. Contact the helpline for all repairs. The phone is capable of amplifying sounds to a loud volume. It is important to instruct all potential users of its proper operation. It is advised to adjust the volume control to its minimum level (Low) when not in use and alert other users that hearing damage can potentially result from misuse... -
Page 63: Guarantee
GUARANTEE From the moment your Geemarc product is purchased, Geemarc guarantee it for the period of one year. During this time, all repairs or replacements (at our discretion) are free of charge. Should you experience a problem then contact our help line or visit our website at www.geemarc.com. - Page 64 GUARANTEE Electrical connection: The apparatus is designed to operate from a 230V 50Hz supply only. (Classified as ‘hazardous voltage’ according to EN60950 standard). The apparatus does not incorporate an integral power on/off switch. To disconnect the power, either switch off supply at the mains power socket or unplug the AC adaptor.
-
Page 65: Recycling Directives
- Or, hand the old product to the retailer. If you purchase a new one, they should accept it. Thus if you respect these instructions you ensure human health and environmental protection. For product support and help visit our website at www.geemarc.com Telephone 01707 384438 Or fax 01707 832529 UGPHOTOPHONE155_En_V.1.5... - Page 68 Welwyn Garden City Germany 59791 GRANDE SYNTHE CEDEX Hertfordshire, AL7 1SB Tel: +49(0)228/ 74 87 09 0 TEL. SERVICE APRES VENTE: For product support: Fax: +49(0)228/ 74 87 09 20 03 28 58 75 99 01707 384438 www.geemarc.com www.geemarc.com www.geemarc.com...
Need help?
Do you have a question about the PHOTOPHONE 155 and is the answer not in the manual?
Questions and answers