Table of Contents
Advertisement
Advertisement
Table of Contents

Subscribe to Our Youtube Channel
Related Manuals for Medeli mc80 standard


Summary of Contents for Medeli mc80 standard
-
Page 2: Table Of Contents
CONTENT General guide ................Introduction ................. Care of your keyboard ..............Power suppl y ................-Using batteries -Using the AC adaptor Connections ............... -
Page 3: General Guide
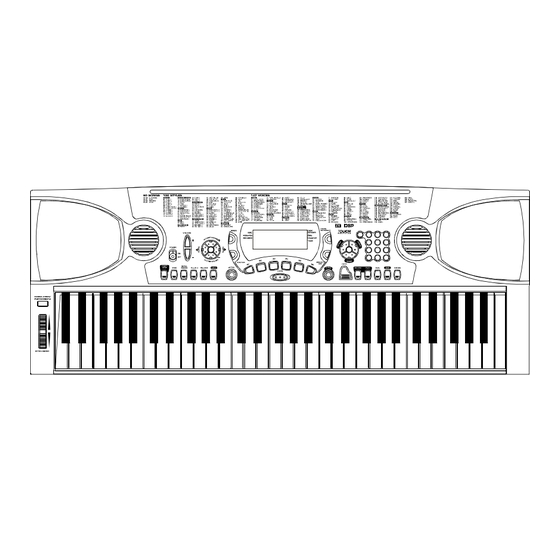
General Guide 1. FRONT PANEL POWER SWITCH MASTER VOLUME +/- 2. REAR PANEL TEMPO +/- ACCOMP VOLUME +/- ACCOMPANIMENT CONTROL MIDI IN PORT AUX. OUT JACK - START/STOP MIDI OUT PORT PHONES JACK - SYNC SUSTAIN JACK DC 12V JACK - INTRO/ENDING - FILL-IN A - FILL-IN B... -
Page 4: Introduction
Introduction Thank you for purchasing the electronic keyboard. This keyboard provides you with the following features and functions: 147 PCM voices + Drum and Percussion Sounds 100 Styles 60 Demo Songs with playing along feature Auto Accompaniment with Normal, Fingered and Single Finger control modes One Touch Setting Record and Playback MIDI compatibility... -
Page 5: Using The Ac Adaptor
Important battery information: Any of the following symptoms indicate low battery power. Replace batteries as soon as possible whenever any of the following occurs. Dim, difficult to read display. Abnormally low speaker/headphone volume. Distortion of sound output. Sudden power failure when playing at high volume. Abnormal rhythm or demo song plays. -
Page 6: Connections
Connections The headphones jack A standard pair of stereo headphones can be plugged in PHONES jack for private practice or late night playing. The internal speaker system is automatically shut off when the headphones are plugged into the PHONES jack. The sustain jack An optional foot switch can be plugged into the SUSTAIN... -
Page 7: Play Demo Songs
Play demo songs A selection of 60 demo songs come built-in for your listening pleasure or play along fun. They will give you a good idea of what your keyboard can do. Turn the power ON by pushing the [POWER] switch upwards. -
Page 8: Basic Operation
Press the [START/STOP] button to start playing the demo song. The song will play in endless loop, re-starting after it reaches the end. Press the [START/STOP] button again to stop the play. Basic Operation Selecting & playing voices The keyboard has 147 PCM voices and percussion kits that you can select and play on the keyboard. - Page 9 The number buttons: The number buttons can be used to directly enter the number of the desired voice, thereby immediately selecting that voice without having to step through a number of other voices. Two-digit voice number are selected simply by entering the two digits in sequence--e.g. to select voice number 17, briefly press the button and then the button.
-
Page 10: Sustain Voice Effect
Sustain voice effect You can add a sustain voice effect to the overall of the sound simply by pressing the [SUSTAIN] button. Press the [SUSTAIN] button again to turn this function off. Pitch bend [PITCH BEND] wheel allows the pitch of notes played on the electronic keyboard to be bend up or down-roll the wheel away from you to bend up, and towards you to bend down. -
Page 11: Auto-Accompaniment
Auto-Accompaniment Selecting a style The keyboard has 100 different auto-accompaniment styles that can be used to provide fully- orchestrated accompaniment. Its sophisticated Auto Accompaniment system can provide automated bass and chord backing that is perfectly matched to the selected accompaniment style. Before you select a style, make sure you have selected STYLE mode. -
Page 12: Playing The Selected Style
Playing a selected Style 1. Press the [START/STOP] button to start playing the selected style. 2. To stop the style, press the [START/STOP] button again. To start the style with introductory pattern 1. Press the [INTRO/ENDING] button to put the keyboard into introduction start standby. 2. -
Page 13: Accompaniment Volume
Accompaniment Volume 1. You can adjust the Accompaniment Volume with the [ACCOMP+]/[ACCOMP-] buttons. The volume level ranges from 00 to 31. 2. You can turn off the accompaniment volume by pressing the [ACCOMP+] [ACCOMP-] buttons simultaneously, the display shows the message "ACPoFF". In this situation, you can turn back on the accompaniment volume by pressing the [ACCOMP+] [ACCOMP-]... -
Page 14: Function Select
Function Select 1. Transpose Press the [FUNCTION] button as many time as necessary until "xPS xx" appear in the display, you can use the [-/NO]/[+/YES] button to adjust the level. 2. Tune Press the [FUNCTION] button as many time as necessary until "TUN xx" appear in the display, you can use the [-/NO]/[+/YES] button to adjust the level. -
Page 15: Octave
5. Octave Press the [FUNCTION] button as many time as necessary until "oCT xx" appear in the display, you can use the [-/NO]/[+/YES] button to adjust the level. 6. Modulation/Portamento Press the [FUNCTION] button as many time as necessary until "ModU" appear in the display, you can use the [-/NO]/[+/YES] button to switch between ModU(modulation) or PoRT(portamento). -
Page 16: Memorize Panel Settings
Memorize panel settings The keyboard has 6 memory pads which can be used to memorize the control-panel setups. You can press one of the MEMORY button (M1-M6) to recall the setups at any time. Register the settings: When you have finished the settings, you press and hold the [STORE] button, then press one of MEMORY... -
Page 17: One Touch Setting
One Touch Setting One Touch Setting lets you instantly select the appropriate panel settings suitable for the current style. Each style contains four variations. 1. Press the [OTS] button. 2. Press the [START/STOP] button to play the selected style. While playing the style, you can press one of the One Touch Setting buttons - [M1] through [M4] to select the appropriate settings. -
Page 18: Midi
MIDI The MIDI IN and MIDI OUT terminals, located on the rear panel of the unit, offer broadened musical possibilities through use of MIDI. The following shows the description of MIDI and how can you use MIDI with the keyboard. What is MIDI? MIDI stand for Musical Instrument Digital Interface. -
Page 19: Specifications
Specifications Keys: 61 keys with Touch Response Voices: 147 PCM voices Polyphony: 64-note (max.) Styles: 100 styles Accompaniment Control: Sync, Intro/Ending, FILL-IN, OTS DEMO Song: 60 demo songs Overall Control: Transpose, Tune, MIDI Channel, Octave, Pitch Bend, Portamento, Modulation Other Control: Record &... - Page 20 Appendix: Chord Table Chord Name [Abbreviation] Normal Voicing Chord Display Major[M] 1-3-5 Major sixth [6] 1-(3)-5-6 Major seventh [M7] 1-3-(5)-7 Major seventh sharp Eleventh [M7#11] 1-(2)-3-#4-(5)-7 CM7#11 CM7#11 Major add ninth [Madd9] 1-2-3-5 Cmadd9 Cm(9) Major ninth [M9] 1-2-3-(5)-7 CM7(9) Major sixth add ninth [6 9] 1-2-3-(5)-6 C6 9...
Need help?
Do you have a question about the mc80 standard and is the answer not in the manual?
Questions and answers