Table of Contents
Advertisement
Quick Links
Advertisement
Table of Contents

Related Manuals for Argus DC2200


Summary of Contents for Argus DC2200
- Page 1 User Guide for DC2200...
-
Page 2: Table Of Contents
User Guide for DC2200 Introduction Electromagnetic Compatibility Notice Precautions Battery Used for DC2200 Camera Nomenclature Connect the camera unit by USB cable TV Mode Review – Reviewing Pictures Slide Show Info Lang Status LCD display Recording a movie Host Software... -
Page 3: Introduction
User Guide for DC2200 The package contains of below items : DC2200 Camera Program CD USB cable, 1.5m, transparent TV cable, 1.2m, black color Hand Strap User manual Alkaline Batteries (3Ax3) are not included Mode Resolution 640x480 QVGA 320x240 2X(Digital) -
Page 4: Electromagnetic Compatibility Notice
User Guide for DC2200 Electromagnetic Compatibility Notice This device complies with Part 15 of the FCC rules. Operation is subject to the following two conditions : (1) This device may not cause harmful interference, and (2) This device must accept any interference received, including interference that may cause undesired operation. -
Page 5: Precautions
User Guide for DC2200 Precautions : Thank you for selecting DC2200 dual mode digital camera. Please read the instructions carefully for a thorough understanding before taking pictures. l This camera is not resistant to water and should not be used outdoors in snow or rain. -
Page 6: Battery Used For Dc2200 Camera
User Guide for DC2200 Battery Used for DC2200 Camera To power up the unit, the 3xAAA alkaline batteries should be put in the battery compartment. Press the Power button. If the battery power is taken off, the internal memory is erased and the TV settings will be reset to default. -
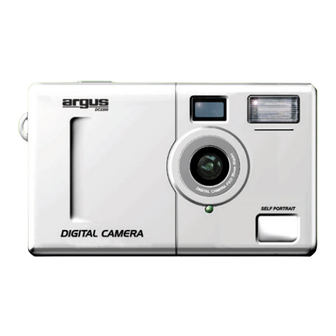
Page 7: Nomenclature
User Guide for DC2200 Nomenclature :... -
Page 8: Connect The Camera Unit By Usb Cable
User Guide for DC2200 Connect the camera unit by USB cable. 1. First, the PC/Mac is installed with the My Camera driver (install the CD-ROM will put the driver to your PC and double click the Mac driver Installer in the Mac computer will start to install the My Camera driver ). -
Page 9: Tv Mode
User Guide for DC2200 TV Mode : Change the camera internal settings You can change some settings of the camera by connecting the video cable to the TV set which has the video input. Power up the unit after connecting the stereo jack of the camera to the RCA jack of TV (this is the Video input socket). -
Page 10: Review - Reviewing Pictures
User Guide for DC2200 REVIEW – Reviewing Pictures Press Shutter button to choose the 1 Press the Mode button to display the 2 pictures taken by the camera. Until the last picture is seen, it will show ‘Done’. Press Mode button again it will go to the 1 picture and continue to review the pictures stored. -
Page 11: Slide Show
User Guide for DC2200 SLIDE SHOW – Display stored pictures one by one Press Mode button to choose SLIDE SHOW. Press Shutter button to confirm. The 1 photo is uploaded to the screen in about 4 seconds. Then it will display the photo for The next photo is automatically uploaded and repeat the process until all the pictures are displayed. -
Page 12: Info
User Guide for DC2200 INFO – Information of internal memory Press Mode button to choose INFO. Press Shutter button to confirm. You can see the screen as below : the numeric values are just for reference. INFO BATTERY FULL VERSION 5.WT6FXX... -
Page 13: Lang
User Guide for DC2200 LANG – Select English, Spanish, Deutch, French or Japanese Press Mode button to choose LANG. It is preset as English. Press Shutter button to confirm change of languages. Press Mode button once, the other language is shown. -
Page 14: Status Lcd Display
User Guide for DC2200 Status LCD display Icons in the status LCD : Battery icon : 2 Levels of power input 3-digit 7 segment display : Count Up from 0 to 999. (if over 999, it will show 999) NTSC, PAL : TV system selection Movie icon : Show movie mode. - Page 15 User Guide for DC2200 Status LCD flow chart : Press Power/Standby button to turn on the LCD. ‘FEA’ Press Mode (feature) is button once displayed in the counter . 1. Operating mode : Ready to take a photo. If selected, press Mode button to other setting, it will save the auto flash mode.
- Page 16 User Guide for DC2200 Just put in the batteries, press the Power button once. The LCD displays as below (no CF card is inserted). 2. Take a photo As the unit is turned on, press the shutter and it will take a photo. You can see the film counter is increased from 0 to 1.
- Page 17 User Guide for DC2200 Then wait for about 10s, it will go back to operating mode but the picture quality is changed to NORM (Normal). This is similar for changing to Econ, Zoom x2 and Movie modes. 4. Change TV system Press the Mode button two times, it will see the NTSC icon, press the Select button and PAL is found.
- Page 18 User Guide for DC2200 6. Self Timer mode : Press the Select button, you see the Timer icon, press the Shutter button, the Timer icon will blink and a photo is taken after 10s. The beeper is ‘Do,Do..’ and the LED is blinking.
-
Page 19: Front Led Indication
User Guide for DC2200 Battery Low Detection When the battery power is detected as Low, the last segment of the battery icon is blinking. Remarks : ZOOM (2X) The photo taken by 2X mode is the middle part of the VGA image size. The resolution is QVGA 320x240. -
Page 20: Recording A Movie
User Guide for DC2200 Recording a Movie You can select the Movie mode in the Quality selection mode. Press the Mode button once, press the Select button 4 times, you can see the Movie icon on. Press Mode button until you see the film counter. -
Page 21: Host Software
Connect the camera with the USB cord. Power on the camera unit. Double Click the driver icon on the desktop. The image files are shown in the “DC2200 Camera” Explorer. You can select all images first. Then click the right button of the mouse and select Copy. Go to another folder in the hard drive. -
Page 22: Install The Arcsoft Programs
User Guide for DC2200 Install the Arcsoft Programs : Place the CD-ROM to the CD-ROM drive. It will auto run. -
Page 23: Install The Camera Driver
User Guide for DC2200 When finishing the installation of the Arcsoft programs, it will start to install the PC driver. DC2200... -
Page 24: Upload Photos
User Guide for DC2200 Make a shortcut of the DC2200 Camera driver to the desktop. Connect it to the camera. Double click the DC2200 Camera icon, it will display the explorer as shown. DC2200... -
Page 25: Use Of Photofantasy
User Guide for DC2200 Use of PhotoFantasy : Open the PhotoFantasy. Get Fantasy and then Get Photos. Click the ‘Add’ icon. -
Page 26: Use Of Photostudio And Photoprinter
User Guide for DC2200 Use of PhotoStudio and PhotoPrinter :... -
Page 27: Product Specifications
User Guide for DC2200 PRODUCT SPECIFICATIONS Hardware : 1. Resolution 2. Lens 3. Memory Internal External input 4. Number of Pictures 5. View Finder 6. Status LCD 7. Buzzer 8. LED 9. Power Button 10. Flash strobe 11. Battery Power 12. -
Page 28: System Requirements
User Guide for DC2200 Software : For both PC and Mac computer 1. QuickTime 4.0 2. Photo Printer 3. Photo Fantasy 4. Photo Studio 5. Camera Driver System Requirements : 1. Pentium 166MHz or higher. 2. Operation System : PC Win98,98SE,Me,2000, NT. MAC OS 8.6, 9.0.
Need help?
Do you have a question about the DC2200 and is the answer not in the manual?
Questions and answers