TREND T10 Original Instructions Manual
Hide thumbs
Also See for T10:
- Original instructions manual (32 pages) ,
- Original instructions manual (32 pages)
Table of Contents
Advertisement
Advertisement
Table of Contents

Related Manuals for TREND T10


Summary of Contents for TREND T10
- Page 1 MANU-T10 v2.0 2/2/05 2:32 pm Page 30 T10 & T11...
- Page 2 Importante: addendum per il manuale di istruzioni Importante - Apéndice al manual de instrucciones Trend è impegnata a fornire prodotti sicuri di altissima qualità. Durante la lettura del Trend se compromete a ofrecer productos seguros de alta calidad. Tenga en manuale di istruzioni, si prega di tenere presente le seguenti correzioni.
- Page 3 Viktig – tillegg til bruksanvisningen Trend s’engage à fournir des produits sûrs et de qualité supérieure. Veuillez noter Trend bestreber seg på å levere sikre produkter av høy kvalitet. Vennligst merk deg les corrections suivantes pour la consultation du manuel d’instructions.
-
Page 4: Table Of Contents
MANU-T10 v2.0 2/2/05 2:31 pm Page 1 T10 & T11 Dear Customer TECHNICAL DATA Thank you for purchasing this Trend product, we hope you enjoy many years of creative and Voltage: UK & Eire 230V productive use. UK & Eire... -
Page 5: Safety
MANU-T10 v2.0 2/2/05 2:31 pm Page 2 T10 & T11 s Use the attachment with the power s Connect dust extraction equipment. SAFETY tools and accessories specified in If devices are provided for the this manual only. Do not force the... -
Page 6: Safety
Trend Routing Catalogue. appropriate spanner or key in the design requirements and s Always use router cutters in a... -
Page 7: Electrical Safety
For 115V units with a power rating exceeding 1500W we recommend to use a plug to BS4343 standard. For T10 & T11 this must be rated to 13 AMP 32A. B&D_47... -
Page 8: Manufacturers Declaration
1 x Dust extractor spout clip Weighted root mean square 1 x Fine height adjuster handle acceleration value according to EN 50144: 1 x Instruction manual < 2.5 m/s 1 x Guarantee registration card Managing Director Stephen Phillips Trend Machinery & Cutting Tools Ltd. B&D_47... -
Page 9: Description Of Parts
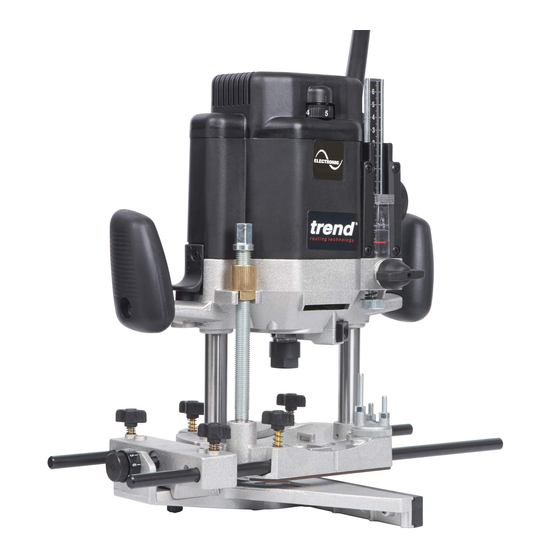
MANU-T10 v2.0 2/2/05 2:31 pm Page 6 T10 & T11 DESCRIPTION OF PARTS T10 Plunge locking lever Variable speed control dial Handle Switch Depth stop locking knob Depth stop micro adjuster Depth stop height adjuster dial Depth stop scale Depth stop lens... - Page 10 MANU-T10 v2.0 2/2/05 2:31 pm Page 7 T10 & T11 DESCRIPTION OF PARTS T11 Plunge locking lever Variable speed control dial Handle Switch Depth stop locking knob Depth stop micro adjuster Depth stop height adjuster dial Depth stop scale Depth stop lens...
-
Page 11: Assembly & Adjustment
MANU-T10 v2.0 2/2/05 2:31 pm Page 8 T10 & T11 ASSEMBLY & ADJUSTMENT Switching On & Off s On; pull the switch up. s Off; press the switch down. Adjusting the Depth of Cut s Place the machine with cutter fitted on to the s Set the measuring lens (5) to a round figure workpiece. -
Page 12: Fitting & Removing Cutters
MANU-T10 v2.0 2/2/05 2:31 pm Page 9 T10 & T11 How to Fit and Remove a Router Cutter Fitting Cutters s Insert at least of the shank length of the cutter (1) into the collet. s Press the spindle lock (2) forward until the router spindle is locked (you may need to turn the spindle slightly to engage it). -
Page 13: Speed Control
Trend Routing Catalogue. 75mm Using a Fine Height Adjuster The T10 has an optional fine height adjuster accessory Ref. FHA/003 and the T11 has a built in fine height adjuster. These should be used when fine height adjustment of the cutter is required. -
Page 14: T10
Whenever possible use the dust extraction spout with a suitable extractor when routing. Fitting the T10 Fine Height Adjuster Optional Accessory Ref. FHA/003 s Plunge router and lock lever (6) down. s Remove hex cap (5) nut from threaded stud (3), using a 19mm A/F spanner. -
Page 15: Template Guide Bush
Turn the router upside down. s Fit inner plate (2) into the recess in the router base plate (1). For T10 the bushes on the inner plate must be towards the router motor. For T11 the raised side of the inner plate must be away from router base. -
Page 16: T11
MANU-T10 v2.0 2/2/05 2:32 pm Page 13 Fitting Dust Extractor Spout Fitting and Removing T11 Dust Extractor Spout The dust extraction spout consists of a main section (1) with underside clip (7), an insert cover (2) and top clip (5) with screw (6). -
Page 17: Fine Height Adjuster
MANU-T10 v2.0 2/2/05 2:32 pm Page 14 Fitting the T11 Fine Height Adjuster Portable Use The fine height adjuster for the T11 can be used portably or when the router is held inverted in a table. If a suitable size access hole is drilled into the router table top, the height adjustment can also be adjusted from above the table top. -
Page 18: Accessories
MANU-T10 v2.0 2/2/05 2:32 pm Page 15 Modification of User Router Table for T11 Fine Height Adjuster To use fine height adjuster in table mode a 20mm diameter hole is required to be drilled into the router table top. To position the hole it is advisable to remove the phenolic base slider of the T11 router and use it as a template. -
Page 19: Operation
MANU-T10 v2.0 2/2/05 2:32 pm Page 16 T10 & T11 OPERATION Sequence of plunging Cutting Direction Step One Plunge down and lock the The direction of routing must always motor carriage, by be opposite to the cutter’s direction of depressing the plunge rotation. -
Page 20: Side-Fence Routing
MANU-T10 v2.0 2/2/05 2:32 pm Page 17 T10 & T11 Side-Fence Routing The side-fence is used to guide the router when moulding, edge profiling or rebating the edge of the workpiece or when routing grooves and slots in the centre of the workpiece, parallel to the edge. -
Page 21: Template Guide Bush Routing
MANU-T10 v2.0 2/2/05 2:32 pm Page 18 T10 & T11 Routing with a Template The guide bush is used in conjunction with a template when the routing operation is repetitive or the workpiece is complex in shape. The template is fixed to the upper surface of the workpiece. -
Page 22: Beam Trammel Routing Accessory
MANU-T10 v2.0 2/2/05 2:32 pm Page 19 T10 & T11 Beam Trammel Routing Optional Accessory Ref. BEAM/002 Cutting Arcs with the Router s Fit the beam trammel (1) to the router base (3). s Place the machine on the workpiece and ensure pin on beam trammel will pierce the workpiece surface. -
Page 23: Bearing Guided Cutters
MANU-T10 v2.0 2/2/05 2:32 pm Page 20 T10 & T11 Bearing Guided Cutter Routing Edge profiling and shaping cutters are available with a bearing fitted to the end. This enables shaped or straight workpieces to be routed without the need for a guiding device such as a side-fence or batten. -
Page 24: Freehand Routing & Batten Routing
MANU-T10 v2.0 2/2/05 2:32 pm Page 21 T10 & T11 Freehand Routing with the Router The router can also be used for signwriting or creative freehand work without any form of guide. With practice, numbers or name plate designs can be routed freehand. Draw the design or motif on the workpiece and then rout the design, taking shallow passes. -
Page 25: Maintenance & Care
Machine, accessories and packaging should be sorted for environmentally friendly recycling. Unwanted tools should be taken to your nearest Trend Service Agent where it will be disposed of in an environmentally safe way. It is advisable to have the brushes... -
Page 26: Spare Parts - Spare Parts List
WP-T10EL/004 Carbon Brush 240V (1 pair) WP-T10E/004 2 Core Cable Only 115V UK T10L & T11L WP-T10L/005 2 Core Cable with Plug 230V UK T10 & T11 WP-T10/005 2 Core Cable with Plug 230V Euro T10/T11EURO WP-T10EUR/005 Brush Holder WP-T10/006... - Page 27 MANU-T10 v2.0 2/2/05 2:32 pm Page 24 T10 & T11 T10 & T11 - SPARE PARTS LIST v1.0 03/2005 Qty. Desc. Ref. Spacer for Revolving Guide WP-T10/036 Spring for Plunge Lever WP-T10/037 Plunge Lever Bolt WP-T10/038 Machine Screw Csk M8 x 35mm Phillips...
-
Page 28: Spare Parts
MANU-T10 v2.0 2/2/05 2:32 pm Page 25 T10 & T11 T10 & T11 - SPARE PARTS LIST v1.0 03/2005 Qty. Desc. Ref. Base Casting Complete T10 WP-T10/078 Base Casting Complete T11 WP-T11/078 Side Fence Micro Adjuster Scale WP-T10/079 Phenolic Slider Base T10... -
Page 29: Spare Parts List
MANU-T10 v2.0 2/2/05 2:32 pm Page 26 T10 & T11 T10 & T11 - SPARE PARTS LIST v1.0 03/2005 Qty. Desc. Ref. Inner Plate T10 WP-T10/075 Inner Plate T11 WP-T11/075 Machine Screw Csk M5 x 8mm Slot WP-SCW/009 Machine Screw Pan M5 x 12mm Slot WP-SCW/042 Line up Pin 12mm &... -
Page 30: Spare Parts Diagram
MANU-T10 v2.0 2/2/05 2:32 pm Page 27 T10 & T11 T10 & T11 - SPARE PARTS DIAGRAM v1.0 03/2005 T 1 1 T 1 0 & -27- B&D_47... - Page 31 MANU-T10 v2.0 2/2/05 2:32 pm Page 28 T10 & T11 T11 Fine Height Adjuster Fitting Hole Position 36mm Actual Size Ø 20mm 68mm -28- B&D_47...
- Page 34 Web: ____________www.trendmachinery.co.uk RECYCLABLE © Copyright Trend 2005. No part of this publication may be reproduced, stored or transmitted in any form without prior permission. Our policy of continuous improvement means that specifications may change without notice. Trend Machinery and Cutting Tools cannot be held liable for any material rendered unusable or any form of consequential loss.
Need help?
Do you have a question about the T10 and is the answer not in the manual?
Questions and answers