Table of Contents
Advertisement
Advertisement
Table of Contents

Related Manuals for oticon Ino


Summary of Contents for oticon Ino
- Page 1 InSTruCTIonS FOR USE...
-
Page 2: Table Of Contents
Thank you Contents Instrument View BTE 13 and BTE Power Thank you for choosing our product as your means to better hearing. Instrument View BTE 13 with Corda To support your efforts, we have put great care and attention into making sure that Changing batteries your new hearing instruments are of the highest quality and that they are easy to Turning your instrument ON and OFF... -
Page 3: Instrument View Bte 13 And Bte Power 5A
Instrument View BTe 13 and BTe power Caring for your hearing instrument How to change Corda (thin tube) Cleaning your hearing instrument with Corda (thin tube) Sound hook Plastic tube Daily maintenance with Corda (thin tube) Domes Microphone Changing the Corda Dome openings Using your hearing instrument... -
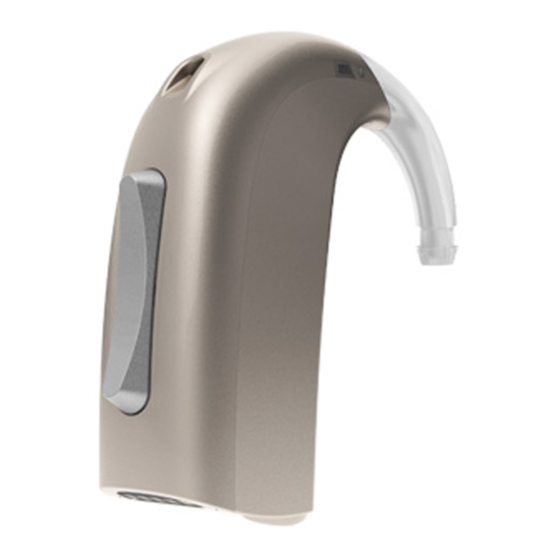
Page 4: Instrument View Bte 13 With Corda
Instrument View BTe 13 with Corda Not available for BTE Power Thin tube Microphone openings Your ear piece: Custom Mould Plus dome Ear grip Open dome: Push-button/ Small Volume Control (Optional) Medium Dome Large Battery door Battery size 13... -
Page 5: Changing Batteries
Changing batteries Your hearing instrument battery size is 13. Batteries per form differently. Ask your hearing care professionalfor help choosing a high quality battery for your hearing instrument. A worn out battery should be removed immediately and disposed of according to local regulations. When the battery power is low, you will hear 2 beeps. -
Page 6: Turning Your Instrument On And Off
Turning your instrument on and oFF To replace the battery, follow these instructions: • Open the battery door completely by pushing the raised edge in the bottom of Turn on your hearing instrument by closing the battery door completely with the battery the instrument. -
Page 7: Left/Right Ear Marking
Left/right ear marking putting on your instrument with earmould Hearing instruments are fitted to the uniqueness of each ear, which means if you have two instruments then your left hearing instrument is programmed differently from your Place the tip of the earmould in your ear canal, right. -
Page 8: Putting On Your Hearing Instruments With A Corda
putting on your hearing instruments push-button Dome with a Corda (thin tube) Your hearing instrument has an ergonomic designed push-button for volume adjustment Not available for BTE Power and switching between different programs. Putting on your hearing instrument with a thin tube correctly The push-button can be activated by pressing either the upper part (UP) or the lower every time, takes practice: part (DOWN). -
Page 9: Programs (Optional)
programs (optional) The push-button on your hearing instrument can be programmed to one of 3 functionalities. Left Right Your hearing instrument can have up to 4 different programs. Program shift: When switching between the different programs, your hearing instrument will beep. Press shortly to change program. -
Page 10: Volume Control (Optional)
Using 2 instruments Using 2 Instruments If you have two Ino Pro instruments the push-button on one instrument can be pro- If you have two Ino Pro instruments the push-button on one instrument can be pro- grammed to change the program on both hearing instruments (Binaural Coordination). -
Page 11: Stand-By (Optional)
Stand-by (optional) Push the button for a minimum of 3 seconds to set the instrument in stand-by mode. To reactivate the instrument, push the button briefly again. Use the stand-by function if you need to silence the instrument while you have the instrument on. -
Page 12: Tamper-Resistant Battery Door (Optional)
Tamper-resistant battery door (optional) Telecoil (optional) This is strongly recommended for infants, small children and people with The telecoil is a receiver for audio signals transmitted from an inductive loop installation. learning difficulties. The telecoil is meant for telephone conversations and for loop systems in e.g. theatres, churches or lecture rooms. -
Page 13: Auto Phone (Optional)
auto phone (optional) Your hearing instrument may have a built-in Auto Phone functionality. When the hearing instrument is close to a telephone receiver, the Auto Phone will activate a Phone Program. When the Phone Program is activated you will hear a number of beeps. When you end your telephone conversation, the hearing instrument will automatically return to the previous program. -
Page 14: Dai (Direct Audio Input)
DaI (Direct audio Input) If you would like the DAI input alone, you can switch to the next program by using the program switch button. If your hearing instrument is connected by means of a DAI adaptor with an external sound source, like a media player/MP3 or hand mic, the signals of these devices will As long as the DAI adaptor is connected to the instrument two programs will automati- be directly transferred to your hearing instrument. - Page 15 If you would like to receive input from the FM transmitter alone, you can switch forwards to the next FM program by using the program switch button. An FM receiver enables the hearing instrument to receive signals directly from an external wireless FM transmitter.
-
Page 16: Caring For Your Hearing Instrument
Caring for your hearing instrument Cleaning the instrument The multi-purpose tool contains a brush for the special purpose of cleaning your Your ear canal produces ear wax (cerumen) which may clog up the sound outlet or the instruments. This should be used to ensure the best care and performance of your ventilation opening of your earmould. - Page 17 Cleaning the earmould Washing the earmoulds • Clean away any traces of wax from around the sound The earmoulds should be washed regularly: outlet with the brush. • Disconnect the earmould and the tubing from the sound • Clean the ventilation opening by pressing the brush hook of the hearing instrument.
- Page 18 How to change Corda (thin tube) • Make sure the earmould and tubing are completely dry before they are reconnected to the hearing instrument. Be careful that left ear earmould and tubing are connected to the hearing instrument with left ear marking and vice versa for the right ear instrument. 1.
- Page 19 Cleaning your hearing instrument with Corda (thin tube) Daily maintenance with Corda (thin tube) Domes To remove cerumen from the thin tube: The dome should not be cleaned. When you require a fresh, clean dome, remove the existing one and put on a fresh one. •...
-
Page 20: Changing The Corda Dome
Changing the Corda Dome The dome is easy to replace. Hold the widest part of the dome and pull it off from the connections joint on the tube. Place the new dome on the speaker and ensure that it is fastened securely. ImporTanT noTICe •... -
Page 21: Using Your Hearing Instrument
Wipe the batteries carefully if moisture is present as it may affect their performance. Your hearing instrument may support wireless connectivity with the Oticon ConnectLine Using an anti-humidity kit can help to avoid these problems and may even extend the life Streamer. - Page 22 If you find it difficult to listen to TV or radio, ask your Hearing Care Professional for more mouthpiece of the telephone in order to ensure good information regarding the Oticon ConnectLine system and other available accessories. understanding on the other “end of the line”.
- Page 23 The varying degree of disturbance can be due to the nature of your particular mobile phone. If you find it difficult to obtain a good result while using your mobile telephone, ask your Hearing Care Professional for more information regarding the Oticon ConnectLine system and other available accessories.
-
Page 24: Common Problems And Their Solutions
Common problems and their solutions Symptom Possible causes Solutions no sound Worn-out battery Change battery pg. 7 Clogged sound outlet Clean earmould pg. 30 & 34 Intermittent Clogged sound outlet Clean earmould pg. 30 & 34 or reduced sound Moisture Wipe battery and instrument with dry cloth pg. -
Page 25: International Warranty
International Warranty If you need service Take your hearing instrument to your Hearing Care Profes sional, who may well be able to Your hearing instruments are covered by a limited warranty issued by the manufacturer sort out minor problems and adjustments on the spot. for a period of 12 months from the date of delivery. -
Page 26: Warranty Certificate
Warranty Certificate product approval, precautions and markings Name of Owner: The hearing instrument contains a radio transmitter using short range magnetic induction technology working at 3.84 MHz. The magnetic field strength of the transmitter is Dispenser: < -42 dBμA/m @ 10m. Dispenser Address: The emission power from the radio system is well below international emission limits for human exposure. -
Page 27: Mobile Phone
mobile phone “Some hearing instrument users have reported a buzzing sound in their hearing instruments when they are using mobile phones, indicating that the mobile phone and hearing instrument may not be compatible. According to the ANSI C63.19 standard (ANSI C63.19-2006 American National Standard Methods of Measurement of Compatibility Between Wireless Communications Devices and Hearing instruments), the compatibility of a particular hearing instrument and mobile phone can be predicted by adding the rating for the... - Page 28 Warnings The hearing instrument contains a module with: You should familiarise yourself fully with the following general warnings and the entire FCC ID: U28FUBTE03 contents of this booklet before using your hearing instrument. IC: 1350B-FUBTE03 The device complies with Part 15 of the FCC rules and RSS-210 of Industry Canada. Hearing instruments and batteries can be dangerous if swallowed or used improperly.
- Page 29 • Most hearing instruments can be supplied with a tamper-resistant battery compartment Dysfunction in hearing instruments upon request. This is strongly recommended for infants, small children, and people • Hearing instruments may stop functioning, for instance if the batteries have expired or with learning difficulties.
- Page 30 Active Implants X-ray, CT, MR, PET scanning and electrotherapy • Oticon shows caution and advise to follow the guideline as recommended by manu- • Remove your hearing instrument for example during X-ray, CT / MR / PET scanning, facturers of implantable defibrillators and pacemakers regarding use of mobile phones.
- Page 31 Safety requirements regarding Direct Audio Input (DAI) Hereby, Oticon A/S declare that this hearing instrument is in compliance with the • The safety of hearing instruments with DAI (Direct Audio Input) is determined by the essential requirements and other relevant provisions of Directive 1999/5/EC.
- Page 32 people First People First is our promise to empower people to communicate freely, interact naturally and participate actively...
Need help?
Do you have a question about the Ino and is the answer not in the manual?
Questions and answers