
Related Manuals for OmniSistem onyxpro 75

Summary of Contents for OmniSistem onyxpro 75
- Page 1 Tel: 253-395-9500 Fax: 253-395-9494 6403 South 208 Street, Kent, WA 98032 KEEP THIS MANUAL FOR FUTURE NEEDS 1 of 18...
-
Page 2: Safety Instructions
Pass this manual on to every further owner or user of the product. Download the latest version of the user manual from the OmniSistem website. For your own safety, please read this user manual carefully before you initially start the product. INTRODUCTION Thank you for choosing an OmniSistem product. OmniSistem is a wholesaler of a large variety of lighting, sound, ... - Page 3 (Safety Instructions Continued) ● Minimum distance from flammable materials to all surfaces of the unit is 0.3m (11.81”). ● If the device has been exposed to drastic temperature fluctuation (e.g. after transportation), do not switch it on immediately. The arising condensation water might damage your device. Leave the device switched off until it has reached room temperature.
-
Page 4: Operating Procedures
Keep away children and amateurs! Never leave this device running unattended. OPERATING PROCEDURES This device is a moving head light for creating decorative effects. This product is only allowed to be operated with an alternating voltage of 100240V, 50/60 Hz and was designed for indoor use only. This device is designed for professional use, e.g. on stages, in clubs, bars, theatres, etc. Lighting effects are not designed for permanent operation. Consistent operation breaks will ensure that the device will serve you for a long time without defects. Do not shake the device. Avoid brute force when installing or operating the device. Never lift the fixture by holding it at the projector head, as the mechanics may be damaged. Always hold the fixture at the transport handles. When choosing the installation spot, please make sure that the device is not exposed to extreme heat, moisture or dust. There should not be any cables lying around. Please make sure that the unit cannot be touched or bumped. This device must never be operated or stockpiled in surroundings where water splash, rain, moisture or fog may harm the device. Moisture or very high humidity can reduce the insulation and lead to mortal electrical shocks. When using smoke machines, make sure that the device is never exposed to the direct smoke jet and is installed in a distance of 0.5 meters between smoke machine and device. The room must only be saturated with an amount of smoke that the visibility will always be more than 10 meters. The ambient temperature must always be between 15°C and +45°C. Keep away from direct heat (particularly in cars) and heaters. The relative humidity must not exceed 50% with an ambient temperature of 45° C. This device must only be operated in an altitude between 20 and 2000m over sea level. ... -
Page 5: Product Features And Specifications
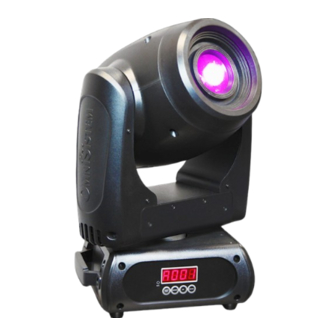
PRODUCT FEATURES & SPECIFICATIONS Light ● Light source: 75W White LED ● Lamp life: 60,000 hours ● Luminous Flux: 6400 lumen, 6990 lux @ 2.5m ● Control: Remote on/off via DMX ● Ballast: switching mode power supply ● Beam angle: 13° to 18° X/Y ● Pan: 630° (4.0 sec) or 540° (3.58 sec), Tilt: 265° (2.8 sec) ● 16bit resolution ● Auto repositioning Colors ● 8+open, interchangeable, indexable and bidirectional rainbow effect ● Color bounce Gobos ● Outside ¢23mm, inside ¢18mm ● 7+ open, custom interchangeable position for rotating gobo wheel ● Real indexable and gobo shaking ●... - Page 6 OVERVIEW Objective lens Arm Base Handle (5) Wireless indicator Display MODE/ESC Down Button Up Button (10) Enter button (11) 3PIN DMX input socket (12) 3PIN DMX output socket (13) Power input (14) Power output ...
-
Page 7: Installation
INSTALLATION Inserting/Exchanging Gobos If you wish to use other gobos, or if gobos are to be exchanged, please follow the instructions below: Remove the fixation ring with an appropriate tool. Remove the gobo and insert the new gobo. Press the fixation ring together and insert it in front of the gobo. Rigging The installation of the projector has to be built and constructed in a way that it can hold 10 times the weight for 1 ... - Page 8 Procedure: The projector should be installed outside areas where persons may walk by or be seated. IMPORTANT! OVERHEAD RIGGING REQUIRES EXTENSIVE EXPERIENCE, including (but not limited to) calculating working load limits, installation material being used, and periodic safety inspection of all installation ...
- Page 9 The manufacturer cannot be made liable for damages caused by incorrect installations or insufficient safety precautions! Install the safety bond by inserting the quick link in the hole on the bottom of the base. Pull the safety bond over the trussing system. Insert the end in the quick link and tighten the fixation screw. The maximum drop distance must never exceed 20cm. A safety bond which already holds the strain of a fall or which is defective must not be used again. Screw the clamp via a M12 screw and nut onto the Omega holder. Insert the quicklock fasteners of the Omega holder into the respective holes on the bottom of the device. Tighten the quicklock fasteners fully clockwise. 9 of 18...
-
Page 10: Dmx-512 Connection / Connection Between Fixtures
DMX512 connection / connection between fixtures Please note, the starting address depends upon which controller is being used. Only use a DMX cable and 3pin XLR plugs and connectors in order to connect the controller with the fixture or one fixture with another. Occupation of the XLR connection: If you are using controllers with this occupation, you can connect the DMX output of the controller directly with ... -
Page 11: Connection With The Mains
Connection with the Mains Connect the device to the power source with the enclosed power supply cable. The configuration of the connection cables is as follows: Cable International Brown Live L Blue Neutral N Yellow/Green Ground Ground needs to be connected! If the device will be directly connected with the local power supply network, a disconnection switch with a minimum opening of 3mm at every pole has to be included in the permanent electrical installation. The device must only be connected with an electric installation carried out in compliance with the IEC standards. ... -
Page 12: Dmx Protocol
Note: After switching on, the device will automatically detect whether DMX512 data is received or not. If there is no data received at the DMX input, the display will flash. This situation can occur if: ● the XLR plug (cable with DMX signal from controller) is not connected with the input of the device. ● the controller is switched off or defective, if the cable or connector is defective or the signal wires are swapped in the input connector. Note: It’s necessary to insert the XLR termination plug (with 120 Ohm) in the last lighting in the link in order to ensure proper transmission on the DMX data link. DMX Protocol Name Function Pan Coarse 0-255 Pan Fine Pan Fine 0-255 Tilt Tilt Coarse 0-255 Tilt Fine Tilt Fine 0-255 Movement Speed Fast to Slow 0-255 Movement Function... - Page 13 Color 07 - Green/Yellow 21-23 Color 08 - Yellow 24-26 Color 09 - Yellow/Pink 27-29 Color 10 - Pink 30-32 Color 11 - Pink/Cyan 33-35 Color 12 - Cyan 36-38 Color 13 - Cyan/Orange 39-41 Color 14 - Orange 42-44 Color 15 - Orange/Magenta 45-47 Color 16 - Magenta...
- Page 14 240-25 Gobo Indexed: Open Gobo 1 6-11 Gobo 2 12-17 Gobo 3 18-23 Gobo 4 24-29 Gobo 5 30-35 Gobo 6 36-41 Gobo 7 42-47 Indexed w/ Blackout: Open 48-53 Gobo 1 54-59 Gobo 2 60-65 Gobo 3 66-71 Gobo 4 72-77 Gobo 5 78-83...
-
Page 15: Control Board
240-25 Prism & Prism Rotation No Function Prism Rotation Forward (Slow to Fast) 4-127 Prism Rotation Stop 128-13 Prism Rotation Reverse (Slow to Fast) 132-25 Focus Focus In to Focus Out 0-255 Control Normal Reset All 8-15 Reset Pan & Tilt 16-23 Reset Color 24-31... -
Page 16: Cleaning And Maintenance
unit off. (Activates after 5 minutes.) Adju CHXX=XXX Adjust Value of Each Channel Info DriT XXXC Driver Temperature Set Rest Rest Reset Move RPan ON/OFF Reverse Pan RTilt ON/OFF Reverse Tilt Degr 630/540 Choose Pan Degree Enco ON/OFF Encoder Wheel Mode Mod1/Mod2 Choose Pan/Tilt Mode UI Mic 0~99%, 60% Mic Sensitivity Sign Close/Hold/Auto/Music Signal Mode Fan Auto Speed/High Speed Fan Mode Hibe OFF, 01M~99M, 15M Hibernate Time Back 02~60M, 02M Backlight Time Flip ON/OFF Flip Display 180° ... -
Page 17: Replacing The Fuse
The objective lens will require weekly cleaning as fog/smoke machine fluid tends to build up residues, reducing the light output very quickly. The cooling fans should be cleaned monthly. The interior of the fixture should be cleaned at least annually using a vacuum cleaner or an air jet. There are no serviceable parts inside the device. Maintenance and service operations are only to be carried out by authorized dealers. Replacing the Fuse Only replace the fuse by a fuse of same type and rating. Procedure: Step 1: Remove the fuse holder on the rear panel. Step 2: Remove the old fuse from the fuse holder. Step 3: Install the new fuse in the fuse holder. Step 4: Replace the fuse holder in the housing. Should you need any spare parts, please use genuine parts. If the power supply cable of this device becomes damaged, it needs to be replaced with a special power supply cable available at your dealer. Should you have further questions, please contact your dealer. TECHNICAL SPECIFICATIONS Power Supply: 100240V AC, ~50/60 Hz Power Consumption: 160W DMX Control Channels: 11/14 ... - Page 18 Outside Diameter of Gobos 23mm Image Diameter of Gobos 18mm Maximum PAN Movement: 630° or 540° (Selectable) Maximum TILT movement: 265° Dimensions (LxWxH): 343 x 262 x 455 mm (13.5” x 10.3” x 17.9”) Weight: 10kg (30.9 lbs) Maximum ambient temperature T : 45°C 113°F Maximum housing temperature T (steady state): 60°C 140°F B Min.distance from flammable surfaces: 0.5 m Min.distance to lighted object: 0.3 m Fuse: T 2A, 250V Please note: All information is subject to change without prior notice. 05.13.2014 18 of 18...
Need help?
Do you have a question about the onyxpro 75 and is the answer not in the manual?
Questions and answers