Advertisement
Quick Links
Advertisement

Subscribe to Our Youtube Channel
Related Manuals for Wet Sounds REV 8


Summary of Contents for Wet Sounds REV 8
- Page 1 REV 8 and REV 10...
- Page 2 Please take a moment to read the instruction manual before starting your installation. This manual will explain the benefits of the technologies developed by Wet Sounds and will help you understand the correct installation methods and use of this product. If you have any questions or concerns please contact a certified Wet Sounds dealer.
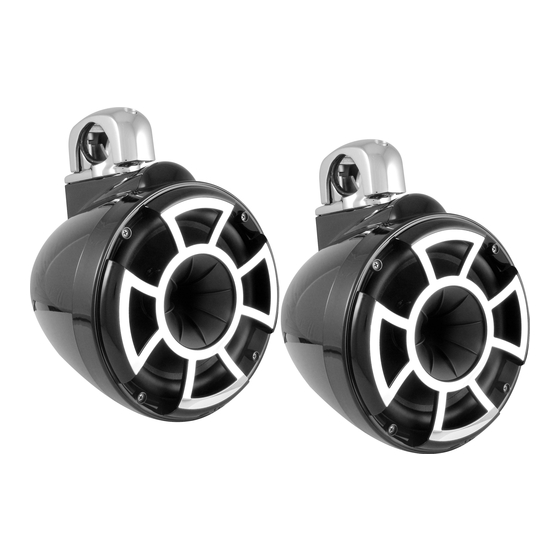
- Page 3 The driver compliment in each REV 8 combines one 8 inch Kevlar reinforced EFG™ driver and one concentrically mounted HLCD (Horn Loaded Compression Driver). The driver compliment in each REV 10 also combines one 10 inch Kevlar reinforced EFG™...
- Page 4 Installation: REV8 FC and REV 10 FC TC3-F Fixed Clamp Pipe Version Installation (pipe tower)
- Page 5 Step 1: Attach Male Connector (7) from clamp base to Female Connector (8) Step 2: Push connector into center hole of speaker as you place clamp base onto the speaker housing. Please make sure the grommet (9) is seated properly. Step 3: Attach two short Allen Bolts (4) through the clamp base and tighten into the housing.
- Page 6 Installation: REV8 SC and REV 10 SC “Patent Pending” TC3-S Swivel Clamp Version Installation Allen Bolts (long) Clamp Top Wire Jacket Clamp Bottom Female Speaker Plug Wire Sleeve Detachment Plate (cast towers) Speaker Plug Screws Allen Bolts for Plate Male Speaker Plug Allen Bolts (short) Bushing Detachment Fork...
- Page 7 Pipe Tower Mount Version using the TC3-S Step 1: Attach Male Connector (10) from clamp base to Female Connector (11) Step 2: Push connector into center hole of speaker as you place clamp base onto the speaker housing. Insert 4 bare wires down into this hole as well. These wires are only used if you are adding the LED speaker rings.
- Page 8 Step 7: Attach Clamp Top (2) to clamp bottom (3) using the two long Allen Bolts (1) Step 8: Make sure the clamp is tightened all the way so there is no movement Step 9: The swivel clamp allows you to rotate the speaker any direction you may want.
- Page 9 Step 5: The detachment plate (5) will be hard mounted to a cast tower. Butt connect speaker wires from detachment plate connector (4) to the speaker wires from the cast tower. Red is positive and Black is negative. Step 6: Push wires into center hole back into the tower and attach the detachment plate to the tower.
- Page 10 X Mount Version. Cast tower fixed mount version. Step 1: Remove 4 screws holding the grille and driver onto the housing. And remove the grille and speaker from the housing. Disconnect speaker wires from mid bass and compression driver. Remove acoustic dampening material. Step 2: Remove two small Phillips screws from the top of the housing next to the grommet (2) This will loosen the internal threaded plate.
- Page 11 (The holes on the plates should line up directly with the factory threaded insets. However we have seen some towers that are not threaded in the proper locations. If this is the case. Please contact Wet Sounds at 877-938-7757 for advice) Step 8: Insert the acoustic dampening material.
- Page 12 What Wet Sounds™, Inc. Will Do Wet Sounds, Inc will repair any part of your product that proves to be defective in materials or workmanship. In the event repair is not possible, Wet Sounds, Inc will replace the product in question.
- Page 13 Internet Warning Wet Sounds, Inc. products sold on any non authorized web site or internet auction site are void of any and all manufacturer's warranty. Please contact Wet Sounds™ at 877-938-7757 or visit our web site at www.wetsounds.com to search for an authorized site and/or an authorized retailer near you.
Need help?
Do you have a question about the REV 8 and is the answer not in the manual?
Questions and answers