
Related Manuals for IRC IKR1240DAB


Summary of Contents for IRC IKR1240DAB
- Page 1 D A B + , D A B , F M D i g i t a l R a d i o I n s t r u c t i o n M a n u a l I K R 1 2 4 0 D A B / H o n e y b e e / F r o z e n S t o n e...
-
Page 2: Safety Precautions
Safety Precautions To achieve the utmost in enjoyment and performance, and in order to become familiar with its features, please read this manual carefully before attempting to operate the unit. This will assure you years of faithful, trouble-free performance and listening pleasure. Important Notes •... -
Page 3: Safety Information
Safety Information Some Do’s And Don’ts For the Safe Use Of Equipment This equipment has been designed and manufactured to meet international safety standards but, like any electrical equipment, care must be taken if you are to obtain the best results and safety is to be assured. -
Page 4: Table Of Contents
Table of Contents Safety Precautions ____________________________________________________ 2 Table of Contents _____________________________________________________ 4 Package Content _____________________________________________________ 5 Overview (a) ______________________________________________________________ 6 Overview (b) ______________________________________________________________ 7 DAB+, DAB MODE _____________________________________________________ 8 How to Get Start? _________________________________________________________ 8 How to Update Station List? _________________________________________________ 8 How to Show Signal Strength? _______________________________________________ 9 DAB+/DAB Menu Tree ______________________________________________________ 9 FM MODE __________________________________________________________ 11... -
Page 5: Package Content
Package Content Main Unit Adapter Instruction Manual... -
Page 6: Overview (A)
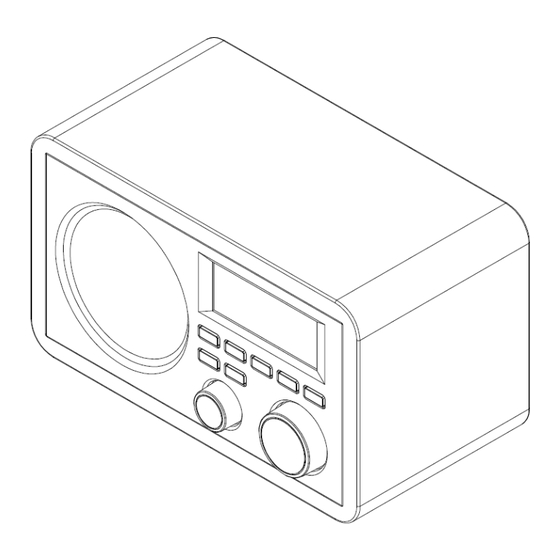
Overview (a) Control DAB +, DAB AUX IN mode STANDBY/ON Press to turn on/off Radio MENU Press to ‘system’ and other options INFO Press repeatedly to shift display queue information SCAN Press to scan stations No function Press and hold to store current playing station to PRESETS station presets No function... -
Page 7: Overview (B)
Overview (b) Unit Back View A 3.5mm Headphone Socket is provided for use with either Headphone headphones or an earpiece. socket: Inserting a plug automatically mutes the internal loudspeaker. AUX IN Uniquely designed for connection to external audio device socket: Power cord Uniquely designed for power cord Socket:... -
Page 8: Dab+, Dab Mode
DAB+, DAB MODE How to Get Start? Note: Place your radio on a suitable shelf or a flat table, and then connect the power adapter between your radio and the mains supply. 1. Extend the antenna found on the back of radio. Press STANDBY/ON to switch it on. 2. -
Page 9: How To Show Signal Strength
How to Show Signal Strength? While playing a DAB/DAB+ program, repeatedly press INFO until the LCD screen display shows a signal bar with the strength of the current station. The indicator on the signal bar shows the minimum acceptable signal level. ... - Page 10 How to Set DRC (Dynamic Range Control) value? You can set the level of the compression of stations to eliminate the differences in dynamic range or sound level between radio stations. Note: Set DRC to off indicates no compression, set DRC to low indicates little compression, set DRC to high shows maximum compression.
-
Page 11: Fm Mode
FM MODE How to Tune in FM Mode? 1. Power on radio and then press MODE repeatedly to < FM Mode >. 2. For initial use, it will start at the beginning of the FM frequency range (87.50MHz). Otherwise, the last listened FM station will be selected. 3. -
Page 12: How To Have Strong Stations Available Only
How to Have Strong Stations Available Only? By default, FM scans stop at any available station. This may result in a poor signal-to- noise ratio (hiss) from weak stations. To change the scan settings to stop only at stations with good signal strength, please follow 2 steps: 1. -
Page 13: General Operation
General Operation How to Set Station Presets? Your radio can store 10 DAB/DAB+ and 10 FM station presets. To store the current station (DAB or FM mode use only): 1. Press and hold PRESETS button. 2. Turn the SELECT knob to cycle through preset stations 1-10. 3. -
Page 14: Aux In Mode
AUX IN MODE How to turn in AUX IN Mode? 1. Switch Radio on and press MODE repeatedly until < Auxiliary Input Mode > appears. 2. Now, your radio is ready to be transformed into a high quality digital audio speaker system. -
Page 15: System Setup
System Setup How to Enter System Setup? 1. Press MENU, turn the SELECT knob to < System >, and then press this knob to confirm. 2. Turn the SELECT knob to cycle through options: ‘Sleep’, ‘Alarm’, ‘Time’, ‘Equaliser’, ‘Backlight’, Language’, ‘Factory Reset’, ‘SW version’. ... -
Page 16: How To Set Time
How to Set Time? It can be activated from < System > < Time >. Press the SELECT knob to confirm. Note: here, turn the SELECT knob, a range of time settings are available, which include the functionality to set: ... - Page 17 3. Turn the SELECT knob to ‘Alarm On’, press this knob to confirm. 4. Turn the SELECT knob to change hours and then press this knob to confirm, using the same method to set minutes. 5. Press the SELECT knob to confirm and then turn this knob to select the duration time: 15, 30, 45, 60 and 90 minutes.
-
Page 18: How To Set Equaliser
• Activate SNOOZE Press the SELECT knob to postpone it 5 minutes. The snooze icon will appear. Note: a. Alarm will sound again after the snooze time has elapsed. Want to continue enjoying your program? Press STANDBY/ON again. • Cancel Alarm Press ALARM to enter alarm1 setting mode, or press ALARM once more to select alarm Press the SELECT knob to confirm, then ‘Alarm On’... -
Page 19: How To Set Backlight
How to Set Backlight? Note: Here, High backlight level can get you pretty easy to view the station information. Low backlight level can let you feel comfortable while you do not want the light bothering you. ∗ Setting Backlight for Power on Condition: 1. -
Page 20: How To Factory Reset
How to Factory Reset? Note: Sometimes, you might want delete all the settings your radio currently has, to have your radio return to its factory default setting mode, do following steps, it’s pretty easy! It can be activated from < System > < Factory Reset >, press the SELECT knob to confirm. -
Page 21: Specifications
Specifications ITEMS DESCRIPTION Specifications: DAB+, DAB and FM Digital Radio Audio Output: 5Wrms FM: 87.5-108MHz Frequency Ranges: DAB: 174 – 240MHz LCD Display: High resolution display AC Power Input: 100-240VAC, 50-60Hz Power Supply: (please use our provided adapter) Dimension: 212mm x 123mm x 111mm This symbol on the product or in the instructions means that your electrical and electronic equipment should be disposed of at the end of its life separately from your household waste.
Need help?
Do you have a question about the IKR1240DAB and is the answer not in the manual?
Questions and answers