
Related Manuals for MACROZA Diamant D2


Summary of Contents for MACROZA Diamant D2
-
Page 1: Instruction Manual
INSTRUCTION MANUAL For your personal safety, READ and UNDERSTAND before using. SAVE THESE INSTRUCTIONS FOR FUTURE REFERENCE. -
Page 2: Specifications
SPECIFICATIONS Voltage 115V / 60Hz, 230V /50Hz No load speed 4100/min Power input 1800W Max cutting depth 15~54mm Max blade diameter 180mm (7 in.) Net weight 7.7 kg (17 lbs.) Groove width 5~47mm GENERAL SAFETY RULES WARNING! Read and understand all instructions. Failure to follow all instructions listed below, may result in electric shock, fire and / or serious personal injury. -
Page 3: Personal Safety
Avoid body contact with grounded surfaces such as pipes, radiators, ranges and refrigerators. There is an increased risk of electric shock if your body is grounded. Don’t expose power tools to rain or wet conditions. Water entering a power tool will increase the risk of electric shock. - Page 4 Tool use and care Use clamps or other practical way to secure and support the work piece to a sta- ble platform. Holding the work by hand or against your body is unstable and may lead to loss of control. Do not force tool.
-
Page 5: Symbols Used In This Manual
Symbols used in this manual V……..volts A……..amperes Hz……hertz W……..watt ~………alternating current n0………no load speed /min……..revolutions or reciprocation per minute ………….class II tool SPECIFIC SAFETY RULES Keep hands away from cutting area and blade at all times! Keep your second hand on an auxiliary handle. If both hands are holding the saw, they cannot be cut by the blade. - Page 6 Never start the tool with the workpiece against the blade. Allow the motor to achieve full speed before cutting. Important: After completing the cut, release power switch and wait for coasting blade to stop completely before putting the saw down Never operate the tool in an area with flammable solids, liquids, or gases.
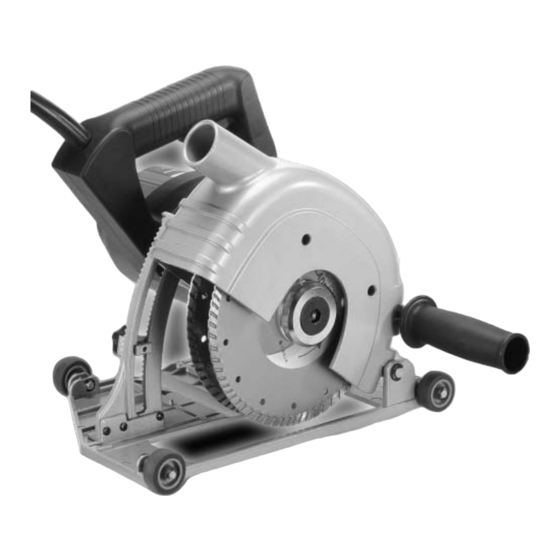
- Page 7 FUNCTIONAL DESCRIPTION Main handle (52,53) Arbor lock lever (36) Outer safety cover (13) Vacuum port Arbor (7) Side handle (15) Blades available as option On/Off trigger switch (59) Secondary handle (51) Adjustable cutting depth stop (16,17) Fig.1...
-
Page 8: Electrical Connection
Electrical connection The network voltage must conform to the voltage indicated on the tool name plate. Under no circumstances should the tool be used when the power supply cable is damaged. A damaged cable must be replaced immediately by an authorized Customer Service Center. Do not try to repair the damaged cable yourself. - Page 9 CARTON CONTENTS 1. Wall Chaser Machine 2. 10mm Hex Allen Wrench DO NOT OPERATE THIS TOOL UNTIL YOU READ AND UNDERSTAND THE ENTIRE INSTRUCTION MANUAL. INSTALLING THE DIAMOND BLADE AND ADJUSTING THE GROOVE WIDTH -ENSURE THAT TOOL IS DISCONNECTED FROM POWER SOURCE. To install the blade: Remove any accumulated debris in the guards and around the...
- Page 10 TO ADJUST DEPTH OF CUT- DISCONNECT TOOL FROM POWER SOURCE. Depth stop track(21) Adjust the depth of cut as desired. The machine swivels against a spring and the depth stop limits its lowermost travel. Depth scale To adjust the depth of cut: Loosen the depth lock knob (16) enough for the Depth stop block(17) teeth of the depth stop block (17) to clear the...
- Page 11 To switch on: This machine is equipped with a "LOCK-OFF" switch. To press the switch, you must first press the lock button located at the top of the switch. Then the trigger switch will be free to be pressed to start the machine. To switch off: Release the trigger switch to stop the machine.
-
Page 12: Maintenance
NOTE: Only operate the machine forwards relative to itself and never backwards. If you cut backwards there is the danger that the machine might be accelerated out of the cut- ting groove (recoil) and cause serious injury. Therefore, when making vertical chases from top to bottom, the machine must be carefully held from the front. - Page 13 WIRING...
-
Page 14: Exploded View
EXPLODED VIEW Fig.10... -
Page 15: Parts List
PARTS LIST Item No. Parts Name Q'TY Item No. Parts Name Q'TY ARBOR BOLT M16x30 BEARING 608 ZZ OUTER BLADE WASHER GEAR CASE 5mm SPACER 49.6x22.4x5 BEARING 6201 2RS 10mm SPACER 49.6x22.4x10 SPINDLE LOCK 12mm SPACER 49.6x22.4x12 FAN SHROUD 15mm SPACER 49.6x22.4x15 ARMATURE SPINDLE SCM440...
Need help?
Do you have a question about the Diamant D2 and is the answer not in the manual?
Questions and answers