
Related Manuals for Bremshey Sport RN5


Summary of Contents for Bremshey Sport RN5
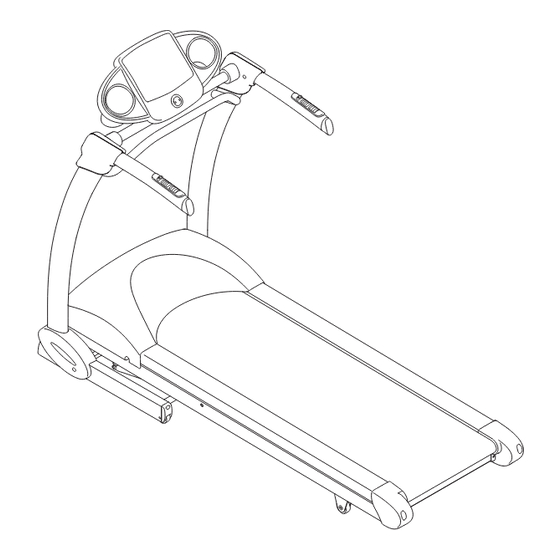
- Page 1 english deutsch nederlands français español italiano svensk suomi...
- Page 2 Illustrations...
- Page 4 17 (2x) 18 (4x) 19 (2x) M8*70 M8*45 M10*60 20 (6x) 21 (2x) 22 (4x) M4*10 ø4*13...
- Page 5 100 CM 100 CM 100 CM 200 CM...
- Page 10 P1. SPEED P2. SPEED P3. SPEED P4. SPEED P5. SPEED P6. INCLINE P7. INCLINE P8. INCLINE P9. INCLINE P10. INCLINE P11. INCLINE P12. INCLINE...
-
Page 12: Safety Warnings
Content TREADMILL Welcome to the world of Bremshey Sport! Thank you for purchasing this piece of Bremshey equipment. Bremshey offers a wide range of home fitness equipment, including crosstrainers, treadmills, exercise bikes, rowers and vibration plates. The Bremshey equipment is suitable for the entire family, no matter what fitness level. -
Page 13: Electrical Safety (Only Applicable For Equipment With Electric Power)
▪ Do not use or store the equipment in humid surroundings. The air humidity must never be more than 80%. ▪ Only use the equipment for its intended purpose. Do not use the equipment for other purposes than described in the manual. ▪... -
Page 14: Package Contents (Fig. B & C)
▪ Do not run the mains cable underneath the equipment. Do not run the mains cable underneath a carpet. Do not place any objects on the mains cable. ▪ Make sure that the mains cable does not hang over the edge of a table. Make sure that the mains cable cannot be caught accidentally or tripped over. -
Page 15: Fasteners (Fig. C)
Fasteners (fig. C) Allen bolt (M8*70) Screw (M4*10) Allen bolt (M8*45) Nut (M10) Allen bolt (M10*60) Screw (ø4*13) Assembly (fig. D) WARNING – Assemble the equipment in the given order. – Carry and move the equipment with at least two persons. CAUTION –... -
Page 16: Pulse Rate Measurement (Hand Pulse Sensors)
to excessive strain. As the fitness level improves, speed and resistance can be increased gradually. The efficiency of your exercise can be measured by monitoring your heart rate and your pulse rate. Hold the side handlebars when stepping on the equipment. Before use, stand on the landing rails to the left and right of the running belt. - Page 17 CAUTION – If there are several heart rate measurement devices next to each other, make sure that the distance between them is at least 1.5 metres. – If there is only one heart rate receiver and several heart rate transmitters, make sure that only one person with a transmitter is within transmission range.
-
Page 18: Maximum Heart Rate (During Training)
Maximum heart rate (during training) The maximum heart rate is the highest heart rate a person can safely achieve through exercise stress. The following formula is used to calculate the average maximum heart rate: 220 - AGE. The maximum heart rate varies from person to person. -
Page 19: Safety Key (Fig. F)
To start the equipment: Insert the mains plug into the equipment. Insert the mains plug into the wall socket. Set the master power switch to the on position. To stop the equipment: Set the mains power switch to the off position. Remove the mains plug from the wall socket. - Page 20 Turn the support feet as required to put the equipment in a stable position. Tighten the locknuts to lock the support feet. Console (fig. J) 33 32 Time Pulse Dist Scan Time Pulse Dist Scan Incline Speed START ENTER MODE STOP Main display Pulse indicator...
- Page 21 CAUTION – Keep the console away from direct sunlight. – Dry the surface of the console when it is covered with drops of sweat. – Do not lean on the console. – Only touch the display with the tip of your finger. Make sure that your nails or sharp objects do not touch the display.
- Page 22 Explanation of displays Display Explanation Main display The display shows the selected program. The display also shows messages in specific modes. Mode display The display shows the value for a specific item: time, distance, calories, pulse, laps and scan (items one after another).
-
Page 23: Program Menu
Press the +/- buttons to set the time (12 - 99 minutes). Press the ENTER button to confirm. Press the START/STOP button to start the program. Press the START/STOP button again to stop the program. Program mode Switch on the equipment. Press the MODE button to select one of the preset programs. -
Page 24: During A Workout
Press the SPEED +/- button to set the speed. Press the INCLINE +/- button to set the incline. Press the ENTER button to confirm. Repeat the above action to configure the other steps. Press the START/STOP button to start the program. Heart rate control programs (H01) The equipment has 1 heart rate control program. -
Page 25: Resetting The Equipment
Adjusting the incline The incline (0% - 12%) can be adjusted with the INCLINE +/- buttons on the side handlebars or on the console. The incline can also be adjusted with the INCLINE quick buttons. The incline is shown in the incline display. INCLINE +/- buttons Press the INCLINE +/- buttons to increase or decrease the incline by 1% at a time. -
Page 26: Cleaning And Maintenance
Cleaning and maintenance WARNING – Before cleaning and maintenance, remove the mains plug from the wall socket. – Do not use solvents to clean the equipment. ▪ Do not block the ventilation openings. Keep the ventilation openings clear from dust, dirt and other obstructions. ▪... -
Page 27: Aligning The Running Belt (Fig. I)
– If you feel lubrication or your fingertips are shiny, there is sufficient lubrication on the running belt. – If you do not feel lubrication or your fingertips are dusty or rough, apply lubricant (15-20 ml) in the middle of the running deck under the running belt and let the equipment operate at 5km/h for at least 5 minutes. -
Page 28: Defects And Malfunctions
CAUTION – Make sure that the running belt is aligned correctly to prevent damage to the edges of the running belt. Set the mains power switch to the on position. Set the speed to 5 km/h. Turn both adjustment bolts 1/4 turn clockwise an equal amount of times. Slow down the running belt by holding onto the side handlebars and braking as you walk. -
Page 29: Transport And Storage (Fig. E)
Transport and storage (fig. E) WARNING – Before cleaning and maintenance, remove the mains plug from the wall socket. – Carry and move the equipment with at least two persons. – Make sure that there are no other persons or objects under the equipment. -
Page 30: Technical Data
Technical data Parameter Unit of Value measurement Mains voltage Mains voltage (North America) Mains frequency Motor 2.75 Speed km/h 0.8 - 20 0.5 - 12 Incline 0 - 12 Length (folded) 198 (105) inch 78 (42) Width 84.5 inch Height (folded) 132 (172) inch 52 (68) -
Page 31: Declaration Of The Manufacturer
Declaration of the manufacturer Accell Fitness Division BV declares that the product is in conformity with the following standards and directives: EN 957 (HB), 73/23/EEC, 89/336/EEC. The product therefore carries the CE label. 04-2011 Accell Fitness Division BV Purmerweg 1 1311 XE Almere The Netherlands Disclaimer...
Need help?
Do you have a question about the RN5 and is the answer not in the manual?
Questions and answers