
Related Manuals for ImmersionRC Vortex

Summary of Contents for ImmersionRC Vortex
- Page 1 Instruction manual International edition Rev 1.0 - May 2015 (Preliminary) ‘Living Manual’...
-
Page 2: Table Of Contents
Table of Contents Table of Contents Living Manual Thank You! Getting Started, ARF Version The Anatomy of a Vortex Connectors and Switches Folding Arm Assembly Camera Mounting Plate Flight Camera HD Camera (GoPro/Mobius) The On Screen Display (OSD) The Welcome Screen... - Page 3 ITU Region 2: Americas, Greenland, eastern Pacific Islands ITU Region 1: Europe, Africa, Middle East, Iraq, Soviet Union ITU Region 1: Europe, Africa, Middle East, Iraq, Soviet Union Troubleshooting / Known Issues Looking after your Vortex Snow and Water The Sun Dirt...
-
Page 4: Living Manual
Thank You! The team that designed the Vortex would like to thank you for purchasing this product. Many hours of development, and testing time went into the Vortex, we truly hope that this is reflected in your experience with the product. - Page 5 WARNING To use dogs as a good analogy, if the DJI Phantom™ is a white fluffy P oodle , the Vortex is a Pitt Bull , bred for fighting, and ready to bite you at any minute :-) This is a race quad. It does not come with GPS hold (infact, it has no GPS at all), and it does require a fair amount of skill to pilot it.
-
Page 6: Getting Started, Arf Version
Getting Started, ARF Version The separate G etting Started guide should be used when setting up your Vortex for the first time. It includes sections on choosing an appropriate battery, and R/C receiver, and also the operation of the setup wizard. -
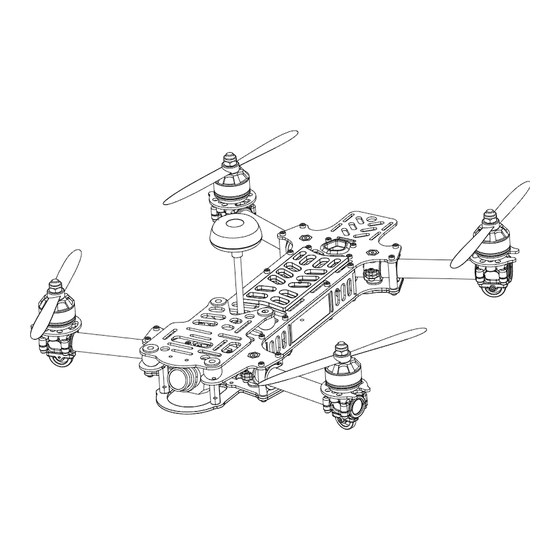
Page 7: The Anatomy Of A Vortex
1) USB connector , used to configure the flight controller and upgrade the Vortex firmware. Note that to use the USB connector, a battery must be connected also. The Vortex cannot be powered through the USB connector. Please be careful not to put too much strain on this connector. It is a lightweight surface-mount part, and if the quad is dragged around by the USB cord it may not survive. - Page 8 Be sure to reinstall the spring when re-assembling the Vortex, to avoid the Tx module from damage in a crash.
- Page 9 5) Flight Camera Video/Power Connector The flight camera video and power connector is a 3-pin Picoblade connector located behind the left side plate. Accessing the connector is easiest by just removing the side plate, without the need to remove the top plate. The connector has the following pinout, starting from the front of the quad: 1.
- Page 10 8) XT-60 Battery Connector The pre-installed XT-60 connector is compatible with most batteries of the size and capacity in the class required by the Vortex. Note: Pay EXTREME attention to the polarity of batteries connected to this connector, especially those soldered ‘DIY’. A reverse-polarity connection, even for a fraction of a second will let out the ‘magic smoke’...
- Page 11 Also Note: When unplugging the battery, especially one with a new, and rather tight connector, take care to hold the cables, and avoid unnecessary strain on the Vortex PDB. Pulling these cables too hard may pull the traces off of the PCB.
-
Page 12: Folding Arm Assembly
The folding arm assembly consists of both injected plastic, and Carbon Fiber parts. The tiny EzESC is located inside the tube. The pivot point is a critical structural element of the Vortex arm. These plastic parts are clamped, and keyed, onto the carbon fiber tube. In a serious crash, this pivot point acts as a ‘fuse’, and should be checked... -
Page 13: Camera Mounting Plate
The Vortex frame was designed for the family of FatShark cameras with lightweight plastic cases, from the 600, and 700 TVL CMOS cameras, through to the 900 line CCD. The Vortex is shipped with the 600 line CMOS installed (certain quads may be shipped with the slightly improved 700 line version). -
Page 14: Hd Camera (Gopro/Mobius)
Two optional kits are available from ImmersionRC resellers which achieve this, the G oPro Recliner (P/N: V XUPGGP ) and the M obius Incliner (P/N: V XUPGMOB ) . -
Page 15: The On Screen Display (Osd)
The On Screen Display (OSD) The Welcome Screen Each time the Vortex is powered up, and before sticks are moved, the following welcome screen is displayed. This shows various pieces of status information, including the Flight Controller version number, and Flight Controller API version which is fairly important for OSD compatibility. -
Page 16: The Main Menu
The Main Menu For Mode 2’ers, holding the throttle stick down and to the left will enter the main menu. Note that this stick position needs to be held for a few seconds before the menu appears. To navigate the menu, use the pitch/roll stick. The OSD Setup Menu Various OSD setup parameters are available in this menu. - Page 17 Alarms may be enabled and disabled in the A larms Setup menu. It is highly recommended to start flying with all alarms enabled, and disable them if required after getting used to the quad.
-
Page 18: The Led Setup Menu
The LED Setup Menu The RGB LEDs on the rear of the Vortex are fully programmable, with colors, and various patterns. For Parameter Mode = I ntensity , the intensity of the LEDs will reflect the current throttle position. -
Page 19: The Flight Controller Menus
The Flight Controller Menus In-field tweaking of flight-controller menus is possible without a laptop and USB cable. All of the critical parameters, PIDs, Expos, Loop time, etc. are available. Note that the PID Setup menu is a two page menu, keep moving the caret down to access the second page. - Page 21 Note that all of the Flight Controller parameters can be preset by loading one of the installed Pro-Tunes...
-
Page 22: The Video Tx Menu
Note the need for RaceBand in this hobby is immediately obvious after looking at this graph! NOTE: Channel 8 of the IRC/FS set cannot be received by 7 channel ImmersionRC or FatShark receivers. Unlocked Uno/Duo5800 receivers can receive it, as can the new FatShark 4-band RaceBand Dominator module. -
Page 23: Flight Controller
Flight Controller R/C Transmitter Control Modes Mode 1 - C ommon in Europe Pitch Throttle Roll Mode 2 - Common in the USA Throttle Pitch Roll Mode 3 Pitch Throttle Roll Mode 4 Throttle Pitch Roll... -
Page 24: Flight Modes
Flight Modes Three flight modes are configured by the Vortex Wizard, and are mapped by default to channel 5 of the R/C Tx. These modes are as follows: Acro This mode is the preferred mode for the more advanced mini-quad pilot. -
Page 25: Cleanflight / Baseflight / Multiwii / Open-Source
Vortex. The variant of the open source flight controller firmware that we chose to power the Vortex is Cleanflight, mainly due to it’s solid support of the OneShot ESC control protocol. -
Page 26: Flight Controller Stick Commands
Flight Controller Stick Commands Enter Menu/Disarm Flight Controller: Mode 2: Throttle stick left, and down (normal flight controller disarm control) Mode 1: Yaw left, Throttle stick down Arm Flight Controller: Mode 2: Throttle stick right, and down Mode 1: Yaw right, Throttle stick down Reset vTx Channel: Mode 2: Throttle Down, Rudder Left... -
Page 27: Overview
ESCs - The 12/16A Vortex ESC Overview The ESCs used in the Vortex are a full-custom design, which uses a potent 32-bit ARM processor. Their diminutive 9.4mm width allows them to be inserted into the carbon fiber arms of the Vortex, where they are fairly well protected against the elements, and from physical damage from passing tree-branches. - Page 28 (PIDs) of the flight controller, using various ‘PID Controllers’ supported by the Cleanflight firmware Each pilot fed back this data to the ImmersionRC team, and we incorporated it into the OSD firmware. Now, as a user, you can choose your favourite pilot, choice of props, battery, flight style, etc.
- Page 29 So what if racers were rewarded for being in the same Altitude ‘plane’.. and penalized for flying too high? A quick coding session in the Vortex OSD and we had our answer… we had synthesized pure adrenaline, directly injected into a quad racer’s veins, with no contact required. The entire dynamics of the race had changed.
- Page 30 Arming the quad will automatically remove the ‘Get Ready’ prompt, and switch to the gaming landscape: The bar at the top is a very rough idea of where you are in the multi-lap race (NOTE: There is no GPS on the Quad, so this is purely time based, but in testing showed to be useful to know roughly how many laps each pilot had completed).
- Page 31 Let us know what you think, and we’ll continue to develop this feature in future firmware updates. feedback@immersionrc.com Idea: for a bit of fun, challenge your fellow internauts to a ‘remote race’. Drop two flags in a flat field a fixed distance apart, and record your best lap time, and score.
- Page 32 Race Guidelines - Flying with Friends The current generation of FPV Analog video link brings many advantages. Low-cost, and zero latency being two of the most significant. They do however suffer from less than ideal ‘selectivity’, even when using large channel spacing as is the case with RaceBand.
- Page 33 4) Press the button on the Fusion board during 3 seconds (through a hole in the top Carbon Fiber plate) 5) Attach the Vortex to a Windows PC (or a system running parallels, or similar) to the Vortex using a standard Micro-USB cable.
- Page 34 3) Follow the standard upgrade instructions for Cleanflight. NOTE: Upgrading Cleanflight to a version not supported by the OSD firmware can easily result in the OSD not functioning. Please refer to the Vortex product page on the ImmersionRC website for compatibility information.
- Page 35 UPSTAT on PPM slot 10 Note: To ease programmation of UPSTAT on a receiver equipped with v1.51 of firmware, a new version of the ImmersionRC tools is required, v1.41. This is now available from our website. Simply click the ‘Configure for XuGong v2/Pro’ to setup your EzUHF receiver.
- Page 36 On startup the wizard will reset Cleanflight configuration to its default state. Once completed the following features, configurations and mode will be injected in Cleanflight so you can start to enjoy your Vortex straight off the box with zero additional configuration needed:...
- Page 37 ITU Region 2: Americas, Greenland, eastern Pacific Islands Assuming that the user has a Ham license, the 5650 - 5925 MHz band may be used. Note that all 8 channels of ImmersionRC’s RaceBand are legal in in this region, with a Ham license.
- Page 38 ITU Region 1: Europe, Africa, Middle East, Iraq, Soviet Union Without a license, only the 25mW Tx module may be used, and then only in the ISM band from 5725 MHz thru 5875 MHz. 5740 5760 5780 5800 5820 5840 5860 5880 IRC/FS...
- Page 39 Another common reason is PID tuning related, try one of the Pro-Tunes. Q. My Vortex flips instead of taking off A. Check that the correct props (CW vs. CCW) are installed in the correct locations.
- Page 40 , which does offer some protection from water, it is not recommended to get the Vortex wet, even if that water comes in the form of snow. If your Vortex does get wet, immediately remove power, and place it in a sealed container containing uncooked rice, for 24 hours.
- Page 41 Socketed, Custom NexWaveRF 5.8GHz module Channels 40 Initially, programmed via OSD Bands 5, including the ImmersionRC/FatShark bands, and RaceBand Frequency, IRC/FS 5740, 5760, 5780, 5800, 5820, 5840, 5860, 5880 MHz Frequency, RaceBand, 5658, 5695, 5732, 5769, 5806, 5843, 5880, 5917 MHz CH1..8...
- Page 42 Maximum Range Highly dependent on battery, and flying style Maximum Speed Blackbox Support Compatibility Supported via the GPS port on the Vortex PDB, Instructions to follow Camera Support Onboard GoPro Supply +5v at 1A Video Standard Composite, PAL or NTSC, switchable using a camera-mounted jumper...
- Page 43 Spare parts and Upgrades Several crash kits, and upgrades, are available for the Vortex, including the following: Part Numbers VX4CK1 Crash Kit #1, Plastic Parts VX4CK2 Crash Kit #2, Carbon Parts VX4CK3 Crash Kit #3, Arm/ESC/Motor assembly VXGF5030RL Gemfan 5030 Props, 4x CW, 4 x CCW...
- Page 44 Directions on safety ImmersionRC advocates the safe use of their products, always make sure you equipment is in proper working order, is checked prior to every flight and that your are familiar with and respect the equipment's capabilities and limitations.
- Page 45 We would like thank you for purchasing this ImmersionRC product. Like ImmersionRC’s Facebook page and be kept up-to-date with news, product releases, firmware updates, tips and tricks, and other information relevant to the FPV hobbyist. http://www.facebook.com/ImmersionRC You can also follow us on Google Plus google.com/+immersionrc...
Need help?
Do you have a question about the Vortex and is the answer not in the manual?
Questions and answers