
Related Manuals for ImmersionRC vortex 250 pro


Summary of Contents for ImmersionRC vortex 250 pro
- Page 1 250 Pro Instruction manual International edition Rev 1.0 - April 2016 ‘Living Manual’...
- Page 2 Table of Contents Table of Contents Living Manual Thank You! Getting Started, ARF Version The Anatomy of a Vortex Connectors and Switches Connector Part Numbers and Sources Arm Assembly Camera Mounting Plate Flight Camera GoPro Camera Mount Lost Model Alarm The On Screen Display (OSD) The Welcome Screen The Main Menu...
- Page 3 Flight Controller Stick Commands Overview RotorSENSE Pro-Tuning R/C (Uplink) Receiver Selection CPPM SBus, or Spektrum Notes on Receiver Selection Receiver Auto-Detection Version 1: OSD Firmware prior to ???.??? Spektrum ™ Radios FrSky Taranis Radio Futaba S-Bus Radios Version 2: OSD Firmware from ???.??? onwards Gaming (Beta) The Birth of a Gaming Mode - The History How Does It Work?
- Page 4 Appendix A: EzUHF Configuration Appendix B: The Wizard - What else does it setup? Appendix C: Video Tx - Staying Legal ITU Region 2: Americas, Greenland, eastern Pacific Islands ITU Region 1: Europe, Africa, Middle East, Iraq, Soviet Union ITU Region 1: Europe, Africa, Middle East, Iraq, Soviet Union Appendix D: LED Board - Status report Looking after your Vortex Snow and Water...
- Page 5 Q. My vortex beeps continuously Q. My vortex is playing Crazy Train song Q. My vortex emits 2 long beeps followed by a short beep on startup (--·) Q. When I fly, all I see is the ground Q. My Vortex flips instead of taking off Q.
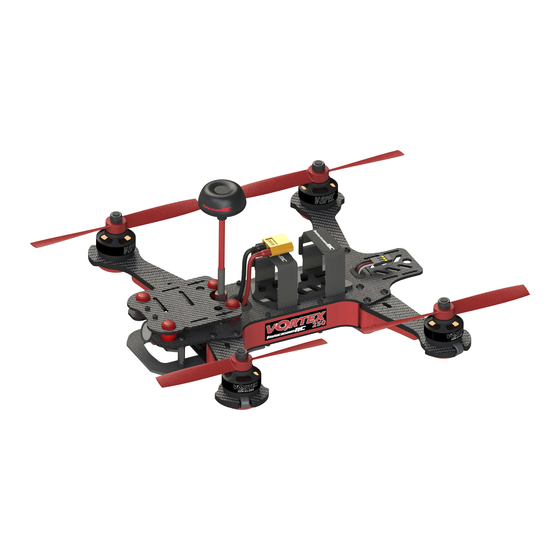
- Page 6 The Vortex 285 was a tough lead to follow, but we believe that the Vortex 250 Pro raises the bar in just about every axis, which hopefully will enable even more pilots to enter the exciting world of FPV racing.
- Page 7 When setting up mini-quads, there is always a remote chance that a configuration change can spin up motors unexpectedly. ImmersionRC accepts no responsibility, or liability, for any injury, or damage, to persons or property, caused by the use of the Vortex.
- Page 8 The separate G etting Started guide should be used when setting up your Vortex 250 Pro for the first time. It includes sections on choosing an appropriate battery, and R/C receiver, and also the operation of the setup wizard.
- Page 9 The Anatomy of a Vortex Connectors and Switches 1) USB connector , used to configure the flight controller and upgrade the Vortex firmware. Note that to use the USB connector, a battery must be connected also. The Vortex cannot be powered through the USB connector. Please be careful not to put too much strain on this connector.
- Page 10 Note: To bind a Spektrum Rx using the rear button, the vortex must be placed in SPEKTRUM 1024/2048 mode, and not AUTO mode, using the Vortex Configurator on a PC or Mac. 3) Fusion FC/OSD button , used to enter firmware update mode in the case of a ‘bricked’ OSD.
- Page 11 ejected from the side of the quad, into awaiting fingers … Be sure to reinstall the spring when re-assembling the Vortex, to avoid the Tx module from damage in a crash. 5) Flight Camera Video/Power Connector The flight camera video and power connector is a 3-pin Picoblade connector located behind the flight camera.
- Page 12 The connector has the following pinout, starting from the front of the quad: 1. +5V ~1A Maximum Current 2. Gnd NOTE: Certain GoPro models will not power up without a battery installed, a little research may be required to identify which ones . 7) Receiver PPM Connector (CPPM Only) When using a classic PPM (a.k.a.
- Page 13 8) Receiver Serial Connector When using receivers which emit a serial protocol (most of the receivers used in Drone Racing today), an alternative connector, located on the top of the Fusion Gen2 PCB is used. This connector contains both a +5V, and a +3.3V supply, to support most of the receivers on the market today.
- Page 14 PDB. Pulling these cables too hard may pull the traces off of the PCB. Connector Part Numbers and Sources If any of the connectors on the Vortex 250 Pro are damaged, or if 3rd party components are to be integrated into the system, the following list of connectors and pre-crimped wires should be useful.
- Page 15 Arm Assembly When changing the arm, a soldering iron is required, to remove the ESC + and - battery cables. Note: The choice of soldered connections here, instead of the much more convenient connector option may not seem ideal. Various connectors were tried, but one compact enough, robust enough, and capable of carrying >...
- Page 16 Camera Mounting Plate Flight Camera The Vortex flight camera is suspended from a dampened carbon fiber plate. This reduces the amount of Jello due to unbalanced (or slightly damaged) props. The camera mount itself allows a tilt of up to ~45 degrees, compensating for frame tilt due to high speed racing.
- Page 17 4) Re-install the anti-vibe plate, the pins, and the clips that restrain them. Lost Model Alarm The Lost Model Alarm on the Vortex 250 Pro sounds when the quad is disarmed after landing, or if a receiver failsafe occurs. The alarm is designed to be as simple as possible, without controls which could allow it to be accidentally disabled, resulting in a lost quad.
- Page 19 The On Screen Display (OSD) The Welcome Screen Each time the Vortex is powered up, and before sticks are moved, the following welcome screen is displayed. This shows various pieces of status information, including the Flight Controller version number, and Flight Controller API version which is fairly important for OSD compatibility. Moving the pitch/roll stick (right stick for mode 2’ers) will dismiss the menu.
- Page 20 The Main Menu For Mode 2’ers, holding the throttle stick down and to the left will enter the main menu. Note that this stick position needs to be held for a few seconds before the menu appears. To navigate the menu, use the pitch/roll stick.
- Page 21 The OSD Setup Menu Various OSD setup parameters are available in this menu. The L andscape , defines the elements that are shown on the main screen in flight, including an EzOSD-type landscape (the default), a clutter-free landscape for hardcore racers, and a gaming mode which is currently in Beta form (documented later in this manual).
- Page 22 Alarms may be enabled and disabled in the A larms Setup menu. It is highly recommended to start flying with all alarms enabled, and disable them if required after getting used to the quad.
- Page 23 The LED Setup Menu The RGB LEDs on the rear of the Vortex are fully programmable, with colors, and various patterns. For Parameter Mode = I ntensity , the intensity of the LEDs will reflect the current throttle position.
- Page 24 The Flight Controller Menus In-field tweaking of flight-controller menus is possible without a laptop and USB cable. All of the critical parameters, PIDs, Expos, Loop time, etc. are available. Note that the PID Setup menu is a two page menu, keep moving the caret down to access the second page.
- Page 26 Note that all of the Flight Controller parameters can be preset by loading one of the installed Pro-Tunes ...
- Page 27 Note the need for RaceBand in this hobby is immediately obvious after looking at this graph! NOTE: Channel 8 of the IRC/FS set cannot be received by 7 channel ImmersionRC or FatShark receivers. Unlocked Uno/Duo5800 receivers can receive it, as can the new FatShark 4-band RaceBand Dominator module.
- Page 28 Flight Controller R/C Transmitter Control Modes Mode 1 - C ommon in Europe Pitch Throttle Roll Mode 2 - Common in the USA Throttle Pitch Roll Mode 3 Pitch Throttle Roll Mode 4 Throttle Pitch Roll...
-
Page 29: Flight Modes
Flight Modes Three flight modes are configured by the Vortex Wizard, and are mapped by default to channel 5 of the R/C Tx. These modes are as follows: Acro This mode is the preferred mode for the more advanced mini-quad pilot. In many ways it is the simplest mode, but also the hardest mode to learn. - Page 30 Since the OSD firmware needs an intimate knowledge of the flight controller API, care must be taken when installing updated Betaflight builds ( IRCFUSIONF3) . The ImmersionRC team may not have support for Beta, and recently released Cleanflight builds the day they are released, but we are committed to keep up with changes.
- Page 31 Flight Controller Stick Commands Enter Menu/Disarm Flight Controller: Mode 2: Throttle stick left, and down (normal flight controller disarm control) Mode 1: Yaw left, Throttle stick down Arm Flight Controller: Mode 2: Throttle stick right, and down Mode 1: Yaw right, Throttle stick down Reset vTx Channel: Mode 2: Throttle Down, Rudder Left...
- Page 32 IMPORTANT: ImmersionRC ESCs D O NOT REQUIRE CALIBRATION . The calibration process required by most ‘budget’ ESCs is required since a precise quartz oscillator is not used in the ESC. The ImmersionRC ESCs all include this critical component, and therefore never need calibration.
- Page 33 (PIDs) of the flight controller, using various ‘PID Controllers’ supported by the Cleanflight firmware Each pilot fed back this data to the ImmersionRC team, and we incorporated it into the OSD firmware. Now, as a user, you can choose your favourite pilot, choice of props, battery, flight style, etc.
- Page 34 CPPM sends all PPM channels down a single cable, and eliminates the mass of wiring that most mini-quads have to contend with. Note that the Vortex 250 Pro is n ot compatible with standard R/C receivers with multiple channels of PWM, each connected via a separate cable.
- Page 35 2) Also remove the two screws at the bottom of the right-hand side-plate, and remove the side-plate. 3) Remove the installed CPPM cable. 4) Looking in the right side of the quad, a white connector is visible on the fusion (flight controller) board.
- Page 36 A unique feature of the Vortex family of quadcopters is that the receiver type is auto-detected by the OSD when running the wizard. With the Vortex 250 Pro, it is no longer necessary to manually specify the receiver type with the ImmersionRC Tools before running the wizard.
- Page 37 During the wizard, which will now request the center, plus each extreme of control movement, it will automatically determine the channel reverse, and program the flight controller with appropriate endpoints. Gaming (Beta) The Birth of a Gaming Mode ‐ The History In the Spring of 2015, A bunch of Vortexes (Vortices?), were racing around a field somewhere in Western Switzerland, while an observer watched.
- Page 38 Enabling Gaming Mode Enter the OSD menu, and change the L andscape to G amer . Fly a few laps around your course, and get a rough estimate for the lap time. Enter this value into the G ame Setup menu, along with the number of laps you wish to fly. Arming the quad will automatically remove the ‘Get Ready’...
- Page 39 Let us know what you think, and we’ll continue to develop this feature in future firmware updates. feedback@immersionrc.com IDEA: for a bit of fun, challenge your fellow internauts to a ‘remote race’. Drop two flags in a flat field a fixed distance apart, and record your best lap time, and score.
- Page 40 Race Guidelines - Flying with Friends The current generation of FPV Analog video link brings many advantages. Low-cost, and zero latency being two of the most significant. They do however suffer from less than ideal ‘selectivity’, even when using large channel spacing as is the case with RaceBand.
- Page 41 Diagnostics - Motor Test Since OSD v1.0.0.22, the Vortex has a built-in motor test. It can be useful to diagnose problems with ESC and\or Motors. It’s located in Vortex Menu>Diagnostics>Motor Test WARNING: This test can be extremely dangerous, great care is required. The Vortex should be securely anchored to an immovable object, ideally one which doesn’t block the airflow under the props.
- Page 43 Motors will be tested independently in sequence, and then all together. Use the roll stick left to go to next steps: Motor1 -> Motor2 -> Motor3 -> Motor4 -> All Motors -> Test Summary The summary screen and the graph could help you to identify a damaged motor:...
- Page 44 To exit the test move the Roll stick to the left.
- Page 45 In order to benefit from the BlackBox, it should be erased before flying. To do this, enter the OSD, on the Flight Controller setup page. The erase will take approx 10-30 seconds. The blackbox log is relatively short on the Vortex 250 Pro, but is sufficient to record enough of a flight to guide PID tuning.
- Page 46 Firmware Upgrades Both the OSD, and the Flight Controller, are updated using the USB port on the rear of the Vortex. Prior to any upgrade, please r emove all Props!. I f for any reason the props spin up during a firmware upgrade, serious damage to persons and/or property is very likely.
- Page 47 V ortex 250 product page o n the ImmersionRC website, and start the update. If during a previous upgrade you had a problem causing the OSD to be bricked, you can still recover from this state using the procedure below: Upgrade procedure for bricked OSD 1) Press and hold fusion board button.
- Page 48 NOTE: Upgrading Cleanflight to a version not supported by the OSD firmware can easily result in the OSD not functioning. Please refer to the Vortex product page on the ImmersionRC website for compatibility information. NOTE: When Vortex will detect a new flight-controller version, it will automatically restart...
- Page 49 UPSTAT on PPM slot 10 Note: To ease programmation of UPSTAT on a receiver equipped with v1.51 of firmware, a new version of the ImmersionRC tools is required, v1.41. This is now available from our website. Simply click the ‘Configure for XuGong v2/Pro’ to setup your EzUHF receiver.
- Page 50 Calibrated at wizard end Pro-Tuning Default ImmersionRC settings (based on UmmaGawd’s tune) NOTE: If you have ‘tweaked’ any Cleanflight settings outside of the Vortex OSD, please remember to back them up before running the wizard the next time, since it will reset...
- Page 51 ITU Region 2: Americas, Greenland, eastern Pacific Islands Assuming that the user has a Ham license, the 5650 - 5925 MHz band may be used. Note that all 8 channels of ImmersionRC’s RaceBand are legal in in this region, with a Ham license.
- Page 52 ITU Region 1: Europe, Africa, Middle East, Iraq, Soviet Union Without a license, only the 25mW Tx module may be used, and then only in the ISM band from 5725 MHz thru 5875 MHz. 5740 5760 5780 5800 5820 5840 5860 5880 IRC/FS...
- Page 53 Appendix D: LED Board - Status report The LED Board is used by the OSD during the startup phase to report flight controller sensor status, flight-controller API compatibility and video link status information. From left to right the bottom led board will turn green ( or red if a problem is detected) one after another as follows: 1.
- Page 54 Looking after your Vortex Snow and Water Even though most of the PCBs in the Vortex are coated with a c onformal coating , which does offer some protection from water, it is not recommended to get the Vortex wet, even if that water comes in the form of snow.
- Page 55 Socketed, Custom NexWaveRF 5.8GHz module Channels 40 Initially, programmed via OSD Bands 5, including the ImmersionRC/FatShark bands, and RaceBand Frequency, IRC/FS 5740, 5760, 5780, 5800, 5820, 5840, 5860, 5880 MHz Frequency, RaceBand, 5658, 5695, 5732, 5769, 5806, 5843, 5880, 5917 MHz CH1..8...
- Page 56 Type ImmersionRC EzESC Rating 20A continuous, 16A peak Features OneShot125, and Motor Braking Processor 32-bit ARM R/C Receiver Channels Required Absolute minimum four. Five recommended to support mode switch. Interface Standard CPPM, S-Bus, Spektrum, XBus, SumH, SumD (auto-sense with manual...
- Page 57 Spare parts and Upgrades Several crash kits, and upgrades, are available for the Vortex, including the following: Part Numbers V25PCK1RD Pimp Kit, plastic parts, Red (stock) V25PCK1PK Pimp Kit, plastic parts, Hot Pink V25PCK1BK Pimp Kit, plastic parts, Black V25PCK1OR Pimp Kit, plastic parts, Orange V25PCK1GN Pimp Kit, plastic parts, Lime Green...
- Page 58 Vortex product line: https://www.facebook.com/groups/ImmersionrcVortex As a last resort, ImmersionRC runs a global network of repair and support centers. These handle warranty repairs, supply hard-to-find spare parts, and also handle non-warranty work. Send an email to ...
- Page 59 Frequently Asked Questions Q. I have taken my 250 Pro apart, and this ‘Spring Thing’ popped out, where does it go? The ‘Spring Thing’ is a dual-purpose part which fits above the video transmitter module. It serves three purposes, first it mechanically restrains the video transmitter module during a serious collision.
- Page 60 Q. Can I fly in the rain? ImmersionRC is one of the only companies in the racing quad business which conformally coats key PCBs to add a level of water-resistance. This avoids problems when flying in very humid areas, occasional crashes in wet grass, and the occasional use of the front of the quad as a snow-shovel.
- Page 61 Q. What is the deal with the new LED board? In early 2016, Vortex 250 Pros started shipping with a new LED board. This LED board increases the LED count from 8 to 12, adds a diffuser to greatly increase visibility from the side/top/bottom of the quad, and also adds the possibility for a solder-free connection to the PDB.
- Page 62 These motors are being replaced under warranty, just send an email to repairs@immersionrc.com including a photo of the motor and bell. Q. My vortex beeps continuously The beeps are coming from the ESC’s.
- Page 63 ‘bleeding edge’ of flight controller code. Unfortunately, this also means that ‘stability’, or ‘backwards compatibility’ is not a priority. The Pro-Tunes shipped with the Vortex 250 Pro were painstakingly learned using the version of Cleanflight/Betaflight that we shipped with. We cannot guarantee that all future versions of either of these firmware bases will keep this same fine level of tune.
- Page 64 Directions on safety ImmersionRC advocates the safe use of their products, always make sure you equipment is in proper working order, is checked prior to every flight and that your are familiar with and respect the equipment's capabilities and limitations.
- Page 65 We would like thank you for purchasing this ImmersionRC product. Like ImmersionRC’s Facebook page and be kept up-to-date with news, product releases, firmware updates, tips and tricks, and other information relevant to the FPV hobbyist. http://www.facebook.com/ImmersionRC You can also follow us on Google Plus google.com/+immersionrc...
Need help?
Do you have a question about the vortex 250 pro and is the answer not in the manual?
Questions and answers