LG L2323T L2323T L2323T User Manual
Lg monitor user manual
Hide thumbs
Also See for L2323T L2323T L2323T:
- Service manual (70 pages) ,
- Specifications (46 pages) ,
- Specification sheet (2 pages)
Table of Contents
Advertisement
Quick Links
Download this manual
See also:
Service Manual
Advertisement
Table of Contents

Related Manuals for LG L2323T L2323T L2323T


Summary of Contents for LG L2323T L2323T L2323T
- Page 1 User’s Guide L2323T ake sure to read the Important Precautions before using the product. Keep the User's Guide(CD) in an accessible place for furture reference. ee the label attached on the back cover and quote this information to your dealer when you require service.
-
Page 2: Important Precautions
Important Precautions This unit has been engineered and manufactured to ensure your personal safety, however improper use may result in potential e shock or fire hazards. In order to allow the proper operation of all safeguards incorporated in this display, observe the following basic rules for its installation, use, and servicing. - Page 3 Important Precautions On Installation Do not allow anything to rest upon or roll over the power cord, and do not place the display where the power cord is subject to damage. Do not use this display near water such as near a bathtub, washbowl, kitchen sink, laundry tub, in a wet basement, or near a swimming pool.
- Page 4 Unpacking Your Display Please make sure the following items are included with your monitor. If any items are missing, contact your dealer. Display P&D cable CD-Rom/Cards RCA Cable SCART Cable Media Station DVI-D Signal Cable 15-pin D-Sub Signal Cable S-Video Cable Half SCART Cable Please see the Speaker User Manual (included in the speaker box) to reference...
-
Page 5: Using The Remote Control
Using the Remote Control For detailed instructions of each button on the remote control, refer to the appropriate pages of this manual. Remote Control TV/AV I/II AUTO SWAP TEXT SLEEP MODE UPDATE LIST TIME Q.VIEW SIZE REVEAL HOLD MUTE To select mute on or off. POWER Use this button to turn the display on or off. - Page 6 Using the Remote Control Remote Control AUTO SWAP TEXT SLEEP MODE UPDATE LIST TIME Q.VIEW SIZE REVEAL HOLD INDEX PR ( ) Buttons VOL ( ) Buttons OK Button Number buttons AUTO Button •This function is to automatically search the available channels.
- Page 7 Using the Remote Control Remote Control AUTO SWAP TEXT SLEEP MODE UPDATE LIST TIME Q.VIEW SIZE REVEAL HOLD INDEX SLEEP : SLEEP Timer You can set a time period after which the HDTV/S-VIDEO/AV1/AV2 /TV should switch itself to standby. Press the key repeatedly to select the number of minutes.
- Page 8 Using the Remote Control Remote Control - PIP/POP function AUTO SWAP TEXT SLEEP MODE UPDATE LIST TIME Q.VIEW SIZE REVEAL HOLD INDEX SOURCE 2 D-SUB DVI-D SOURCE 1 D-SUB DVI-D S-VIDEO HDTV PIP (Picture in Picture) The sub-screen is changed in the order shown below.
- Page 9 Using the Remote Control Remote Control - Using the Teletext function AUTO SWAP TEXT SLEEP MODE UPDATE LIST TIME Q.VIEW SIZE REVEAL HOLD INDEX TEXT To select the teletext on or off. The main index page or the last selected page appears on the screen together with an information headline and an option line at the bottom of the screen.
- Page 10 Using the Remote Control Remote Control - Using the Teletext function AUTO SWAP TEXT SLEEP MODE UPDATE LIST TIME Q.VIEW SIZE REVEAL HOLD INDEX MODE The mode will be switched in the Teletext mode. TIME When viewing a TV programme, press this button to display the time at the top right hand corner of the screen.
-
Page 11: Preparing The Remote Control
Using the Remote Control Insert the batteries into the remote control to operate the monitor. Preparing the Remote Control Open the battery cover. Insert batteries (AAA size). Make sure to match the + and - on the batteries to the marks inside the battery compartment. -
Page 12: Media Station Rear
Connecting the Display Media Station Rear *LINE OUT A terminal used to connect to the speaker including a built-in amplifier (Amp). Make sure that the connecting terminal of the PC sound card is checked before connecting. If the Audio Out of PC sound card has only Speaker Out, reduce the PC volume. -
Page 13: Using The Computer
Connecting the Display Before setting up the monitor, ensure that the power to the monitor, the computer system, and other attached devices is turned off. Using the Computer Connect the P&D (Plug and Display) cable. When attached, tighten the thumbscrews to secure the connection. Connect the signal cable When connecting D-SUB signal cable Media Station Rear... - Page 14 Connecting the Display Connect the power cord into a proper power outlet that is easily accessible and close to the display. Media Station Rear Turn the media station power on. Media Station Rear Select an input signal. Press the SOURCE button on the remote control to select an input. When connecting D-SUB signal cable •...
- Page 15 Connecting the Display Connecting the Speakers Connect the audio cable.
-
Page 16: Connecting The External Equipment
Connecting the external equipment Connecting the VCR/DVD When connecting RCA cable Connect the each audio/video output jack of the VCR/DVD to the corresponding input port as shown on the Display (or Media station). Media Station Rear When connecting S-Video cable If you connect the S-Video input port to external equipment, you can have an improved definition image. - Page 17 Connecting the external equipment Watching HDTV (720p/1080i) Connect both HDTV cable (Y/Pb/Pr) and audio cable (Audio L/R) to the Display (or Media station) jack and the Set-top box jack. Media Station Rear White Blue Green Select an input signal. Press the SOURCE button on the remote control to select an input. •...
- Page 18 Connecting the external equipment Connecting the HDTV/DVD(576i only) Take these connection steps if the HDTV/DVD player has a RCA jack and the output is 576i only. Connect half of the SCART cable. Media Station Rear HDTV/DVD(576i) White Blue Green Select an input signal. Press the SOURCE button on the remote control to select an input.
- Page 19 Connecting the external equipment Watching TV Before setting up the monitor, ensure that the power to the monitor, the computer system, and other attached devices is turned off. Connect the antenna. Media Station Rear Antenna (not included) Select an input signal. Press the SOURCE button on the remote control to select an input.
-
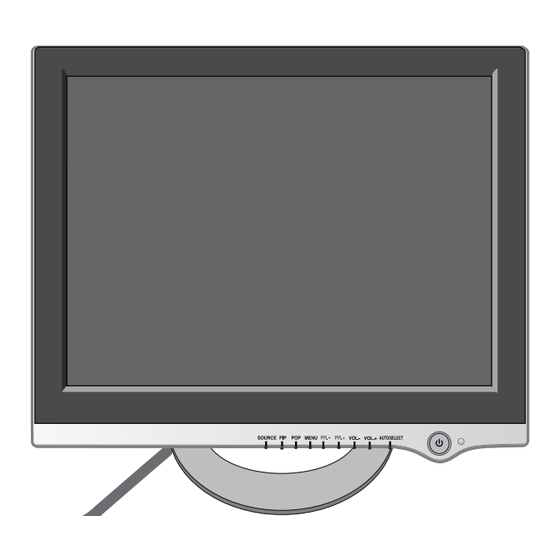
Page 20: Front Panel Controls
Control Panel Functions Front Panel Controls Control Function Source Selection: Use this button to select an input signal. • DSUB ANALOG: 15-pin D-sub analog signal • DVI-D DIGITAL: DVI-D digital signal • HDTV YPbPr: HDTV • S-VIDEO: S video • AV1 : SCART •... - Page 21 Control Panel Functions Control MENU Button Power Button Power (DPMS) Indicator Remote Control Sensor CONTROLS LOCKED/UNLOCKED : MENU and VOL.+ This function allows you to secure the current control settings, so that they cannot be inadvertently changed. Press and hold the MENU button and VOL.+ button for 5 seconds: the message “CONTROLS LOCKED”...
-
Page 22: On Screen Display (Osd) Control Adjustment
On Screen Display (OSD) Control Adjustment Screen Adjustment Making adjustments to the image size, position and operating parameters of the display is quick and easy with the On Screen Display Control system. A short example is given below to familiarize you with the use of the controls. The following section is an outline of the available adjustments and selections you can make using the OSD. -
Page 23: On Screen Display(Osd) Selection And Adjustment
On Screen Display(OSD) Selection and Adjustment The following table indicates all the On Screen Display control, adjustment, and setting menus. Using the computer Main menu Sub menu BRIGHTNESS BRIGHTNESS CONTRAST CONTRAST PRESET COLOUR ADJUSTMENT R/G/B(User Colour) V POSITION IMAGE POSITION H POSITION AUTO TRACKING... - Page 24 On Screen Display(OSD) Selection and Adjustment Using the VCR/DVD/TV/HDTV Main menu Sub menu PROGRAMME STATION SYSTEM SELECT CHANNEL FINE TUNE NAME AUTO PR. CONTRAST ADJUSTMENT BRIGHTNESS SHARPNESS COLOUR TINT MUTE AUDIO VOLUME BASS TREBLE BBE EFFECT SOUND LANGUAGE SETUP IMAGE SIZE OSD POSITION TRANSPARENCY PIP MODE...
- Page 25 On Screen Display(OSD) Selection and Adjustment You were introduced to the procedure of selecting and adjusting an item using the OSD system. Listed below are the icons, icon names, and icon descriptions of the all items shown on the Menu. To adjust the screen when using the computer To adjust the brightness and contrast of the screen OSD Adjust...
- Page 26 On Screen Display(OSD) Selection and Adjustment To improve the clarity and stability of the screen OSD Adjust To adjust the audio function OSD Adjust Description This function is suitable for analog signal AUTO input only. This button is for the automatic adjustment of the screen position, clock and phase.
- Page 27 On Screen Display(OSD) Selection and Adjustment To customize the screen status for a user's operating environment OSD Adjust SPECTACLE This function provides different areas of the screen with a varied ratio, so that the ratio at the central area is close to 4:3 and near the edges it exceeds 16:9.
- Page 28 On Screen Display(OSD) Selection and Adjustment To adjust the PIP(Picture in Picture) of the screen OSD Adjust After selecting ON in the PIP ON/OFF menu, the following menu items can be adjusted. To select an input signal for PIP. PIP SOURCE To adjust the size of the PIP screen: SMALL/LARGE PIP SIZE To adjust the position of PIP screen.
- Page 29 On Screen Display(OSD) Selection and Adjustment To adjust the POP(Picture out Picture) of the screen OSD Adjust After selecting ON in the POP ON/OFF menu, the following menu items can be adjusted. POP SOURCE To select an input signal for POP. POP SIZE To adjust the size of the POP screen: POP1/POP2/POP3/POP4 POP IMAGE...
- Page 30 On Screen Display(OSD) Selection and Adjustment To adjust the screen when using the VCR/DVD/HDTV/TV To select TV channel settings and adjust the channel quality OSD Adjust STATION PROGRAMME SYSTEM V/UHF CHANNEL NAME C 04 AUTO PR. FINE TUNE In case of poor reception, you can improve the reception by fine tuning. Use the buttons to fine tune for the best picture and sound.
- Page 31 On Screen Display(OSD) Selection and Adjustment SYSTEM Press the buttons to select the TV system of the country or part of the world from where you want to receive the TV channels. If you want to receive 'SECAM L' channel, change the SYSTEM menu to 'L' before launching an automatic search.
-
Page 32: To Improve The Clarity And Stability Of The Screen
On Screen Display(OSD) Selection and Adjustment To improve the clarity and stability of the screen OSD Adjust To adjust the audio function OSD Adjust Description To adjust the contrast of the screen CONTRAST To adjust the brightness of the screen. BRIGHTNESS To adjust the clearness of the screen. - Page 33 On Screen Display(OSD) Selection and Adjustment To customize the screen status for a user's operating environment OSD Adjust SPECTACLE This function provides different areas of the screen with a varied ratio, so that the ratio at the central area is close to 4:3 and near the edges it exceeds 16:9. Since most people concentrate their focus upon the central area of the screen, they do not clearly recognize a nonlinear expansion of the image near the edges of the display.
- Page 34 On Screen Display(OSD) Selection and Adjustment To adjust the PIP(Picture in Picture) of the screen OSD Adjust After selecting ON in the PIP ON/OFF menu, the following menu items can be adjusted. To select an input signal for PIP. PIP SOURCE To adjust the size of the PIP screen: SMALL/LARGE PIP SIZE To adjust the position of PIP screen.
- Page 35 On Screen Display(OSD) Selection and Adjustment To adjust the POP(Picture out Picture) of the screen OSD Adjust After selecting ON in the POP ON/OFF menu, the following menu items can be adjusted. POP SOURCE To select an input signal for POP. POP SIZE To adjust the size of the POP screen: SMALL/MEDIUM/LARGE POP IMAGE...
-
Page 36: Troubleshooting
Troubleshooting Check the following before calling for service. No image appears No image appears Is the power cord of the display connected? Is the power indicator light on? When the power is on with the power indicator lighting blue, does the screen appear dark? (Display:blue, Media station:blue) -
Page 37: Display Image Is Incorrect
Troubleshooting Display image is incorrect Display Position is incorrect. On the screen background, vertical bars or stripes are visible. Any horizontal noise appearing in any image or characters are not clearly portrayed. The screen color is mono or abnormal. The screen blinks. “ZOOM”... -
Page 38: Have You Installed The Display Driver
Troubleshooting Display image is incorrect Is the H/V position not adjustable from the ZOOM function? Has the screen size of your PC changed automatically? Is the sound not displayed on the TV channel indication window? In the PC signal source, is the brightness of the main screen different from that of the sub-... -
Page 39: Audio Function
Troubleshooting Audio function No sound. No sound in PIP /POP mode. Sound is too high pitched or too low piched. Sound level is too low. Do you see a "CONTROLS LOCKED" message on the screen. Do you see “CONTROLS LOCKED” when you push MENU button? TV function... -
Page 40: Specifications
Specifications 23 inches (58.4cm) Flat Panel Active matrix-TFT LCD Display Anti-Glare coating 23 inches viewable 0.258mm pixel pitch Horizontal Freq. Sync Input Vertical Freq. Input Form Signal Input Video Input Input Form Resolution Recommend Plug&Play DDC 2B Display Power Input Input Media station Input... - Page 41 Specifications Display (with tilt stand) Dimensions &Weight Media Station Operating Conditions Environmental Conditions Storage Conditions VESA wall mounting Connected to another object (stand type and wall- mounted type. This monitor accepts a VESA- compliant mounting interface pad.- optional) For further information, refer to the VESA Wall Mounting Instruction Guide.
-
Page 42: Display Modes (Resolution)
Specifications Display Modes (Resolution) PC mode Display Modes (Resolution) 640 x 350 640 x 480 VESA 640 x 480 720 x 400 VESA 800 x 600 VESA 800 x 600 832 x 624 VESA 1024 x 768 VESA 1024 x 768 VESA 1280 x 768 VESA... -
Page 43: Signal Connector Pin Assignment
Specifications Signal Connector Pin Assignment DVI-D Connector Signal T. M. D. S. Data2- T. M. D. S. Data2+ T. M. D. S. Data2/4 Shield T. M. D. S. Data4- T. M. D. S. Data4+ DDC Clock DDC Data Analog Vertical Sync. T. - Page 44 Digitally yours...
Need help?
Do you have a question about the L2323T L2323T L2323T and is the answer not in the manual?
Questions and answers